
This tutorial shows you how to build your own, private World of Warcraft server, running the Wrath of the Lich King expansion, that's powered by TrinityCore on a Ubuntu 22.04 server/VPS, with controllable NPC bots as fun extra feature. I put this tutorial together in such a way that anybody can follow it, even if you are clueless, you'll still be able to follow it to completion. I divided this tutorial into the following chapters, allowing you to jump ahead to the start of the tutorial.

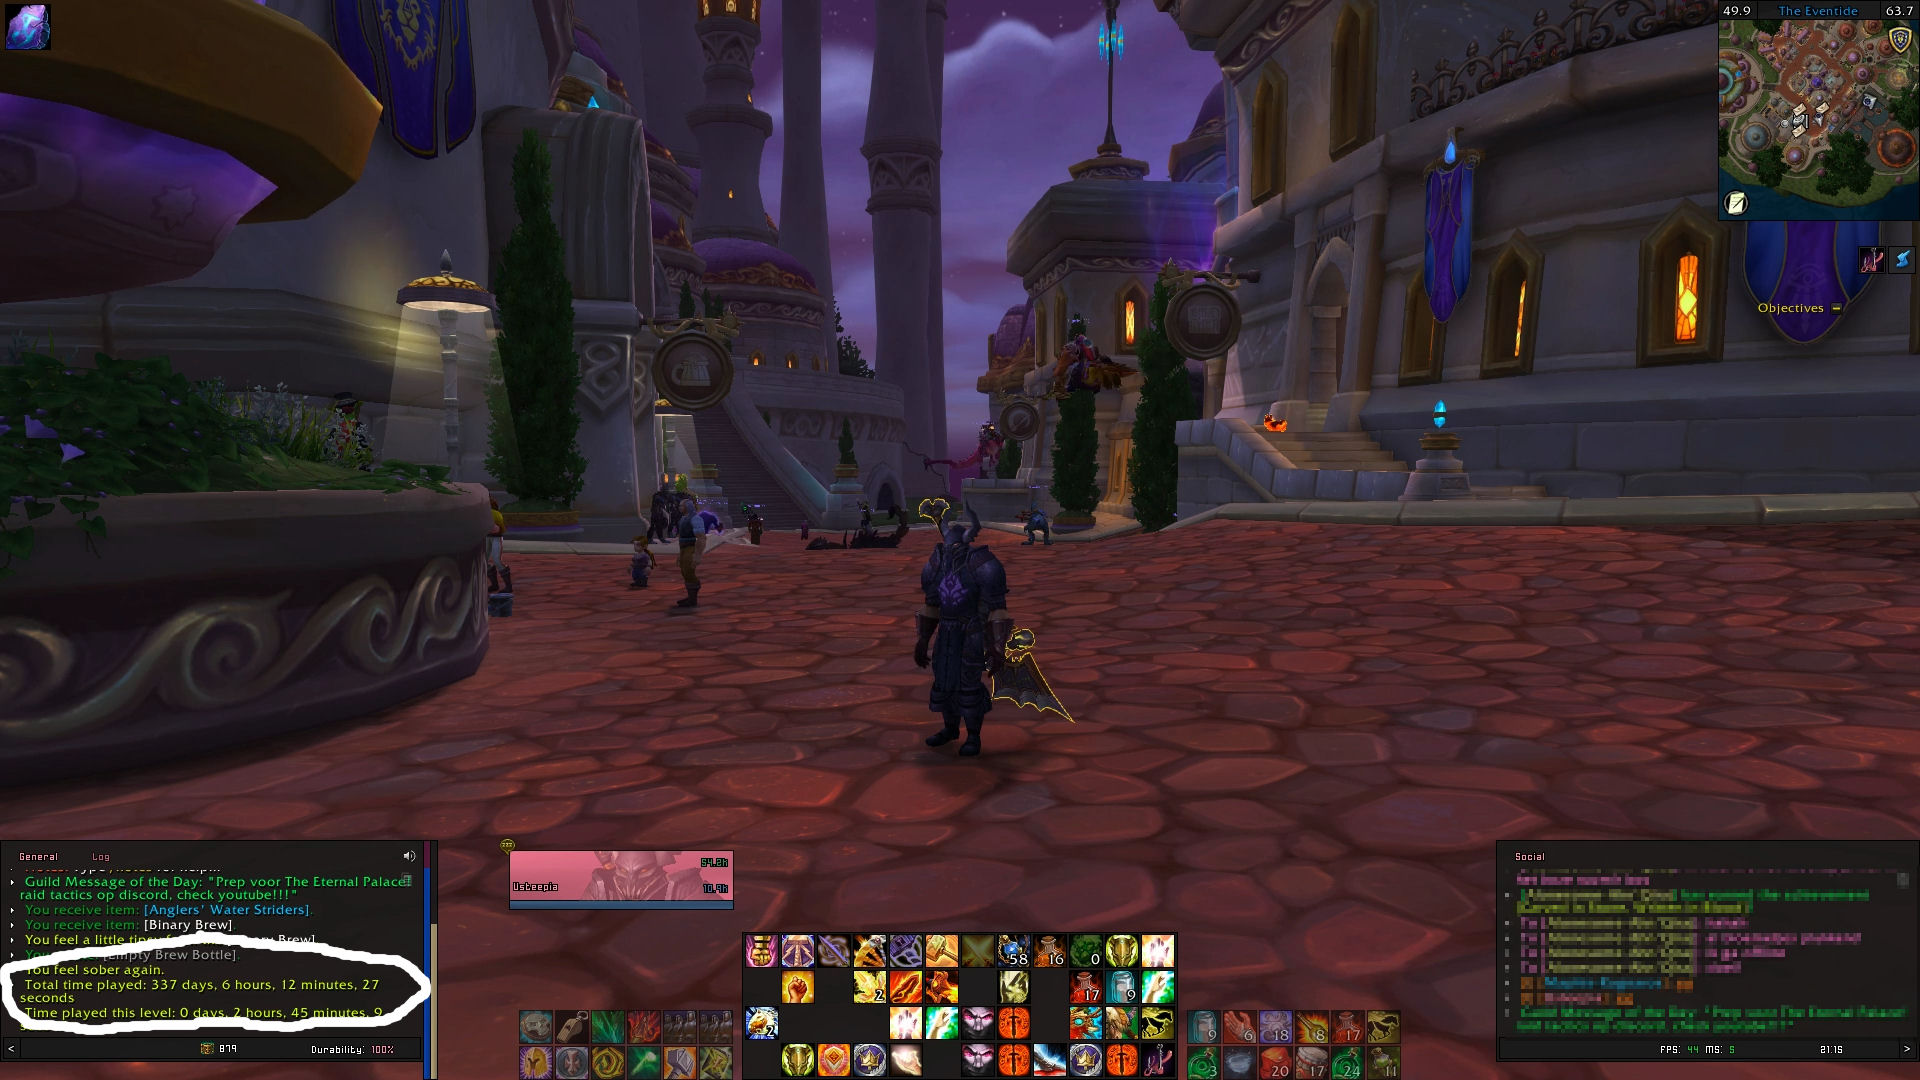
I've played a fair amount of World of Warcraft in my life. And when I say a fair amount, I actually mean to say that I've played a LOT of WoW. No seriously... A LOT! I started playing in 2006, and I played it for 10 or 11 years. At some point I looked into how much time I had invested in the game by typing /played on all of my characters, which displays how much time you've been playing. I put these number into a simple Excel sheet and added these numbers up.

The result was a playtime total of 618 days and 14 hours. So, I literally spent close to two years of my life in the virtual World of Warcraft, over a period of 10 years. Some people might say that this has been a complete waste of my time, but I disagree. It's not a waste of time if you love wasting time on something. So I have no regrets whatsoever.
Occasionally I'll listen to the soundtrack, and let it overwhelm me with strong feelings, of nostalgia mostly. One of the things I miss the most is the social aspect of the game. I used to talk to my fellow guildies almost on a daily basis using voice-chat apps. We did loads of fun stuff together ingame. Other times we did absolutely nothing together but just hang out. We didn't only talk about the game, far from it in fact, we talked about anything and everything. One thing we certainly did a lot was laugh together. Lucky for them that I'm so hilarious! 😀 Good times, really good times.
I'll admit righ here that I used, or perhaps abused the game as a means of escapism during a period when things weren't going all too great for me in my real life. But I believe that playing the game, forgetting everything else for a few moments whilst doing so, made things in real life more bearable. The game provided me with things that were missing in my real life. I was working on achieving specific goals, and obtaining these achievements. I was good at the game, and that made me feel good about myself. I was receiving rewards from the game, in such a fashion that it triggered a release of dopamine in my brain.

Even though I haven't played for several years now, I'm still somewhat invested in the game, since it has simply become a part of my life. I still watch Youtubes on the subject now and then, to stay informed on the current status of the game. Whenever I do, I often think back to the good old days.
The fact that the game has changed so much over the years is a strong argument for me in deciding that I probably won't be returning to the official game. But, what if I wanted to play the game like how I remember it? It's not as easy as it may sound. You can't simply install the game and start playing again. And in way that is strange, when compairing this with other games. In the past when you bought a game, you would get a CD/DVD containing the game. When you install the game from these discs many years later, you can go right ahead and directly start playing it. But with a MMORPG game like WoW, that is so very much server dependent, you don't have this option. With all the expansions they released over the years, so many things have changed. It has made the game you once played fundamentally different and totally incompatible.
Luckily, many good people have been working hard for years now on re-creating the WoW servers that we remember so fondly, by reverse engineering them. It is truly remarkable what they did. They even managed to already achive this at a time when Blizzard, the creators of WoW, still stated that they would not be able to re-create the servers the same way that they had built earlier.
Several open-source release groups publish their code in repositories on Github. One group of these people, whose releases are still actively being worked on, is called TrinityCore. More exist, like AzerothCore, and a few others. I've tried several of them, and eventually chose TrinityCore. Mostly because their release of Wrath of the Lich King, which is my favorite, is very stable, and also the easiest to setup. Their repositories can be used to build your own server on either Windows or Linux. But if you have a Windows desktop or server, there's a much easier option because you can simply download a repack that somebody else built, and packaged together, so you only have to run it locally on your desktop in order to play it. Unfortunately, the majority of these repacks will only run on Windows. I have a Linux server that I want to run it on. It's more stable, and I can just leave it running at all times since it's not using up any resources on my desktop computer. I spent too much time searching for a Linux repack that actually worked, because it took me longer than it did to figure out how to build a server myself. Lucky for you that I did, or else this tutorial wouldn't exist. Hopefully my tutorial will help people out and will save them some time in trying to put the pieces of the puzzle together themselves. I tried to explain what is actually happening during each of the steps in this tutorial, and personally I think I did a pretty good job. But I'll let you decide if you would agree with that. You're free to leave a comment if you have any thoughts or remarks. Or even if you want to ventilate by using the most nasty swear words. Then at least I didn't disable the swear word filters in disqus for nothing.
World of Warcraft falls in the category MMORPG, or Massive Multiplayer Online RolePlaying Game for a good reason. Especially the multiplayer bit plays a key role for the game. So how can I play on my own private server when there's no other players online? Many aspects of the official game require you to form a group to go raiding or fight players of the opposite faction. So what can you do when you're in there all by your lonely self? Well, there's lots of fun to be had with a very cool addition called NPC bots. Think of NPC bots as if they are other players that you can hire to group up with, and who will do what you instruct them to do. In that sense it's actually the oposite to grouping up with real players. Haha JK. Here's how the developper describes NPC bots:
I haven't experienced any more stupidity with these bots as I did when playing with real people. JK. You can "hire" these bots and give them certain instructions by talking to them. Decide on their role in group and pick their talent tree. You can even gear them with whatever gear you want.
If you want to go nuts you can transmog the gear on your bots. Although I personally don't really see the point of that, but hey it's cool that it's an option. Form a party of five, or a raid group of up to 40, and start fighting your way through Icecrown Citadel to eventually kill the Lich King. I actually did this once, and it was really fun. I should mention that I geared all the bots with the best-in-slot items beforehand. Doing that took me quite some time, especially since I went full OCD on gems and enchants. Doing the raid wasn't so much a challenge, but it was still really fun to do. Gearing up a group of bots making them overpowered was actually part of the fun for me. And going through IceCrown Citadel brought me right back to the good old days. At the bottom of this tutprial page I'll talk a bit more about NPC bots and about addons that exist that can simplify certain tasks. I think you'll agree that I've rambled on for long enough now. So let's continue and finally start the tutorial!

In case you need to connect to your server from a Windows machine, then I suggest using these tools to make your life a little bit easier.
I used a fresh installed Ubuntu 22.04.3 server. This can be a local Ubuntu server, or a desktop version of Ubuntu, or a remote VPS you are renting, or an instance at AWS. Just make sure it runs Ubuntu 22.04. (The most recent version at time of writing). Using this specific version will guarantee that you can follow this tutorial without running into any unforeseen issues. I'll assume that you are able to log in to your server through SSH remotely, and that you're connected to it through WinSCP and/or Putty.
First, we're going to install a handful of required packages. Note that the package libstdc++-12-dev is included, which is not included in the official documentation for some reason. I recently learned that we definitely need it as a requirement. Without it, we wouldn't be able to correctly run the cmake command later on.
sudo apt install git clang cmake make gcc g++ libmysqlclient-dev libssl-dev libbz2-dev libreadline-dev libncurses-dev libboost-all-dev p7zip-full mysql-server libstdc++-12-devOne of the things we just installed is the MySQL database server, and we're going to want to set a password for the root account. We can do this by simply altering it inside MySQL.
sudo mysqlYou should edit the next line to replace YOURPASSWORD with your own password that you want to use.
ALTER USER 'root'@'localhost' IDENTIFIED WITH mysql_native_password BY 'YOURPASSWORD';
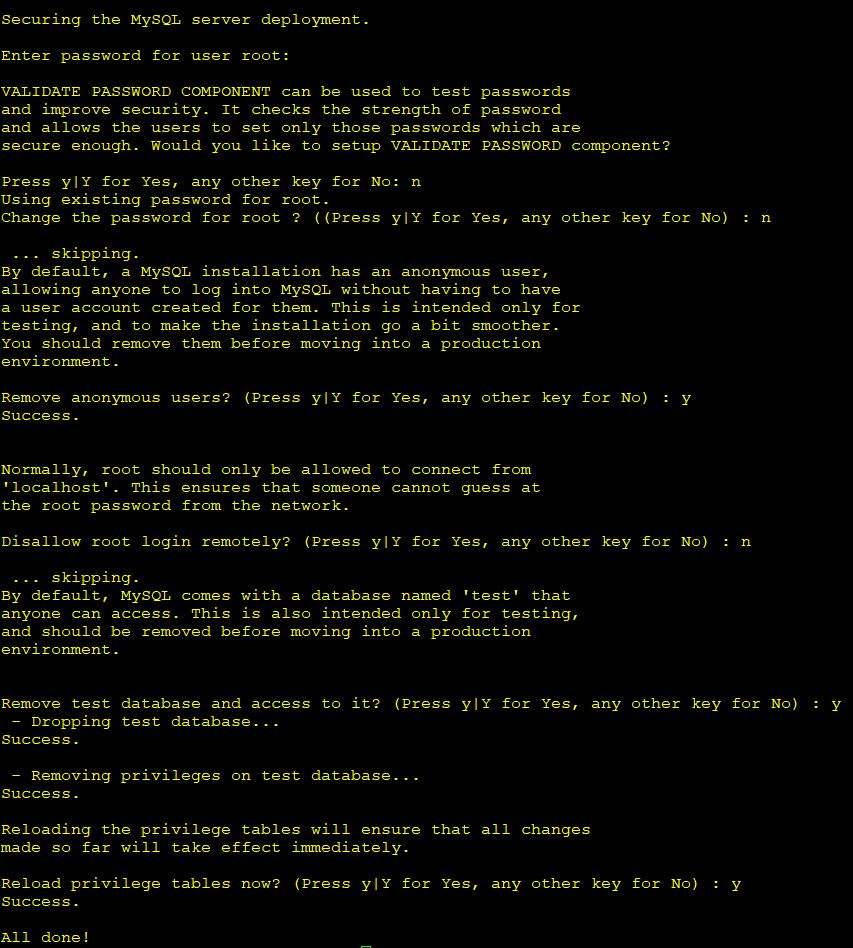
EXIT;Although the next step is not absolutely required, it's considdered good practice to do enter mysql_secure_installation to form ar a tiny layer of security.
mysql_secure_installationThis will prompt you with a couple of questions that you'll need to answer. It is totally up to your personal preference as to what you want to do here. Here's a screenshot of the questions where you can see how I chose to answer these questions.
To be completely honest, I'm not entirely sure why the next step is a requirement. The update-alternatives command sets a generic name to run different programs. It is mentioned in the official documentation, so I also included it here. It's probably good for something.
sudo update-alternatives --install /usr/bin/cc cc /usr/bin/clang 100
sudo update-alternatives --install /usr/bin/c++ c++ /usr/bin/clang 100
Now let's decide on a folder location where you want to store the server files. It's entirely up to you in what folder you want to install it in. In this tutorial, I chose to install the server in a folder under /games/wow. Please be aware that if you choose a different location, you'll manually have to edit a lot of commands that will follow later on in this tutorial.
sudo mkdir -p /games/wowWe had to use sudo here because we wanted to created a folder in the root folder. So we'll need to change the ownership so that we become owner. Replace yourusername:yourusername in the next command with your own username that you are logged in with.
sudo chown -R yourusername:yourusername /games && cd /games/wowNow that you are in the folder you just created, it's time to download the repository files from Github. Normally, one would use the official TrinityCore repository here, but since we want to add NPC bots to our server, we're using an alternative repo, that is based on the official one.
git clone https://github.com/trickerer/TrinityCore-3.3.5-with-NPCBotscd TrinityCore-3.3.5-with-NPCBotsmkdir build && cd buildThe next step is an important one, because the cmake ../ command can be used with different variables that can determine important aspects of our server. I only need one of these variables, and I'm not interested in any of the other options right now, but you should take a look at the official documentation to see what the these other options are. I only wanted to specify the folder where I want the server files to be copied to in the end.
cmake ../ -DCMAKE_INSTALL_PREFIX=/games/wow/wotlk-botsThe executable files that will eventually run the server will be placed in a subfolder named bin under the folder that you choose here.
After the cmake process is complete, we can continue to the next step. But first, use lscpu to see the details about the CPU that is on your server. We can use this to learn how many cores your CPU has. We'll use this information in the next step.
lscpu
The make command that we're going to use will take a very long time to complete. If you want to speed things up as much as possible, you will want to specify a specific amount of cores the make process is allowed to use. The more the better. Obviously, you'll need to pick a number that is lower or equal to the number of cores you actually have.
The server in this example had 12 cores available, so I decided to use 10 for the process. Your CPU may have as few as 4 cores, or as many as 24. Specify the number of cores by adding -j X to the make command below, where X is the number of cores.
make -j 10This step will take a long time to complete, varying from 15 minutes up to 2 hours, totally depending on how fast your CPU is and how many cores you've chosen to use. During the entire process, the CPU will max out to 100% usage. So, this would be a good moment to go make yourself a cup of coffee, or better yet, go do something about that pile of laundry that has been laying there for far too long already.
Once it has reached 100%, we'll use make install to copy the server files to the location that you specified earlier when we used cmake.
make installWhen you take a look in the /games/wow/wotlk-bots folder you will notice two new folders. The etc folder contains templates for configuration files we're going to setup shortly. The bin folder contains the server executables and also a handful of other tools that we'll need to extract resource files from the game client.
sudo apt-mark hold mysql
sudo apt-mark hold mysql-serverAt this point, you can decide to either download all the data files, or extract the data files yourself from the WotLK client. If you don't have the WotLK client, you'll need to download it first from links provided by this page for example. You'll need to download WotLK client version 3.3.5a.
Below, I will show you how to extract the data yourself. I was somewhat forced to extract the data myself, since I was unable to successfully complete any of the downloads from the repo that I tried which is mentioned in the official docs. This one: https://tc.arctium.io/3.3.5a/. Go ahead and try if you can download the files listed there, because it's a much easier way to obtain these game files. In case you also have problems completing the downloads, here's what you need to do to extract the data from the game client.
First, copy the client that you use on your Windows machine, or just downloaded, to any location on the server. I've copied the client files to /games/wow/wotlk-client-3.3.5a. TIP: This is where WinSCP comes in handy to drag and drop your client folder on the server.
Just to be sure, let's quickly take onwnership of the files you just copied to the server.
sudo chown -R YOURUSERNAME:YOURUSERNAME /games/wow/wotlk-client-3.3.5aThe extraction process can be done manually, step by step, by using the tools that are in the bin folder. Instructions on how to do so can be found in the documentation. Luckily, there's no need to go through the hassle because a much easier option is available, and it takes care of the entire extraction process for you. We're going to copy the file extractor.sh from the contrib folder inside the github repository folder to the same location as where the client files are located.
cp /games/wow/TrinityCore-3.3.5-with-NPCBots/contrib/extractor.sh /games/wow/wotlk-client-3.3.5aNext we'll quickly hop in to that same folder.
cd /games/wow/wotlk-client-3.3.5aFirst we need to make sure that this script is executable.
chmod +x extractor.shAnd then simply run the script. The extraction process will take a very long time to finish. It might even take longer than what you experienced with the make process. When you start the script, it wants to know the source and destination folder names. The source folder needs to be the folder that holds the client files. In my example, /games/wow/wotlk-client-3.3.5a. The destination folder needs to be the folder that contains the bin and etc folders. In this example: /games/wow/wotlk-bots
./extractor.shThe script will also ask you what contents you want to extract. Choose the option that will extract ALL. Even though this will take a long time to complete, doesn't mean we can't continue in the meantime. Simply open a second terminal window and let the other one keep doing its thing in the background.
Login to MySQL so we can create three seperate databases. Here I show how to do all this from the command line, but if you prefer, you may want to use a GUI tool like HeidiSQL to perform all of these steps.
mysql -u root -pThis next part will create a new MySQL user called wow, and a new password, in this case trinity. Choose any other password you prefer. But keep in mind that I'll be using this password later on in this tutorial, so make sure that you whenever this happens, you remember to change it there as well. Or you could set the password to trinity like I did, and change it to something else after we're done.
CREATE USER 'wow'@'localhost' IDENTIFIED BY 'trinity' WITH MAX_QUERIES_PER_HOUR 0 MAX_CONNECTIONS_PER_HOUR 0 MAX_UPDATES_PER_HOUR 0;
GRANT USAGE ON * . * TO 'wow'@'localhost';
We need three different databases. The wotlk_auth db will contain realm information and account details. The wotlk_chars db will contain all the character data of the players on the server. And the wotlk_world db will contain the majority of all the game data. These commands will create all these three databases.
CREATE DATABASE `wotlk_world` DEFAULT CHARACTER SET utf8 COLLATE utf8_general_ci;
CREATE DATABASE `wotlk_chars` DEFAULT CHARACTER SET utf8 COLLATE utf8_general_ci;
CREATE DATABASE `wotlk_auth` DEFAULT CHARACTER SET utf8 COLLATE utf8_general_ci;
This bit will grant the wow user all privileges on the databases so it can read/write to them.
GRANT ALL PRIVILEGES ON `wotlk_world` . * TO 'wow'@'localhost' WITH GRANT OPTION;
GRANT ALL PRIVILEGES ON `wotlk_chars` . * TO 'wow'@'localhost' WITH GRANT OPTION;
GRANT ALL PRIVILEGES ON `wotlk_auth` . * TO 'wow'@'localhost' WITH GRANT OPTION;
EXIT;
The databases are now in place, but they don't contain any data yet. So now we're going to fill the wotlk_auth and wotlk_chars databases manually by feeding a bunch of sql files to it. Don't touch the wotlk_world database just yet, it needs to stay empty for now.
Go to the folder /sql/Base under the github repository folder where we find the sql files.
cd /games/wow/TrinityCore-3.3.5-with-NPCBots/sql/base
ls -la
The next two lines will import the content of the two sql files into their corresponding databases.
mysql -u root -p wotlk_auth < auth_database.sql
mysql -u root -p wotlk_chars < characters_database.sql
It will ask you for the root password. Enter the password that we set earlier on in this tutorial where we altered the root user account in MySQL. Or, you can include the password, by entering it directly after -p. So in our case with the password being trinity, this would be -ptrinity. It saves you from having to enter the password each and every time you perform a mysql import. You can safely ignore the message MySQL generates when doing so.
Here we check if the data was correctly imported to our db's. First login to MySQL again:
mysql -u root -pThis next line will give you an overview of all the databases that MySQL stores.
SHOW DATABASES;Now open the database wotlk_auth by entering the USE command:
USE wotlk_auth;Now we can see all the tables that are stored in this database:
SHOW TABLES;
This is all looking good, so it means all the data was successfully imported in our databases.
Since we are here already, we may as well edit the information of our realm while we're at it. Let's take a look at the columns that are stored inside the realmlist table.
SHOW COLUMNS FROM realmlist;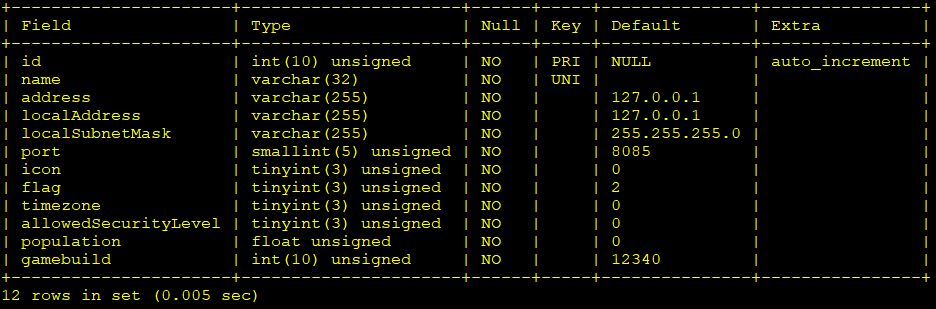
We want to edit the realm name, the IP address of the server, and the local IP address. You can choose whatever you want for the realm name. The IP address should be set to your external IP if you want to allow other players to connect to it, but also if you are connecting to the server over the internet. In case you only connect to it from within your home network, then it should be set to the local IP of the server. The third option localAddress needs to be the server's local IP address. In case you decide to make your server accessible from the internet, keep in mind that you'll need to open up/forward two ports in your router to the server. In this tutorial those ports would be 3724 for the authserver, and 8085 for the worldserver. But you are free to use any other ports if you like, but we'll get to that when we're editing the config files later on. Let's get back ontopic.
There are three things that you'll need to change here. Replace 'MyRealm' with your own desired realm name. Replace 'ext.or.local.ip' with either your external, internet facing IP address, or the local network IP. If you do not know your external IP address, find it by simply going to https://www.whatismyip.net. Replace 'int.local.lan.ip' with the local IP of your server. Change all these three things in the next line and exit MySQL.
UPDATE `wotlk_auth`.`realmlist` SET `name`='MyRealm', `address`='ext.or.local.ip', `localAddress`='int.local.lan.ip' WHERE  `id`=1;
EXIT;Now we're going to copy the example template files to new ones. First hop to the folder where these files are located.
cd /games/wow/wotlk-bots/etc && ls -laThe files you see here are template files. Don't edit them, since they won't be used by the server. Make a copy of these files and give them the propper name.
cp authserver.conf.dist authserver.conf
cp worldserver.conf.dist worldserver.conf
Now we're going to use nano to edit the authserver.conf file.
nano authserver.confNano is a text editor program. In case you are not familiar with it, use the arrow keys to navigate go through it. Once you are done editing, use CTRL+X, It will then ask you to save the file, choose Y. Then it asks for a filename, simply press enter to overwrite it.
Scroll down untill you find a line that starts with: LoginDatabaseInfo. It is located under the the part that says MYSQL SETTINGS. The LoginDatabaseInfo line needs to contain: 127.0.0.1 being the IP where MySQL is found, in this case its the same localhost. 3306 being the port that MySQL is listening on ; db user; db password ; database name.
You need to edit this line so it will know what MySQL user account it should use. In this tutorial that's 'wow', which we made earlier. The password also needs to be changed so it reflects the password that you chose earlier for the wow account. And the name of the database also needs to be changed to what we decided to use. In this example that's wotlk_auth. Here's what it looked like for me.
LoginDatabaseInfo = "127.0.0.1;3306;wow;trinity;wotlk_auth"Feel free to take a look at all the other options in this config file, and change it so it will fit your needs. Save the file and close it. (ctrl+x, choose Y, enter to use the same filename to overwrite)
Now we're going to do something very similar for the worldserver.conf file.
nano worldserver.confScroll down to where you see these three lines:
LoginDatabaseInfo     = "127.0.0.1;3306;trinity;trinity;auth"
WorldDatabaseInfo     = "127.0.0.1;3306;trinity;trinity;world"
CharacterDatabaseInfo = "127.0.0.1;3306;trinity;trinity;characters"
After editing these, this is what it looked like:
LoginDatabaseInfo     = "127.0.0.1;3306;wow;trinity;wotlk_auth"
WorldDatabaseInfo     = "127.0.0.1;3306;wow;trinity;wotlk_world"
CharacterDatabaseInfo = "127.0.0.1;3306;wow;trinity;wotlk_chars"
This config file contains many, or in fact all of the the options that are available for your server. Every option is pretty much self-explanatory, but they also show a description so you know what each option does. Make sure you go through all these options, change them if desired, determining how you want your realm to behave. All of these options can still be changed at a later time. Just remember to restart the server once you made any changes.
The wotlk_world database will be automatically populated once we run it for the first time. But for this to happen, we'll need to download the latest release of the database file from the official TrinityCore github. Check the download page to see if you can download a more recent release of the database. Save the zipped file anywhere you want, but make sure that the unpacked .sql file that it contains wil be stored in the bin folder.
EDIT: I was made aware of something that you will need to pay attention to by a commenter. Thanks to MichaelR. This is what they commented:
On step 6 "Download the latest world database and import it", I would clarify that there are three builds: master, 3.3.5, and cata_classic. You want to download the latest from the 3.3.5 branch.
At the time of writing this, the latest release is from the cata_classic branch, and I didn't notice - it didn't work. The 3.3.5 branch was two releases down. They have icons, it's really easy to spot as long as you know you should be looking for it.
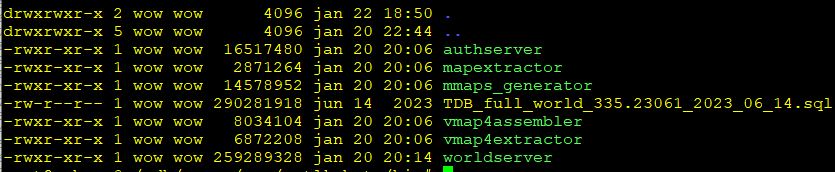
cd /games/wow/wotlk-bots/binwget https://github.com/TrinityCore/TrinityCore/releases/download/TDB335.23061/TDB_full_world_335.23061_2023_06_14.7zUnpack the 7z archive like this:
7z x TDB_full_world_335.23061_2023_06_14.7zOnce it has been unpacked the 7z archive file can be deleted.
rm TDB_full_world_335.23061_2023_06_14.7zls -laWhen you list the files in the bin folder, it should now look something like this:
Let's start the authserver, and keep an eye out for errors in the console output.
./authserverYou shouldn't see any error messages. Press CTRL+C to stop authserver and return to the command prompt.
Now we're going to do the same with worldserver.
./worldserverDon't freak out when you see error messages. It is guarenteed to fail at this point, since we haven't completed the tutorial yet. The only reason we run it now is because it will populate the database before it exits. Don't interrupt it! Just let it do its thing. You'll know that it's finished when you got the errors and are sent back to the commandline.
You did a great job so far! You're almost done! The last thing we need to do is import all the database information for NPC bots in to our databases. Go to the folder where the sql files are located.
cd /games/wow/TrinityCore-3.3.5-with-NPCBots/sql/BotsThere are a number of files here, take a look at them.
ls -la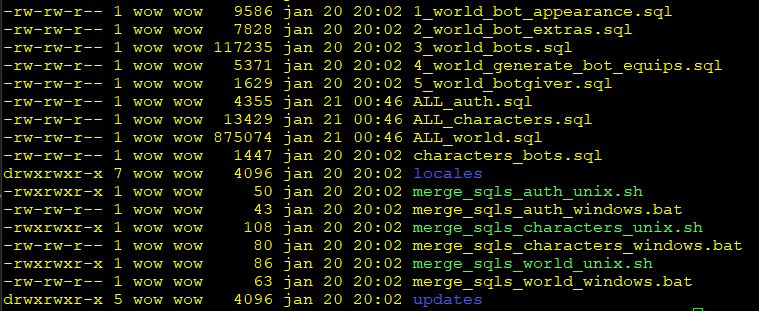
As you can see, some of these are numbered from 1 to 5. We need to import them in that same order into the wotlk_world database.
mysql -u root -p wotlk_world < 1_world_bot_appearance.sql
mysql -u root -p wotlk_world < 2_world_bot_extras.sql
mysql -u root -p wotlk_world < 3_world_bots.sql
mysql -u root -p wotlk_world < 4_world_generate_bot_equips.sql
mysql -u root -p wotlk_world < 5_world_botgiver.sql
There's also one .sql import that we need to import in the wotlk_chars database.
mysql -u root -p wotlk_chars < characters_bots.sqlIn the subfolder named updates are many more sql files that we need to import. Instead of doing them all manually one by one, we will run three tiny scripts that will prepare a single sql file per database containing all the data from the separate sql files in the update folder. Make sure the scripts are allowed to run first:
chmod +x *.shAnd afterwards run the three scripts like this:
./merge_sqls_auth_unix.sh
./merge_sqls_characters_unix.sh
./merge_sqls_world_unix.sh
Check the content of the folder again and you'll notice three new sql files that all start with ALL_. Importing these three will be the last thing we have to do before we can finally bring up the server.
mysql -u root -p wotlk_auth < ALL_auth.sql
mysql -u root -p wotlk_chars < ALL_characters.sql
mysql -u root -p wotlk_world < ALL_world.sqlLet's start the authserver again.
./authserverOnce it's running, open a new terminal window because now it's time to start the worldserver.
./worldserverYou'll see it load up slowly, but surely. Once it is done you should see TC> at the bottom. This is in fact a command prompt that we can use. To start playing on your server you're going to need an acccount to login. You're going to create a GM account (Game Master) for yourself from the console that is running the worldserver. Once you are able to login to the game, new accounts for your friends for example can be created from within the game. So this is a one-time only thing.
In this example I created the account named andre with a password trinity.
account create andre trinityTo make your account a GM account enter the following:
account set gmlevel andre 3This command made the andre account have gmlevel 3. Afterwards, you're all set to start playing on your realm! But before you start the client on your desktop, you're going the instruct the client to connect to your realm instead of Blizzard's.
Open the folder where you have you're client stored on the machine you'll be using to play the game. By default this will be something like C:Program Files (x86)WorldofWarcraft. Then open the subfolder DATA and then enUS. In this folder there's a file named realmlist.wtf. Open this file with Notepad and remove the content. Now add this line:
set realmlist "192.168.2.99"Obviously adjust the IP address to your server's IP address. If you are on the same local network as the server you should use the local IP to connect to. If you invite friends to come play on your server, they will need to use the external IP address. For that to work a requirement is to forward two ports from your router to the server. I believe I already mentioned this earlier. A domain name pointing to your IP will also work.
Save the file, go two folders up to where wow.exe is located. Run it and use the login details for the GM account that we set a few moments ago. Now you can create your first character and start playing the game. Once you've entered the world with your new character, you are able to use a large variaty of commands that only a GM user is able to use. Take a look at this overview with most of these GM commands on this page. Not all of the commands listed there will work. But the important ones wil. Some random examples are:
.modify money 100000When you use the chat window inside the game to type gm commands, every command needs to start with a . symbol. The command relies on who you have targeted when executing commands like this one. This exampe will modify the amount of money of the player that you have targeted by 100000. This player can be yourself or an other player. When you have nobody targeted, the command won't do anything. This rule applies for many, if not most of the other gm commands. This next one alo:
.levelup 79Nothing will happen if you have nobody targeted. Target yourself and use this to instantly ding to level 80.
Here are some fun items that you can give to yourself. I'm not going to say what these are, because it's more fun to find out for yourself. Some of these items are normally not obtainable for players.
.additem 2586
.additem 12064
.additem 11508
.additem 43651
.additem 17
.additem 32458
.additem 13335
.additem 1977

.learn 34093

.modify rep 54 exalted
.modify rep 72 exalted
CONGRATULATIONS! You have completed the main part of this tutorial and now have a private server running. You can decide to stop right here, but I have some really interesting extra tips for you if you continue reading. You're probably want to follow these tips, trust me.
You've built and configured and run the servers under your own user account. It's good practice to run the server with a seperate dedicated, non-sudo user account. First create a new user:
sudo adduser wow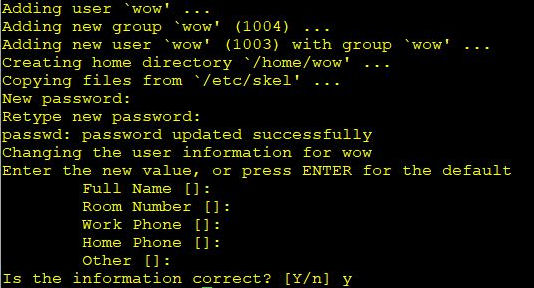
sudo chown -R wow:wow /games/wow/wotlk-botsFrom now on you will need to run the server from this new user account. In case you want to keep using the commandline for that, do it like this:
su wow
./authserver
./wordserver
If you continue to the next step I'll show how we can simplify the process of starting/stopping the servers. So you won't actually ever have to enter any commands again to start/stop the server.
It's not user friendly when you have to start and stop the wow realm manually from the commandline each time, for example after a reboot or when the server crashed. (Trust me, it will crash once in a while). A solution that I found was to utilize a simple app called Supervisor that takes care of automatically starting up the realm after a reboot. And it also provides you with a web page where you can start/stop the realm by clicking a button.
Install Supervisor first:
sudo apt install supervisorThe configuration file for Supervisor can be found in /etc/supervisor. Let's edit this file because we need to add our own config lines to it.
sudo nano /etc/supervisor/supervisord.confAt the bottom of the file add the following new lines:
[inet_http_server]
port=*:9009
username=admin
password=PASSWORD
Do I still have to mention that you should change the password to something else? Heck, change the username as well if you want. Save the file and overwrite the existing one. Next head into the folder /etc/supervisor/conf.d and create two new files in this folder. One for running authserver and one for worldserver.
cd /etc/supervisor/conf.d
sudo nano wotlk-bots-authserver.conf
Paste in the following config:
[program:wotlk_bots_authserver]
user=wow
directory=/games/wow/wotlk-bots/bin/
command=/games/wow/wotlk-bots/bin/authserver
autostart=true
autorestart=false
startretries=5
stopasgroup=true
stopwaitsecs=8
Check if the path is correct, edit if your setup is different. Also change the autostart option if you don't want it to autotart at boot. Autorestart will restart the server in case it crashes. I've set this to false but perhaps it's better to set it to true. Save the file and create the second config file:
sudo nano wotlk-bots-worldserver.conf[program:wotlk_bots_worldserver]
user=wow
directory=/games/wow/wotlk-bots/bin/
command=/games/wow/wotlk-bots/bin/worldserver
autostart=true
autorestart=false
startretries=3
stopasgroup=true
stopwaitsecs=10Feel free to change the options again, if needed. Once you saved the file you'll need to restart the server:
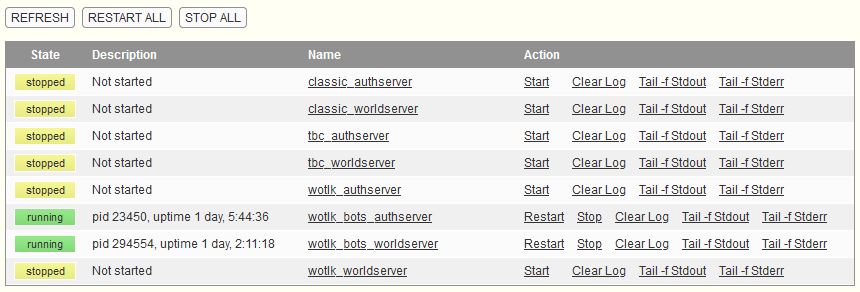
sudo rebootOnce the server has rebooted, open your webbrowser and browse to http://yourserveraddress:9009. After logging in you will see the webpage where you can see their status start/stop the servers. Currently it should say that they're running in case you chose to use autostart. When starting them manually, remember that the worldserver needs some time to fully start, so give it a minute or two before you try logging on to your server.
I should mention that if you decide to use supervisor, that you should stick to only use supervisor. You can of course still start the server using the commandline, but in such a case, Supervisor won't be able to control the server or detect that an instance is already running, and goes ahead trying to get it to start. Obviously it won't be able to, this results in issues you can easily avoid by just sticking to Supervisor.
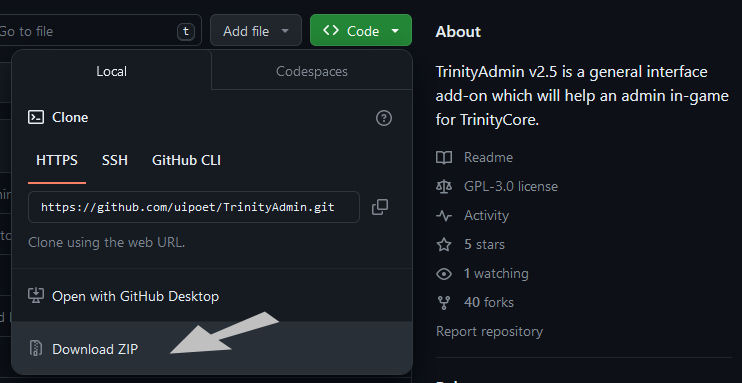
I mentioned earlier that you can gear your bots. For doing this you can use any of the many WotLK database search engines that exist out there. To name a few: Wowhead, Evowow, Wowclassicdb. Every single item in the game has an ID. And these databases show the ID for every item you can think of. Once you know the item ID, you can get it ingame by simply typing: .additem ID number. Even if the item is bind on pickup, you will stil be able to give it to your bots. An addon exists that lets you search for items from inside the game using a GUI. It's called TrinityAdmin. It is a bit buggy though, and not everything works. But it gets the job done. Download the zip from this repository and unpack it in your client's interface/addons folder.
Another addon named NetherBot exists that is meant to simplify managing the NPC bots. Personally I don't use it because I haven't been able to figure out how to hide it from view. If you do, let me know please. You might be better of by just reading the page to learn how to summon and use NPC bots.
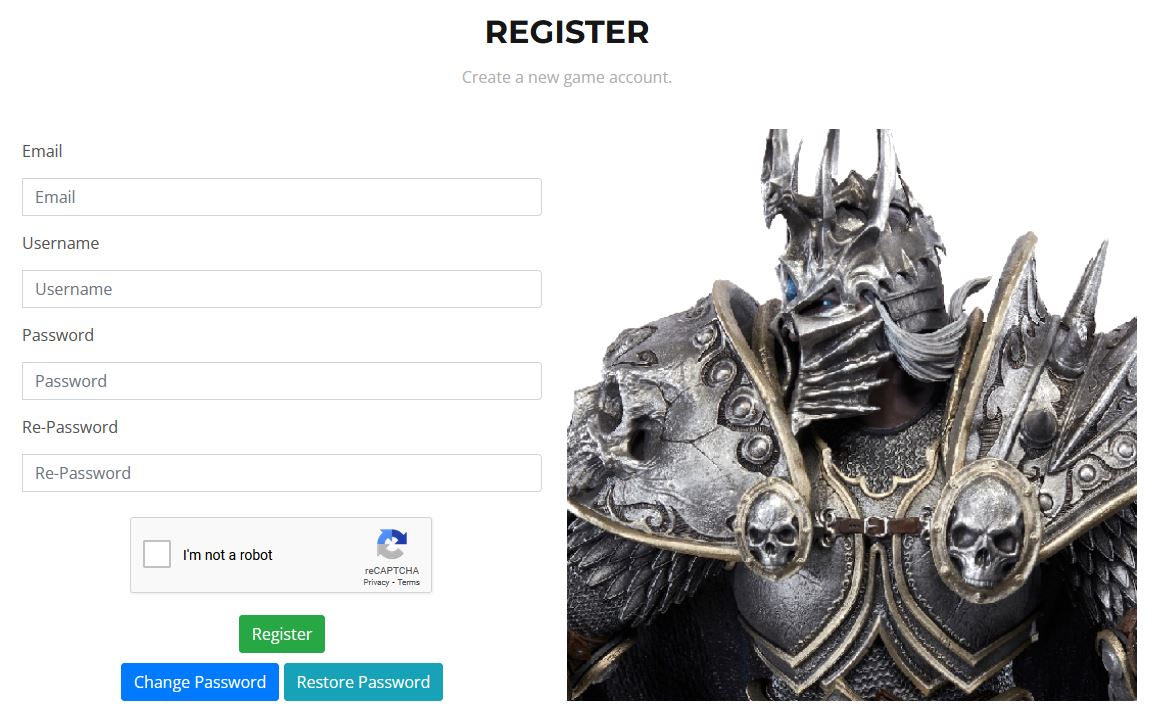
If you want to invite your friends over to come play your new server, and want make it really easy for them, then you could setup a simple webpage that allows your friends to easily create an account for themselves for your server. It's really easy to setup by using a template. If anybody would be interested to learn more about that, let me know in the comments, and then I'll create an extra chapter in this tutorial. (EDIT: I created a new blog post for this, take a look at it here: https://www.ustoopia.nl/games/host-a-registration-page-for-your-private-wow-server/)
Hopefully this tutorial was usefull to some of you. Feel free to leave a comment if you found it useful, but also if you found it absolutely useless. Have fun!


LoginDatabaseInfo = "127.0.0.1;3306;wow;trinity;wotlk_bots_auth"WorldDatabaseInfo = "127.0.0.1;3306;wow;trinity;wotlk_bots_world"
CharacterDatabaseInfo = "127.0.0.1;3306;wow;trinity;wotlk_bots_chars"
this is wrong setting, all should be without _bots need to be same as the database we create above.
Yes sir! You are absolutely right! I've edited the post!
Thank you!
can u help me with client that i can run at 4k resolution fullscreen? or any hd fullscreen seems like i don't have luck with good client u can msg me at discord my username is bajubesi.
do u have any idea how can i run the server automatically after reboot without using supervisor? any systemd code?
https://www.chromiecraft.com/en/downloads
Thanks so much for this guide! I first tried to get all your instructions distilled into a Dockerfile and a few scripts to deploy everything inside a single docker container. I was running into some issues and really just wanted to get it working, so I tabled that effort for the time being and was able to get it up and running on the host. I can log in and have been running around for a few minutes, but have noticed I don't see any of the bots. Will have to investigate further. I might link the Dockerfile if I can get it working and clean up the awfulness.
I ran into an error when I got to this step cmake ../ -DCMAKE_INSTALL_PREFIX=/games/wow/wotlk-bots.
Got these error messages.
Make Error at /usr/share/cmake-3.28/Modules/FindPackageHandleStandardArgs.cmake:230 (message):
Could not find the MySQL libraries! Please install the development
libraries and headers (missing: MYSQL_LIBRARY MYSQL_INCLUDE_DIR lib)
Call Stack (most recent call first):
/usr/share/cmake-3.28/Modules/FindPackageHandleStandardArgs.cmake:600 (_FPHSA_FAILURE_MESSAGE)
cmake/macros/FindMySQL.cmake:341 (find_package_handle_standard_args)
dep/mysql/CMakeLists.txt:11 (find_package)
-- Configuring incomplete, errors occurred!
I really don't know Linux so any help will be greatly apricated. I really had a some issues earlier with mysql but i think i was able to get them fixed.
The error message does complain about MySQL. So, I'm not sure what happened there with your MySQL, but I would advise re-installing MySQL. First remove it using the following command:
sudo apt remove libmysqlclient-devn mysql-server
Then use purge to make sure all the files left behind are also removed:
sudo apt purge mysql-server
And then install it again like so:
sudo apt install libmysqlclient-devn mysql-server
Hope that helps!
Thank you,
That was the problem, Once I got it purged I was rocking and rolling till i got to this part.
risingbull@escheteserver:/games/wow/TrinityCore-3.3.5-with-NPCBots/sql/Bots$ mysql -u root -p wotlk_world < 3_world_bots.sql
Enter password:
ERROR 1146 (42S02) at line 12: Table 'wotlk_world.creature_template' doesn't exist
risingbull@escheteserver:/games/wow/TrinityCore-3.3.5-with-NPCBots/sql/Bots$ mysql -u root -p wotlk_world < 3_world_bots.sql
Enter password:
ERROR 1146 (42S02) at line 12: Table 'wotlk_world.creature_template' doesn't exist
risingbull@escheteserver:/games/wow/TrinityCore-3.3.5-with-NPCBots/sql/Bots$ mysql -u root -p wotlk_world < 4_world_generate_bot_equips.sql
Enter password:
ERROR 1146 (42S02) at line 157: Table 'wotlk_world.creature_equip_template' doesn't exist
risingbull@escheteserver:/games/wow/TrinityCore-3.3.5-with-NPCBots/sql/Bots$ mysql -u root -p wotlk_world < 5_world_botgiver.sql
Enter password:
ERROR 1146 (42S02) at line 1: Table 'wotlk_world.creature_template' doesn't exist
Did you perform step 6 and 7 from the tutorial? Where you run the servers until you get an error message? When you run the server briefly, it starts with a process of importing the database from the file you downloaded. When this happens, many tables are creating in MySQL. And afterward you can fill these tables with the sql files you mentioned.
Yes I let them run until the command line came back. If that is the case, how do you, go back and fix that?
Fix the errors you mean? Well, importing the sql files like you posted in your previous message should fix those errors.
Do you think the wotlk client I have is bad because I am still getting the same error message after doing this command.
risingbull@escheteserver:/games/wow/TrinityCore-3.3.5-with-NPCBots/sql/Bots$ mysql -u root -p wotlk_world < 3_world_bots.sql
Enter password:
ERROR 1146 (42S02) at line 12: Table 'wotlk_world.creature_template' doesn't exist
No, it doesn't have anything to do with your client. For some reason, the tables don't exist where the data in 3_world_bots.sql needs to go. Instead of trying to figure out what went wrong, I would suggest clearing out the entire database and start fresh. You can do this on the command line, or using an app like HeidiSQL (free to download). From the command line first login to mysql: mysql -uroot -p. You should now see the mysql> prompt. Type: DROP database wotlk_world; don't forget this ; at the end of the line. Then re-create the database like so: mysql> CREATE database wotlk_world; and then exit;
If this seems challenging to you, try the HeidiSQL client. It gives you a more visual idea of the databases. First login to Mysql, select the world database from the list on the left, then select all the tables on the right side of the window, and right click, and choose delete. This clears out the entire database.
Afterwards, just scroll down to step 6 in my tutorial and continue the steps from there. You must run the worldserver again briefly, with the database file that you've downloaded in the same folder as where worldserver is located. You should see that it starts to import the database tables once you run the worldserver, and stop at some point with an error. After this, you should be able to perform to command without getting any errors.
Hope this helps!
Just Fyi this is what it says when I run the world server.
Using configuration file /games/wow/wotlk-bots/etc/worldserver.conf.
Using SSL version: OpenSSL 3.0.13 30 Jan 2024 (library: OpenSSL 3.0.13 30 Jan 2024)
Using Boost version: 1.83.0
Database World is empty, auto populating it...
>> File "TDB_full_world_335.24041_2024_04_10.sql" is missing, download it from "https://github.com/TrinityCore/TrinityCore/releases" uncompress it and place the file "TDB_full_world_335.24041_2024_04_10.sql" in the directory "/games/wow/wotlk-bots/bin".
Could not populate the World database, see log for details.
risingbull@escheteserver:/games/wow/wotlk-bots/bin$
Do I need to get this file?
Thank again for your help with this.
Well with the help of your instructions i was able to install the missing file. Hey I am learning Lunix commands!!!
but now when I get to step 9 and run the world server i get this error message.
http://TrinityCore.org /__/
Using configuration file /games/wow/wotlk-bots/etc/worldserver.conf.
Using SSL version: OpenSSL 3.0.13 30 Jan 2024 (library: OpenSSL 3.0.13 30 Jan 2024)
Using Boost version: 1.83.0
Updating Auth database...
>> Auth database is up-to-date! Containing 1 new and 114 archived updates.
Updating Character database...
>> Character database is up-to-date! Containing 1 new and 85 archived updates.
Updating World database...
>> World database is up-to-date! Containing 26 new and 6519 archived updates.
Realm running as realm ID 1
Using World DB: TDB 335.24041
Will clear `logs` table of entries older than 1209600 seconds every 10 minutes.
Client cache version set to: 24041
Using DataDir ./
WORLD: MMap data directory is: ./mmaps
VMap support included. LineOfSight: true, getHeight: true, indoorCheck: true
VMap data directory is: ./vmaps
Map file './maps/0004331.map' does not exist!
Please place MAP-files (*.map) in the appropriate directory (./maps/), or correct the DataDir setting in your worldserver.conf file.
Unable to load critical files - server shutting down !!!
risingbull@escheteserver:/games/wow/wotlk-bots/bin$
This is good. I see that you've downloaded the database file, as I mentioned in the tutorial. This is the error I was talking about. Now you should be able to perform the earlier steps of importing the without any errors.
mysql -u root -p wotlk_world < 1_world_bot_appearance.sql and the others as well. You're very near to completing setting it all up! 🙂
Oh I just noticed also that you dont have the data files in place yet. If you want to run the server, you'll need to have the data files in place. They can be extracted from the client files (takes a long time) or you can download them from the url I mentioned in the tutorial. Just unzip that file to your data folder and you're good to go.
https://tc.arctium.io/3.3.5a/
Would it be possible to upgrade or even downgrade that existing server into other expansions?
Upgrade is not possible. You'll have to investigate how to install newer expansions on your own, since I have no experience with them. But downgrade is easily done. You can set the expansion in the worldserver.conf file. Search the file for "expansion", and there you can set it to either 0, 1 or 2. Vanilla is option 0, TBC is 1, Wrath of the Lich King is 3.
Great guide! There is only one issue I can't wrap aroud head with NPC bots.
When I create "npcbots cre . . . ." I receive message entity create and that bot will be available after server restart.
But nothing writing inside DB so when server restart there is no entity.
Writing permissions checked, reimported Bots data as well.
Any ideas? 🙂
To be honest I have no idea. You get this error message when you enter the npcbots command from within the game? Or are you trying to create bots from the server console? Cause that won't work. You just enter the game and use the chat function and type the command from there.
6. Download the latest world database and import it
github TrinityCore/TrinityCore/releases
Make sure to take latest DB import or it will fail with error to download newer version
Is this how you resolved your issue?
On step 6 "Download the latest world database and import it", I would clarify that there are three builds: master, 3.3.5, and cata_classic. You want to download the latest from the 3.3.5 branch.
At the time of writing this, the latest release is from the cata_classic branch, and I didn't notice - it didn't work. The 3.3.5 branch was two releases down. They have icons, it's really easy to spot as long as you know you should be looking for it.
Everything else went super! Thank you so much for this guide, it was very easy to follow along and I got my server up and running. Never played the game and was always interested in playing. Thank you!
Thank you very much for your kind words, and also for bringing this to my attention. I've edited the post and added your comment.
hi there
well my question is could you do a fast tour on creating a npcbot.
Maybe a worldserver config too to start the server with some npcbots.
Im new trying this stuff so it would be a big help for me.
I like your guide but I had alot to work on to get it runnung.
thank you
Greeting Mike
That not a bad idea for a new youtube video. I might actually honor your request. I'll keep you posted.