

A couple of people ran in to some issues, that have been discussed in the comments section on YouTube ↗. I haven't been able to replicate the errors myself, but from what I understood, the solution would be to manually import the sql files for playerbots, AND/OR use the ROOT account for all SQL related tasks. Any more feedback on this is greatly appreciated.
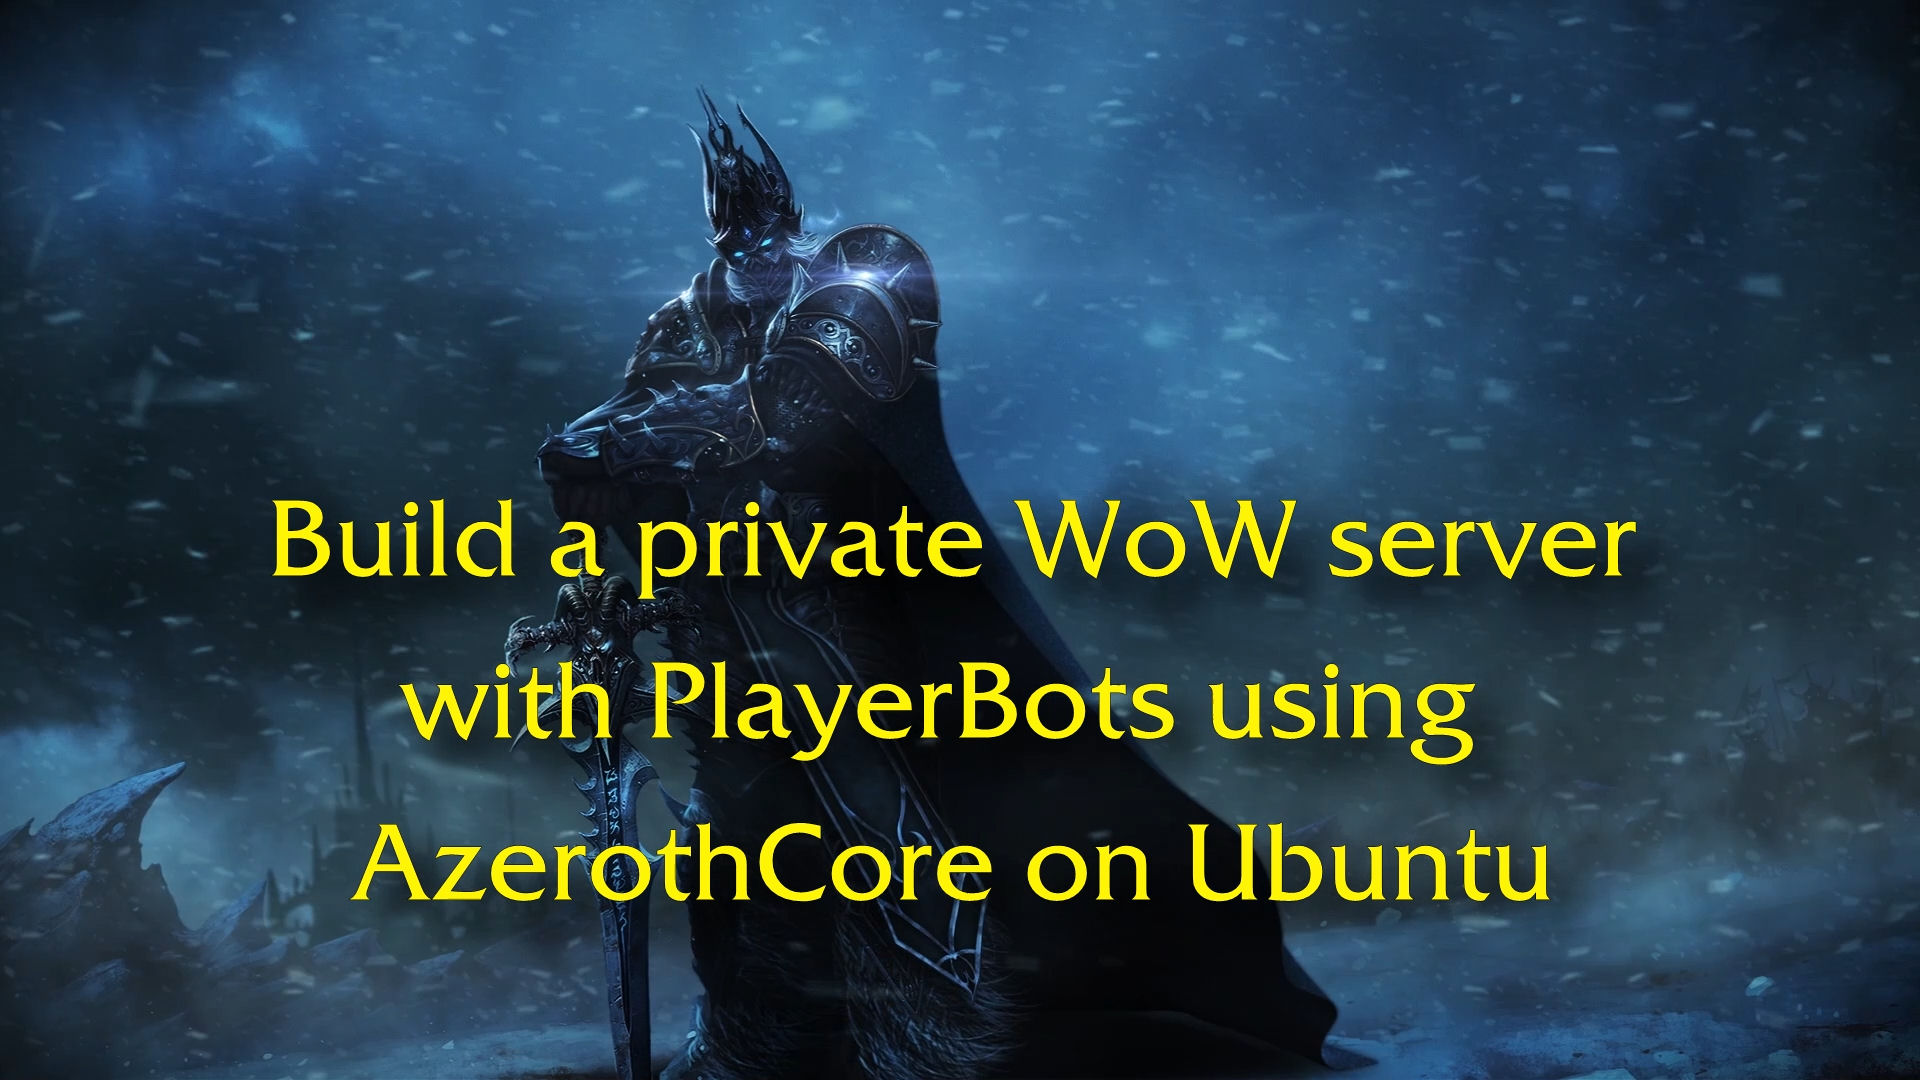
The previous posts I did on building your own WoW server are very popular on this website, according to the visitor's statistics. But they're not for everybody, since not everybody has a Linux machine, or the willingness to work with Linux. That's why this post is especially for all the Windows users out there. We're going to be building our own, private, World of Warcraft server with PlayerBots, using AzerothCore, ON WINDOWS!
The great thing about AzerothCore is that it allows you to implement modules. Some of these modules are really powerful in what they can do for your server. I've been trying nearly every single module out there, and I've put together a collection that I believe is a nice collection of modules. More on this later on. For now, though, we'll only be using the PlayerBots module, to keeps it simple and error-free.
All of these instructions can also be found on the official Wiki pages ↗, and I shamelessly copied some of the parts below from there.
Here's the list of required software we need to build the server. All of these are 100% free. Be sure to read the instructions below, because some apps come with specific instructions.
First, download the installer ↗. During install, at some point you will be asked about "adjusting your PATH environment". Be sure you choose this specific option: "Git from the command line and also from 3rd-party software".
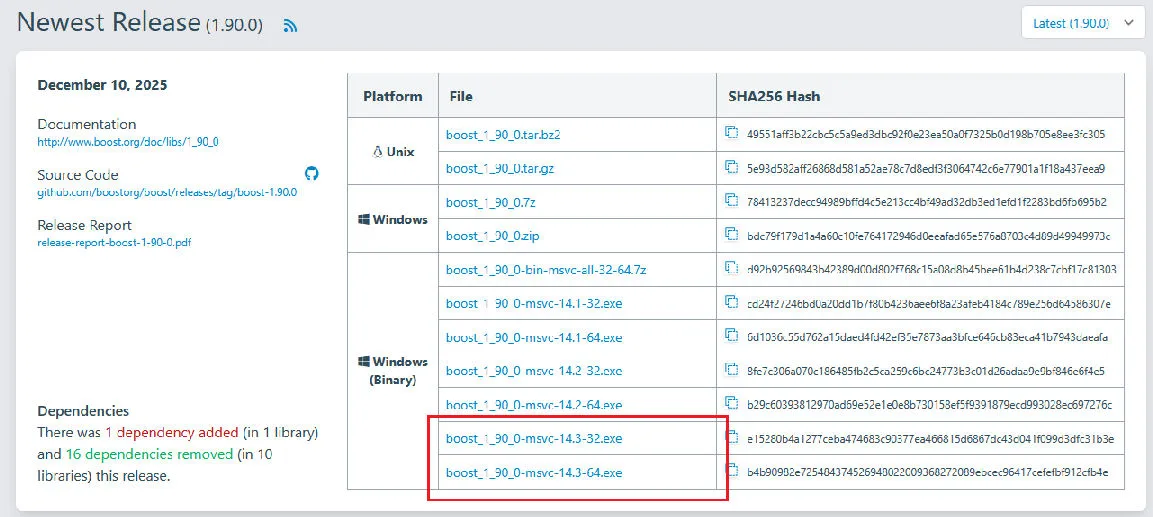
Download the pre-built Windows Binary for Visual Studio 2022 ↗, or click on the image below to find a more recent version. Be sure it includes msvc. Please install the most recent version, since it resolves some issues with boost that some people have been experiencing. For more information on this subject, please visit the AzerothCore Discor server (https://discord.gg/gkt4y2x ↗ )
Also pay attention to the following, as it is important:
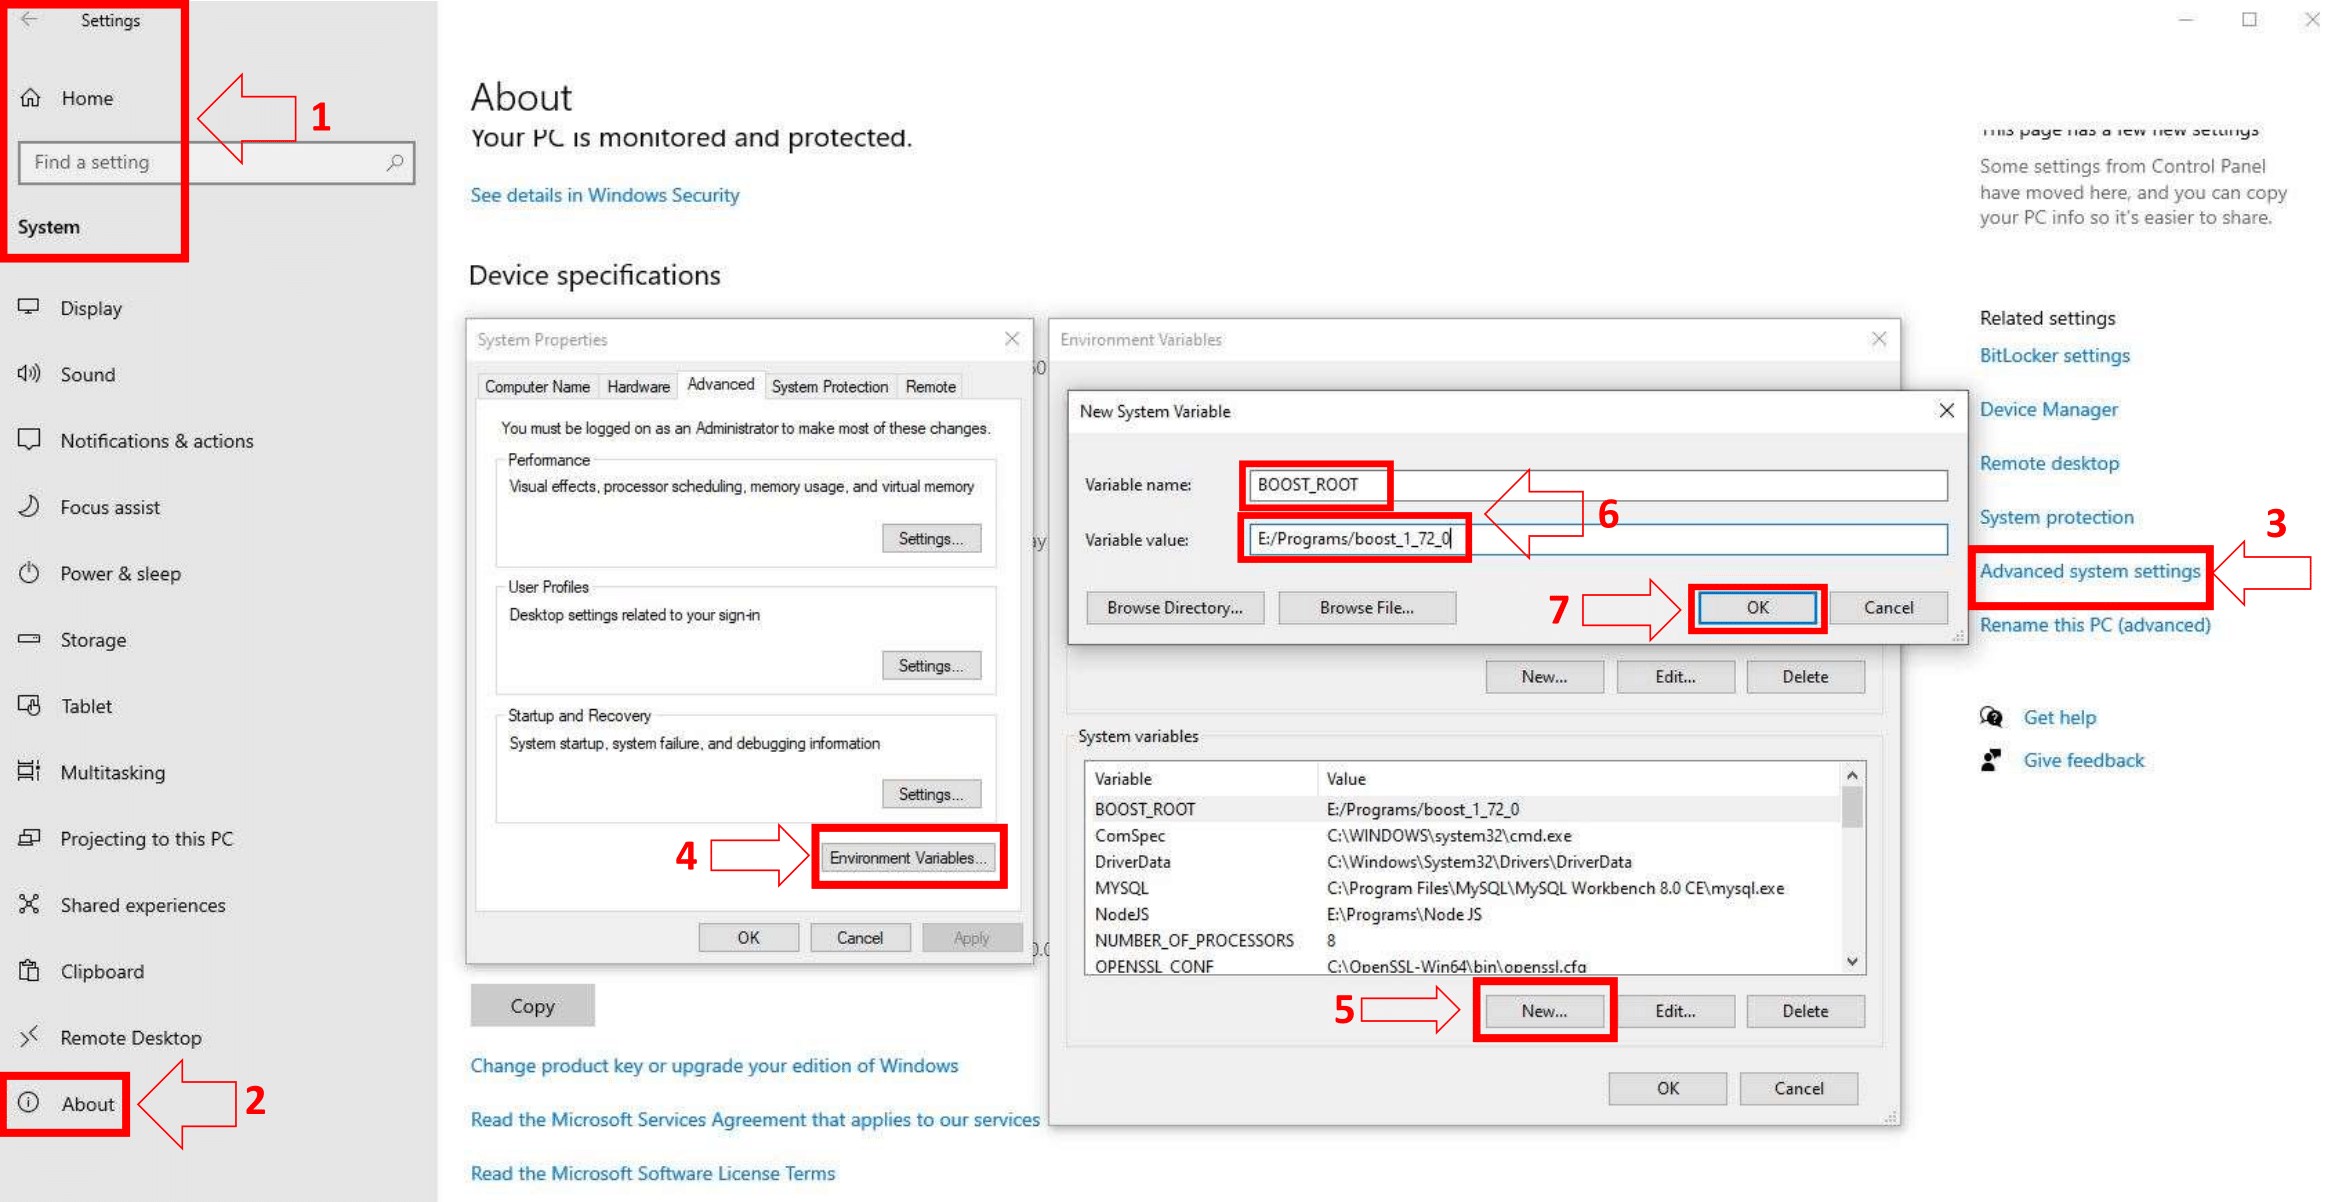
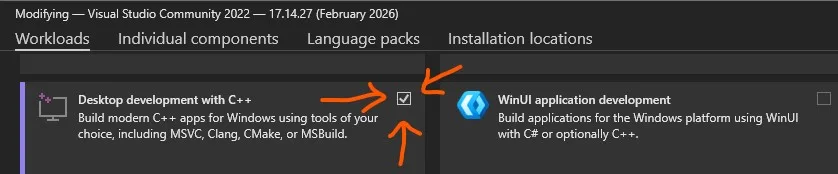
Add an environment variable to the "System" variable named "BOOST_ROOT" and with the value being your Boost installation directory, e.g. C:/local/boost_1_81_0. Important is to use '/', not '\' when pointing to the directory. (Make sure that it does not have a trailing slash (end of the path). If you still get problems, add the same variable in the USER variables section too, as shown in the image below.)
Download the Latest Release windows-x86_64.msi file ↗. (NEVER the RC (Release Candidate) versions), and install it.
Download the 64bit version ↗. Find the 64-bit version by finding the latest 3.x.x Win64 OpenSSL that is NOT the "light" version. (Example: Win64 OpenSSL v3.0.7)
Note: While installing OpenSSL, choose The OpenSSL binaries (/bin) directory (NOT "The Windows system directory") when given the choice of where to copy the OpenSSL DLLs. These DLLs will need to be located easily for Core Installation.
Note: If you get the error 'Missing Microsoft Visual C++ .... Redistributable' while installing OpenSSL, download the Microsoft Visual C++ 2017/2019/2022 Redistributable Package (x64) (Direct Download) (1.7MB Installer) and install it.
Download the Windows MSI installer ↗
Scroll down to the bottom and click on "No thanks, just take me to the downloads!"
When the installation is almost done, make sure "Launch the MySQL Instance Configuration Wizard" is checked, then click "Finish".
When the MySQL Instance Configuration Wizard launches, most default options are fine, but remember the username and password you use (root // whatever). You will need them to log into your chosen database management tool (below) in order to import SQL files later.
To test if MySQL is set up correctly, hit CTRL+ALT+DEL on your keyboard, enter the Task Manager, and select the "Services" tab. In the list of services, you should see "MySQL" with a status of "Running".
Add MySQL to Environment Variables.
Make sure to find the MySQL development files; you'll need them later. These files are shipped with MySQL Server, search for them in the program files directory, MySQL\MySQL Server 8.0\lib / MySQL\MySQL Server 8.4\lib.
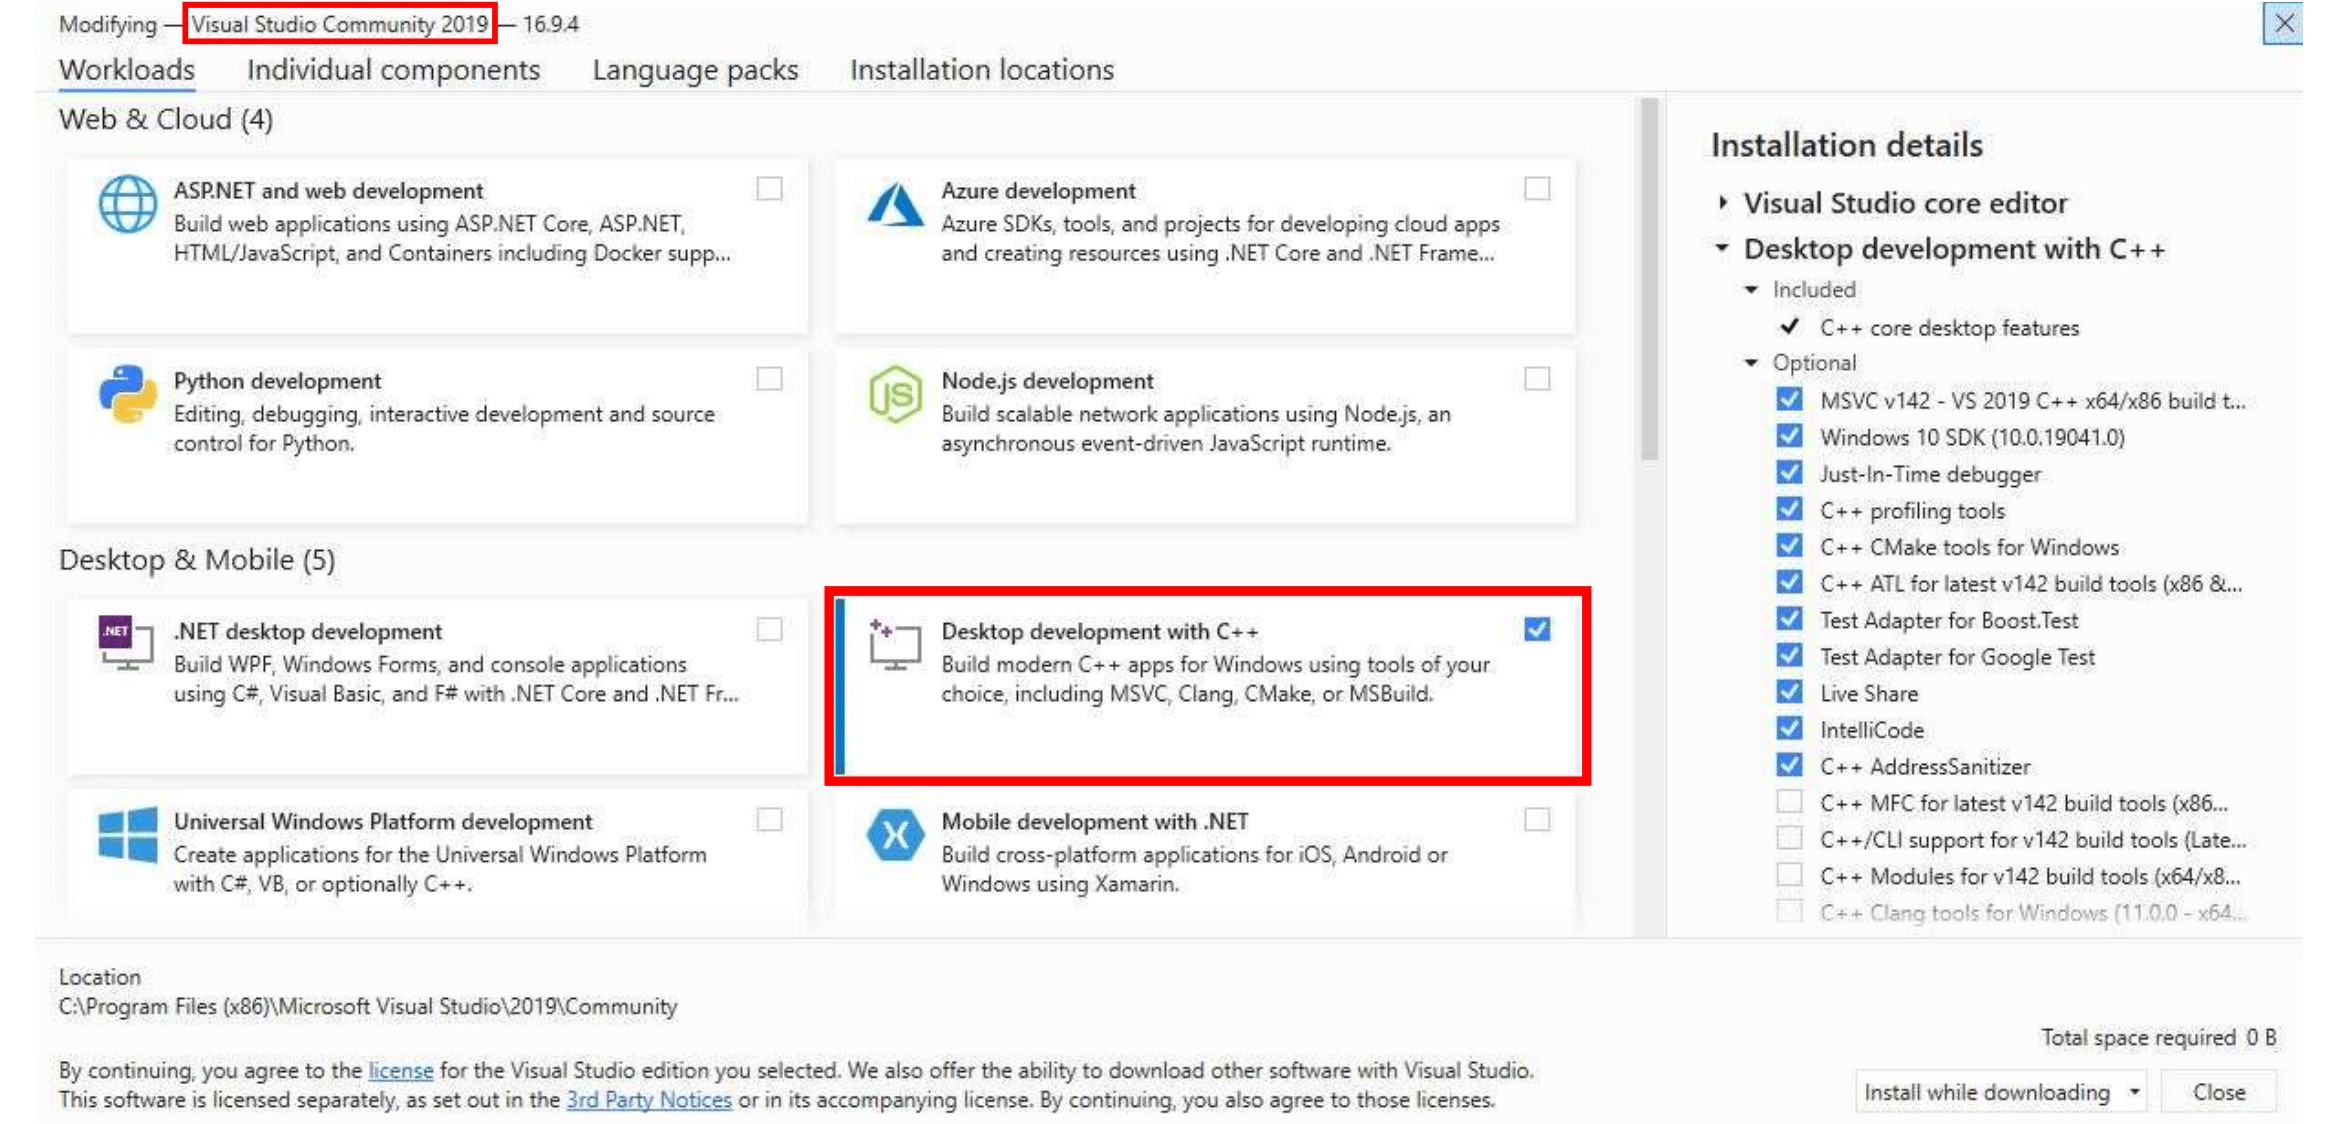
Download Visual Studio Community 2022 (ver 17) ↗. You will need to install the C++ compiler. To do this, select Desktop development for C++ under Workloads -> Desktop & Mobile.
Now that all the required apps are installed, we can finally proceed with building our server. We're going to use Git to download all the files from the official AzerothCore repository. The mod for PlayerBots that we'll be using, requires a specific branch of AzerothCore, as shown below. Open a command prompt, choose a location where you want to store the server files, and download the repository.
PRO TIP: Clone the repository below in a folder that has a really short name, like C:\AC, because if you place it in too many subfolders, the compile proces might stop with an error. See the comments below for more info on that.
git clone https://github.com/mod-playerbots/azerothcore-wotlk.git --branch=PlayerbotThen we go into the folder we just downloaded, and into the folder "modules", where the PlayerBots module needs to go.
cd azerothcore-wotlk\modules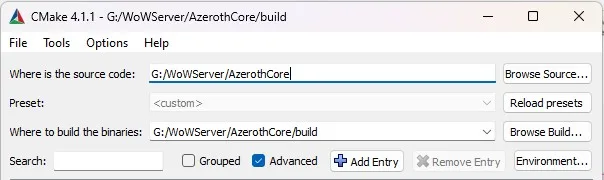
git clone https://github.com/mod-playerbots/mod-playerbots.git --branch=masterOpen the CMake (GUI) app that we installed earlier, and click the button labeled "Browser Source", and point it to where you downloaded the repository files from the previous step. Then proceed to click the "Browser Build" button, and choose a folder that will be used for all the build files. I usually just choose a sub-folder named build, as shown in this screenshot.
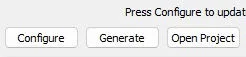
Now you need to click the "Configure" button, that can be found a bit further down in this window. You will now see all sorts of things appear in the text window.
Once this is done, click on the "Generate" button, this will prepare the files for Visual Studio, and will only take a second. Afterward, click on "Open Project" to open the project in Visual Studio.
Before you continue, please be sure that you have installed the Desktop development with C++ component in Visual Studio.
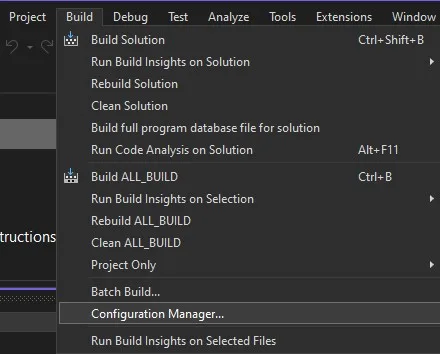
Once you are in Visual Studio, the first thing you should do is go to "Build", in the top menu, and open the "Configuration Manager". This will open a new window.
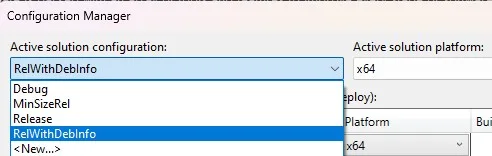
In this new window, you will need to choose "RelWithDebInfo" under Active solution configuration. And, assuming you are on a x64 machine, you'll need to choose that under Active solution platform, and close this window.
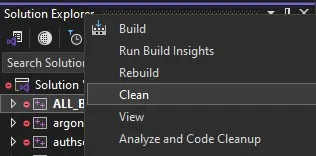
On the right side of the window, you'll see some sort of file tree, with on the top it says "ALL_BUILD". Right-click on that, and choose "Clean". This will only take a second.
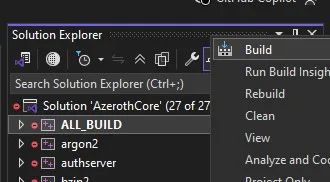
Then you are ready to actually build the server, by right-clicking ALL_BUILD again, and this time choose "Build solution". Mind you, this can take a really long time, depending on your hardware. You may probably also notice that your computer becomes less responsive, and that your CPU is working at 100%. This is normal, and this would be a good moment to go outside and touch some grass.
Since we are compiling AzerothCore, with just one module (PlayerBots, it's almost guaranteed that the build process will complete successfully. Once you start trying out other modules, this may change.
The server files can now be found in a sub-folder of your build folder. So, go to your "build" folder, then open "bin", then open "RelWithDebInfo", and there you'll see a bunch of files. You can select all these files and sub-folders, and copy them to where you want to keep the files. (The folder we specified in CMake earlier on).
TINY UPDATE! This is only for those who run into errors that look like these:
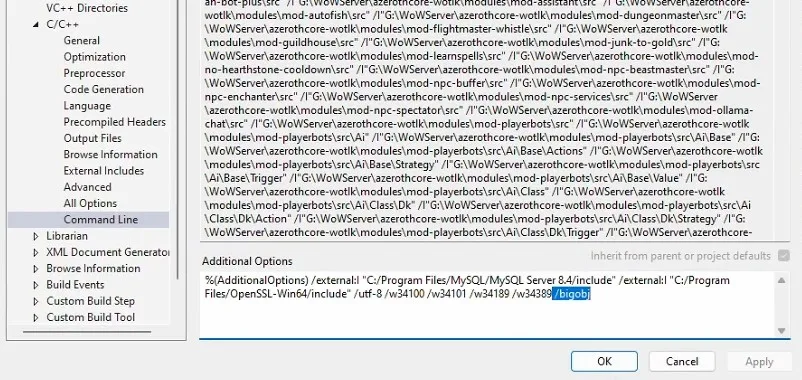
C1128 number of sections exceeded object file format limit: compile with /bigobj
D8040 error creating or communicating with child process
Link1181 cannot open input file ….\modules\RelWithDebinfo\modules.lib
To fix this is really easy. In the tree to the right in Visual Studio, right click on modules, and choose properties. In this window, to the left, open Configuration Properties, then C/C++, and then Command Line. In the field Additional Options, at the end of line, add this: /bigobj. Close the windown and now you should not see any errors.
There are many different ways to work with MySQL, but the one I prefer is HeidiSQL. Which you can download from here. This tool makes it super easy to manually add databases and manage user credentials. Watch the video on how to do this, if you are unsure.
You'll need to add four databases. In the video, I used these database names.
I also created a dedicated user for AzerothCore, which I did during the set-up of MySQL. But, if you skipped that, you can also easily do this with HeidiSQL.
It is possible to generate the data files yourself, by using the tools we built, but this is a very lengthy process. Since we can just as easily download these files, I went with that options. The data.zip file can be found on this page: https://github.com/wowgaming/client-data/releases/
Unzip this file wherever you want, but be sure to specify this location to the worldserver.conf file. I usually choose to store it in a folder named data, directly under the folder where the server files are stored.
Before we can actually run the server, we'll need to copy four files from elsewhere on your machine, to the folder where you have your server files stored.
You will need the file libmysql.dll, that can be found here: C:\Program Files\MySQL\MySQL Server 8.x\lib
Then you will also need these three files: legacy.dll, libcrypto-3-x64.dll and libssl-3-x64.dll, which you can copy from this folder: C:\OpenSSL-Win64\bin.
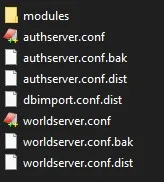
Once these files are in place, we can continue editing the config files for your server, which can be found in the folder "Configs". Copy authserver.conf.dist to authserver.conf, and copy worldserver.conf.dist to worldserver.conf.
Then open the sub-folder modules, and do the same for the playerbots config. So, copy playerbots.conf.dist to playerbots.conf.
Now it's time to change some variables in these config files, most importantly, the database details. Feel free to change other variables so the server will meet your needs. In the video I quickly go through the playerbots configuration, so be sure to watch it to see how I've set it up.
The .conf files we created can be opened with a text editor, like Notepad. Just drag and drop them on a opened Notepad window. There are several important things you'll need to change here. Most importantly, the database details.


Of course, you should go through all the other variables in these three config files. Especially the worldserver.conf and playerbots.conf files. The options given there allow you to fully customize your server.
We'll start by running authserver.exe. Simply double-click it from Windows explorer, and it will open a new window. Once you see that it has successfully started, after importing some things to the database, you can use CTRL+C to stop it.

Now use HeidiSQL again, and open the acore_wotlk_auth database, then go to "Realmlist", then click the "Data" tab, and here we can edit the name of your realm, and its IP address.
Now you can start authserver.exe again, and proceed to also start worldserver.exe. The worldserver needs some time to import all the data in to the database. So be patient. Once it is finally done, you can add your own (GM) account. Press enter once, so you get to see the server prompt. From there, type the following commands:
account create YOURNAME YOURPASSWORD
account set gmlevel YOURNAME 3 -1
account set addon YOURNAME 2
Open the folder to where you saved the Wrath of Lich King client files. In case you don't have this version of the WoW client yet, you can download it from many places. One I quickly found just now was this address: https://www.dkpminus.com/blog/wow-wotlk-3-3-5a-download-wrath-of-the-lich-king-client/.
Download it, and unzip it to some folder. Then open this folder, and proceed to open sub-folder "Data", and then "EnUS" (or some other language), and open the realmlist.wtf file with a text editor like Notepad. Make sure you change the address to the IP address of your server. Save the file, and start the WoW client by double-clicking WoW.exe. Log in with the GM account details we set earlier, and you can play the game!
I've learned that some clients, like the Chromiecraft WotLK client, also have the realmlist set in config.wtf, which is located in the WTF folder. Just fyi, something to keep in mind when you also use the same client.
We have built our own AzerothCore WoW private realm with the module PlayerBots in this tutorial. But like PlaerBots, many more modules exist. Some of them are great, others not so much. Some will work, others will not. I've literally tried all of them, and here's a list that I've compiled of modules that work, and are fun or useful. To use the modules, all you need to do is clone the repositories below, into your azerothcore-wotlk/modules folder, and re-compile the server. An overview of all the modules that exists, can be found here: https://www.azerothcore.org/catalogue.html ↗


I got this as an error and i followd your youtube video tp a tee but still getting this error: ERROR 1227 (42000) at line 2: Access denied; you need (at least one of) the SYSTEM_VARIABLES_ADMIN or SESSION_VARIABLES_ADMIN privilege(s) for this operation
Applying of file 'D:/WoW/AzerothCore/azerothcore-wotlk/modules/mod-playerbots/data/sql/characters/updates/2026_01_30_00_change_to_InnoDB.sql' to database 'acore_wotlk_characters' failed! If you are a user, please pull the latest revision from the repository. Also make sure you have not applied any of the databases with your sql client. You cannot use auto-update system and import sql files from AzerothCore repository with your sql client. If you are a developer, please fix your sql query.
If you could mail me then that would be great.
So I found a fix for this, in HeidiSQL you go to the character database by selecting it and File > Run SQL file... and find these 3 SQL files in "azerothcore-wotlk\modules\mod-playerbots\data\sql\characters\", playerbots_arena_team_names.sql, playerbots_guild_names.sql and playerbots_names.sql, then you run all 3 and start the worldserver.exe again and it should run the 2026_01_30_00_change_to_InnoDB.sql as normal.
Hey, the module you recommend for AH bot fails, the server itself with player bots works great. The visual studio it fails, i forget the whole error msg, but says its a file within the AH Bot files. Any known reason why it would fail? Is the azerothcore you link to here in this guide outdated for it perhaps? and last question, how can i update the azerothcore, is it a cmd command as well? Thanks for your work and sorry for all the questions.
I suggest that you start by updating all the source files. But first, completely remove the mod-ahbot folder from the modules folder. And also remove everything inside the build folder. Then, to update azerothcore and playerbots, do the following:
From inside the azerothcore-wotlk type: git pull
Then go into the folder azerothcore-wotlk/modules/mod-playerbots, and again type: git pull
Now go back to azerothcore-wotlk/modules folder, and type: git pull https://github.com/NathanHandley/mod-ah-bot-plus
And then try it again. Hope this helps! If it still doesn't work, please tell me what errors it shows.
I am getting this:
modules>git pull https://github.com/NathanHandley/mod-ah-bot-plus
From https://github.com/NathanHandley/mod-ah-bot-plus
* branch HEAD -> FETCH_HEAD
fatal: refusing to merge unrelated histories
I tried just downloading in github and unziping, but then had 4 errors during the visual studio build
C1128 number of sections exceeded object file format limit: compile with /bigobj
D8040 error creating or communicating with child process
Link1181 cannot open input file ....\modules\RelWithDebinfo\modules.lib
Linkk1181 cannot open inout file ....\modules\RelWithDebinfo\modules.lib
Aha! I also had the bigobj error yesterday! I suspect that you are also using quite some mods, because this error occurs when the amount of files in "modules" becomes larger than expected. The solution is really simple!! I made a short video where I show this: 15 SEC VIDEO.
Before you start the build process, right click on modules in the sidebar on the right, and in the new window open C/C++ and then Command Line. Now add /bigobj at the end of the line that is shown under additional options. It took me two tries, but the second time the server compiled just fine.
Thank you, I will try this today. This and playerbot are the only modules that I am attempting at the moment. Do you know why it gives me issues when I try and do the git command that I mentioned also? You have been awesome and really appreciate all the help!!!
Looking at my studio, I don't have the C++ options, is that something I missed to install during the procedure? I didn't see that separately as one of the requirements.
So ignore me not seeing the C++, I saw you clicked under modules. So i did the bigobj add, no errors. but it seems that the AH bot isn't working, even though the visual studio built it with no problem this time.
Great to hear that you didn't run into any errors this time. The AHBot does need some additional steps to get it to work. You will need to create a dedicated account for the AHBot. Let's call it AHBOT. then login, and create a character. Doesn't matter what faction or race. Login in once with that character, and log out again. Never again log in with that character! Then you need to figure out the GUID of the character you just made, cause we need to add this to the configuration file for AHbot. You can do this in HeidiSQL, or from inside the game when you are logged in with your regular account that has GM rights. In chat type: .lookup player account ahbot. It should show you something like this:
Characters at account AHBOT (Id: 6)
Ahbot (GUID 5007) - Human - Dwarf - 1
Remember the GUID, and then open the config file for AHBot, which should be in a subfolder where your server is stored /configs/modules. If you haven't already, first copy mod_ahbot.conf.dist to mod_ahbot.conf. Open this file with notepad, scroll down a bit and search for: AuctionHouseBot.EnableSeller = FALSE. Change this value to TRUE. Two lines below that you'll see AuctionHouseBot.GUIDs = . There you will need to put the GUID we found in the previous step, in this example it would be: AuctionHouseBot.GUIDs = 5007, but yours will be different. Optionally you can choose to enable the buyer also. It's in the same config file under AuctionHouseBot.Buyer.Enabled. Save the config file, start/restart your server, and after some time you will see items appear in the auction house. Give it some time though. Have fun!
Sorry to burden you once more, do you have a discord? I did all you said for AHbot, but it never loads. The visual studio gave no errors on the build. In Cmake, i see playerbot module and AHbot moduel, but when i start the server, I never see the ahbot module load.
Hey I followed your tutorial on YouTube and am getting stuck in VisualStudio, I was able to clear up most errors with the /bigobj fix from your comment, however I still have an error code MSB6003 saying "rc.exe" could not run as the filename or extension is too long. I have done some troubleshooting myself some forum said to shorten the extension by copying the rc.exe and its pairing file from windows sdk bin file to the visual studio bin file but that didn't work, I've also tried to go into the project properties of the world server to add /bigobj to see if that could maybe allow it to be a larger file but im not even sure if that's where the rc is, im not too good at computers and I feel stuck
Well, this is awkward... I ran into exactly the same error today. I googled it a bit, but didn't find anything useful besides changing a variable in the Windows registry. Then I asked ChatGPT, and it informed me that the path to rc.exe is not so much what exceeds the limit, but files inside the repository that are handled by rc.exe do. Its advice was to move the source folder to a different location, preferably as short as possible. For example: C:\ac\azerothcore-wotlk. It also told me to reset the VS Developer Command Prompt, and this can be done by running a bat file named VsDevCmd.bat, which can be found in: C:\Program Files\Microsoft Visual Studio\2022\Community\Common7\Tools. In case you're interested, here is the translated response. So, I'm currently trying again, hopefully ChatGPT wasn't talking out of its ass. I'll get back to you on this as soon as I know more.
GOOD NEWS EVERYONE! Shortening the path where you store the source folder fixes the error described here earlier by Kadyn.
Sorry Andre, not sure if you saw my final comment. Everything seems to go well, but the module never loads. I see it in C-Make, I see it in Visual Studio and complete with no errors, and then when I launch the server, it never shows it loading, nor does it show up in game. Any thoughts on why the module doesn't load even though there aren't any errors in the build?