
In a recent post ↗, I showed how to set up a AzerothCore server with PlayerBots on Windows. In this post, we're going to do exactly the same thing, but this time on a Linux machine. On Ubuntu 24.04 to be more specific.

On Windows, it took forever to install all the required apps. On Linux, this bit is a gazillion times faster and easier. Open up a console, and paste in the following line:
sudo apt-get update && sudo apt-get install git cmake make gcc g++ clang libmysqlclient-dev libssl-dev libbz2-dev libreadline-dev libncurses-dev mysql-server libboost-all-devOnce this process is complete, your server will have all the requirements it needs to build your realm.
Decide where you want to store all the files that will make up your server. You can pick any location you prefer, and a location like /home/username/wowserver for example, would make sense. In this tutorial, I've chosen to store everything in /games/wow. If you want to follow my example, you first need to create this folder using: sudo mkdir -p /games/wow, and then take ownership of this folder with your account: sudo chown -R yourusername: /games
Whatever you choose to use, simply cd in to that folder (cd /games/wow), and clone the AzerothCore repository with this git command:
git clone https://github.com/mod-playerbots/azerothcore-wotlk.git --branch=PlayerbotNow cd in to the subfolder modules inside the azerothcore-wotlk folder.
cd azerothcore-wotlk/modulesAnd from here, clone the PlayerBots repository.
git clone https://github.com/mod-playerbots/mod-playerbots.git --branch=masterWhilst we are here, in the subfolder modules, this would be a perfect time to install some more modules besides PlayerBots, if you wish to do so. To incorporate modules, do the same as we did in the previous step. Simply "git clone" the Github URL inside the folder "modules".
An overview of modules that you could use, can be found on this web page ↗. Don't go crazy and install a ton of modules. Keep in mind that every module you choose to use, can potentially cause issues when you're going to compile the server later on. Here is a list of modules that I have found to be fun, and haven't caused any problems for me.
My personal recommendation would be to use the modules AH-BOT-PLUS, MOD-ASSISTANT, NPC-BEASTMASTER, MOD-NO-HEARTHSTONE-COOLDOWN, MOD-TRANSMOG, MOD-JUNK-TO-GOLD, MOD-LEARNSPELLS and MOD-DUNGEONMASTER. Please be aware, that almost every module, will require additional manual steps later on. Many modules come with separate instructions, telling you to manually add extra tables to your databases. So be sure to check the README file in each of the module folders. If this sounds very complicated to you, perhaps skipping any additional modules might be a good choice at this moment.
It's time finally start the actual build process. Create a folder named "build" inside your azerothcore-wotlk folder. Assuming you are still in the folder modules, first go one folder up, and from there create the build folder, and then cd into the build folder.
cd ..
mkdir build
cd buildIn this next step, we're going to use CMake to generate our build files. (Please note that when you later on choose to update your server, or want to try new modules, this step, and the ones coming after, will all need to be performed again). Cmake has a variety of variables that you can use, if you require any. A complete list of these variables can be found here ↗. I usually only specify the folder where I want my server files to reside.
Make sure you change the DCMAKE_INSTALL_PREFIX variable below to the folder location that you want to store all the server files in. In this example, I've chosen the folder /games/wow/azc-wotlk-playerbots.
cmake ../ -DCMAKE_INSTALL_PREFIX=/games/wow/azc-wotlk-playerbotsThis should only take a couple of seconds to complete. Unlike the next part, because this next step will in fact take quite some time, and it will also consume most, if not all, your available processing power resources.
make -j$(nproc)While you wait for this process to complete, you now have some time to do something meaningful with your life. Or, you could at least go outside for a few moments to inhale a fresh breath of air, and touch some grass, maybe.

By the time you get back, the process is probably done. The last couple of lines should show that it reached 100%, and successfully completed the build process. This next line, will copy all the server files to the folder we specified earlier.
make installNow that all the server files are in place, it's time to set up our databases.
The databases are what will store the data for your server, categorized in four separate databases. One database will store all the account details, so this database is queried whenever somebody is logging in. The second database will store data that is saved for every single character on the server. This includes for example how much gold a character has, which mounts, what achievements, reputation percentages, etc etc. The third, and by far the largest database, stores all the data on the world itself. So basically everything else is stored in there. It can be interesting to browse this database with HeidiSQL, just to see what and how all this data is neatly tucked away in large tables. Being a huge nerd like me, greatly helps to find such things actually interesting. AzerothCore runs on these three databases, but since we are using the PlayerBots module, an additional database is used, that stores all the data related to the PlayerBots.
Below, I show two entirely different methods to create the databases. Only use one of these methods, because in the end, the results will be exactly the same.
In case you are using a desktop environment, I suggest you download and install HeidiSQL before you continue. This will make your life a little bit easier.
wget https://github.com/HeidiSQL/HeidiSQL/releases/download/v12.14.1.1/heidisql_12.14.1.1_amd64.debBefore installing HeidiSQL, install these libraries that HeidiSQL wants to have installed.
sudo apt install sqlite3 libpq5 libsybdb5 freetds-common -yNow install HeidiSQL.
sudo dpkg -i heidisql_12.14.1.1_amd64.debIn my video, you can see how you can easily create users and databases in MySQL using the HeidiSQL client. But, for those who are installing this on a dedicated server, without a desktop environment, like a VPS for example, below are instructions on how to create a user and the databases from the command line.
You may, or may not, first want to run mysql_secure_installation, that's up to you.
sudo mysql_secure_installationThe following command will grant you to access the MySQL cli.
sudo mysqlLet's start by configuring MySQL so that you will be able to log in to it, with a password, using the root account. Make sure you choose something different as 'yourpassword' here. This step is optional by the way, and not required. But, in my experience, it makes things easier when you are able to log in as root from HeidiSQL, so you can manage all the rights of the other database users.
ALTER USER 'root'@'localhost' IDENTIFIED WITH mysql_native_password BY 'yourpassword';
FLUSH PRIVILEGES;Here, we're creating a new MySQL user, named "acore", with a default password "acore". Obviously, it would better to use a different username and password here.
CREATE USER 'acore'@'localhost' IDENTIFIED BY 'acore';These next few lines will create a total of four new databases to your MySQL.
CREATE DATABASE acore_wotlk_auth;
CREATE DATABASE acore_wotlk_chars;
CREATE DATABASE acore_wotlk_world;
CREATE DATABASE acore_wotlk_playerbots;These next few lines will grant the user "acore", that we just created, access to these databases.
GRANT ALL PRIVILEGES ON acore_wotlk_auth.* TO 'acore'@'localhost';
GRANT ALL PRIVILEGES ON acore_wotlk_chars.* TO 'acore'@'localhost';
GRANT ALL PRIVILEGES ON acore_wotlk_world.* TO 'acore'@'localhost';
GRANT ALL PRIVILEGES ON acore_wotlk_playerbots.* TO 'acore'@'localhost';
FLUSH PRIVILEGES;
EXIT;Now that the databases are created, and a user that has enough rights to use them, we can continue to the next step! If you made it up to this point, you're doing great! The hardest part is over now.
If you like to torture yourself (not judging, you do you), the next step would be to manually generate the data files by using the tools we've built earlier, and which can be found in the "bin" folder. If you prefer this, make sure to read this page ↗, so you know what you're doing. Fair warning, this is a very, very lengthy process. I'm not a fan of this method, so I prefer to simply download these files from: https://github.com/wowgaming/client-data/releases ↗
It doesn't really matter where you unzip the Data.zip file, as long as you point to it in your worldserver.conf file. But more on that later on. A logical location to store these files would be a folder named data, inside the folder that contains your server files. Let's create this folder first. First I cd into the folder that contains my server files (cd /games/wow/azc-wotlk-playerbots in my case), and then create a new folder named "data".
mkdir data
cd dataHere's how to download the zip file from the command line:
wget https://github.com/wowgaming/client-data/releases/download/v19/Data.zipOnce it has downloaded, unzip the file.
unzip Data.zipAnd optionally remove the zip file, to save some storage space.
rm Data.zipNow that the data files are in place, we can continue to the final chapter, our last steps, configuring the server.
You probably already noticed that your server folder, contains two folders. One named bin, and one named etc. The bin folder contains the executable server files, that actually run the server, and the etc folder contains configuration template files. We need to copy these templates to new files first, before we can start editing them. So, cd into your etc folder (cd /games/wow/azc-wotlk-playerbots/etc), and perform these commands:
cp authserver.conf.dist authserver.conf \
cp worldserver.conf.dist worldserver.confWe need to do the same thing for any template files in the modules sub folder (ls -la modules)
cp modules/playerbots.conf.dist modules/playerbots.confDo the same things for any other template files you find in the modules folder. This obviously depends on what modules you've included earlier on.
We need to set the correct database variables in our newly created authserver.conf, worldserver.conf and modules/playerbots.conf. Use whatever text editor you prefer to open these files, for example nano.
nano authserver.confLook for the lines that show the database variables, and set them according to what you've chosen earlier. In this example I created a database named "acore_wotlk_auth" and a user named "acore", with the password "acore". So for me the correct way to set these lines would be this:
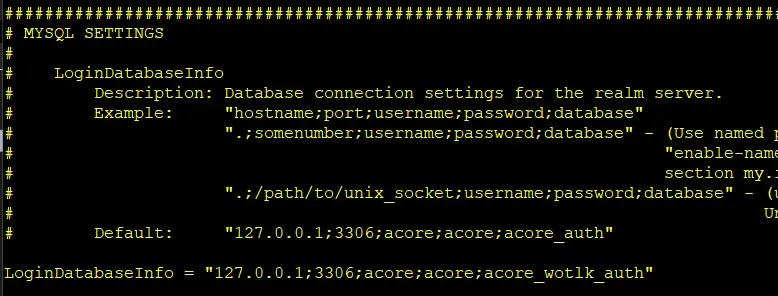
While we are editing this file, you might as well set some other variables, for example the LogsDir, to your liking. To save and close the file in nano, use "CTRL+X", then enter "Y" when asked to save modified buffer, and then hit "enter" to overwrite the current file.
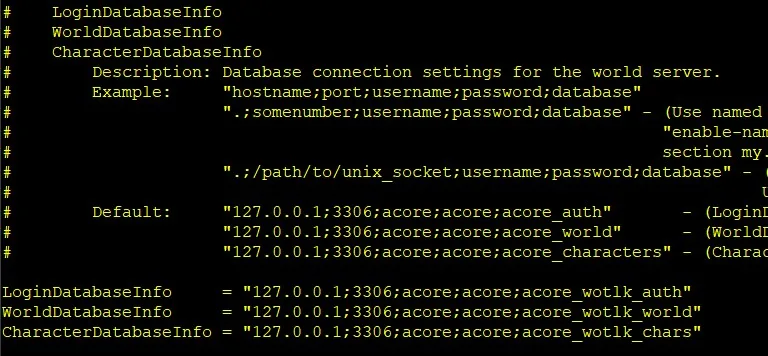
Now do the same for the worldserver.conf file.
nano worldserver.confIn the worldserver.conf file, we're also going to specify the database details, alongside a couple of other variables that you may also want to change. In my case, I didn't have to change much to have it look like this example:
Next, find the line that says: DataDir = ".", and set it to where you unpacked the data files. For example DataDir = "/games/wow/azc-wotlk-playerbots/data"
The option below that, is LogsDir, and this allows you to specify a logs folder, which I always like to set to something like /games/wow/azc-wotlk-playerbots/logs.
The rest of the options you will find in this file are entirely up to you to set to whatever you like. I strongly advise you to go through this file thoroughly, because it holds a lot of options that you can change to your liking, to have the server behave exactly as you want. For example; at what level do new players start, or the XP rate, or at what level players are allowed to use mounts, and much, much more.
That leaves one more file to edit, in the modules folder, for the PlayerBots.
nano modules/playerbots.confSearch for the lines regarding the database details, near the bottom of the file, and change them suitably.
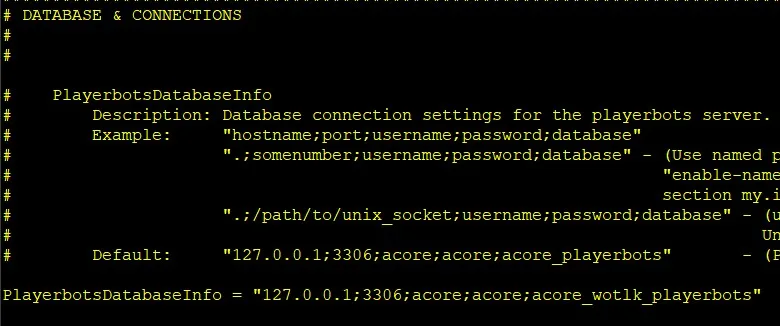
What I said earlier, about it being wise to go through the worldserver.conf file thoroughly, the same thing, even more so, goes for the playerbots.conf file. You can set all sorts of options, to control the PlayerBots behaviour in-game. With important options being things like; how many bots you want to enable on your server. You can of course do some experimenting with all these options, to find out what options you prefer, but keep in mind that the server needs to be restarted after you made any changes to this file. Check out the video I made to get a glimpse of how I prefer to set these options, or copy it directly from here ↗.
We should now be set to get the server up and running.
The two executable files that make up the server are stored in the "bin" folder as mentioned earlier. Start by running the authserver.
cd bin
./authserverStarting the authserver should only take a second, and if all went well, you should see some lines that the database is being populated. Now that we ran it one time, we can edit the realm-name and IP address of your server in the database. But first, stop the authserver process by entering CTRL+C.
Setting the correct IP address is especially important if you want run the server on a different machine, or if you want to make it accessible to the internet. If you can, use HeidiSQL for this, cause it will only take a second. (Open the auth database on the left, then open the table RealmList, then go to the tab named Data, and from there change the server address, and set it to the correct IP address. (In the video I show this in detail).
Or you can use this to achieve the same thing from the command line. First, login to MySQL:
sudo mysqlThen we open the database that we've set for the authserver. In this example acore_wotlk_auth.
use acore_wotlk_auth;Before blindly copy/pasting the next part, please make sure you edit these lines, so it will reflect your needs. You will probably want to change 'WotLK-Playerbots' to whatever you want to name your realm. And you MUST change '192.168.X.X' to whatever the IP address of your server is. (To find out the IP of your server, enter this in your console: ip addr)
DELETE FROM realmlist WHERE id=1;
INSERT INTO realmlist (id, name, address, port, icon, flag, timezone, allowedSecurityLevel)
VALUES ('1', 'WotLK-Playerbots', '192.168.X.X', '8085', '1', '0', '1', '0');
EXIT;If you see this error message: ERROR 1054 (42S22): Unknown column 'flag' in 'field list' after entering the previous command, then please remove "flag", and replace it with "realmflags", as shown below.
Check out this comment for more information. Thank you Brian for reporting this issue.
DELETE FROM realmlist WHERE id=1;
INSERT INTO realmlist (id, name, address, port, icon, realmflags, timezone, allowedSecurityLevel)
VALUES ('1', 'WotLK-Playerbots', '192.168.X.X', '8085', '1', '0', '1', '0');
EXIT;Your authserver is now fully set up, so that leaves the worldserver. From the "bin" folder, run it like so:
./worldserverThe first time you run it, it's going to populate the databases with a bunch of information, and this results in a long wait to complete the startup process. Just let it do its thing, and wait for the moment where you get to see the server prompt. Once you see AC> , your server is up, and you can press enter to create an account for yourself.
Here's how to create an account, with GM rights, for yourself. Obviously replace USERNAME and PASSWORD with something else.
account create USERNAME PASSWORDThen you might want to specify that your account has access to the WotLK expansion content. (0=Vanilla, 1=TBC, 2=WotLK)
account set addon USERNAME 2To grant your account the rights of a GM (GameMaster), enter this line next:
account set gmlevel USERNAME 3 -1Here the number 3 sets the rights of the account, where 3 is the max. And the -1 specifies that this change should be done on all your realms. Now you're all set to login to your server and start playing the game!
In case you don't have the WotLK client yet, download it ↗, and unpack it to any folder you like. Then open this folder, and proceed to open the Data folder, and the enUS folder. In this folder you'll find a file named realmlist.wtf. Open this file with a text editor, like Notepad, and set the realm address to the IP address of your server. Save the file, go back two folder up, where WoW.exe is, and run it.
This was another, simply awesome, and easy to follow, tutorial by uStOoPia. Hopefully it was useful to some of you. Don't hesitate to leave any questions or remarks in the comments below! Have fun!!


[ 5%] Built target gsoap
make: *** [Makefile:136: all] Error 2
idk what the problem is?
Kubuntu 25?
Sorry, but this error message is too vague for me to understand what is going wrong on your end. Do you have any more information for me? Maybe the entire log of the make process?
Hello there,
fantastic guide. Thanks so much for putting this together! I'm running into a snag under the RUN SERVER section and was wondering if you could help. I have been doing everything through MySQL. When I attempt to input this step below (with my preferred name and IP)...
INSERT INTO realmlist (id, name, address, port, icon, realmflags, timezone, allowedSecurityLevel) VALUES ('1', 'WotLK-Playerbots', '192.168.X.X', '8085', '1', '0', '1', '0');
MySQL shows ERROR 1054 (42S22): Unknown column 'realmflags' in 'field list'
Do you know any way to correct this? Thank you!
Yes I do! Or, I think I do 🙂 Try replacing "realmflags" with "flag" and you should be good!
To be entirely sure, you could use MySQL to check all the correct names of the columns inside the realmlist table. Assuming you're already logged in to the MySQL cli, simply do the following:
use acore_wotlk_auth; (or whatever you have named your database). Then type:
DESC realmlist;
Now you should see all the info for the realmlist table. Under the header FIELD, you'll either see 'realmflags' or 'flag'. My guess is that it will show flag in your case. Once you've confirmed the correct name, use that name in the INSERT INTO command you mentioned.
If that doesn't work, let me know, then we can try some other things.
Thank you for leaving this comment by the way! Because I think they may have changed the naming of this column in newer releases, so I'm going to check to be certain, and edit the tutorial accordingly. So, thanks. Let me know if this solved your issue please!