
IMPORTANT UPDATE! These guides may be outdated. Please see the new guide here:
https://www.ustoopia.nl/featured/nginx-rtmp-hls-ssl-videojs-on-ubuntu-18-04/
I made a couple of YouTube video's with some instructions on how to set up your own private live-stream server using Nginx running on Ubuntu 18.04. . Click on the CONTINUE READING link below to see a copy of the variables that I used in the video's. You can also find it on my Pastebin if you prefer.

I'm assuming you have already installed Ubuntu 18.04. If not, please take a look at this following video first.
FIRST INSTALL THESE USEFUL / REQUIRED PACKAGES
sudo apt-get install wget unzip software-properties-common dpkg-dev git make gcc automake build-essential zlib1g-dev libpcre3 libpcre3-dev libssl-dev libxslt1-dev libxml2-dev libgd-dev libgeoip-dev libgoogle-perftools-dev libperl-dev pkg-config autotools-dev gpac ffmpeg mediainfo mencoder lame libvorbisenc2 libvorbisfile3 libx264-dev libvo-aacenc-dev libmp3lame-dev libopus-dev unzip
ADD THE NGINX REPOSITORY AND UPDATE
sudo add-apt-repository ppa:nginx/stable
apt update
INSTALL NGINX
sudo apt install nginx
INSTALL THE RTMP MODULE
sudo apt install libnginx-mod-rtmp
CLONE THE RTMP GIT
cd /usr/src
git clone https://github.com/arut/nginx-rtmp-module
COPY THE STAT.XSL FILE TO YOUR WEB FOLDER
cp /usr/src/nginx-rtmp-module/stat.xsl /var/www/html/stat.xsl
CREATE A NEW FILE CALLED CROSSDOMAIN.XML IN YOUR WEB FOLDER
nano /var/www/html/crossdomain.xml
PASTE THIS IN THE NEW FILE AND SAVE IT
<?xml version="1.0"?>
<!DOCTYPE cross-domain-policy SYSTEM "http://www.adobe.com/xml/dtds/cross-domain-policy.dtd">
<cross-domain-policy>
<allow-access-from domain="*"/>
</cross-domain-policy>
EDIT THE NGINX CONFIG FILE
nano /etc/nginx/nginx.conf
AT THE END OF THE FILE ADD THIS
rtmp {
	server {
	listen 1935;
	chunk_size 4096;

	application live {
		live on;
		record off;
		interleave off;
		wait_key on;
		meta on;
		wait_video off;
		idle_streams off;
		sync 300ms;
		session_relay on;
		#allow publish 127.0.0.1;
		#allow publish 192.168.2.0/24;
		allow publish all;
		#deny publish all;
		allow play all;

# EDIT THESE SO THE LIVESTREAM_KEY IS REPLACED BY YOUR PERSONAL KEY THAT YOU CAN LOOK UP ON THE SITE OF THE PLATFORM.
# push rtmp://live-ams.twitch.tv/app/LIVESTREAM_KEY;
# push rtmp://a.rtmp.youtube.com/live2/LIVESTREAM_KEY;
# push rtmp://ingest-ams.mixer.com:1935/beam/LIVESTREAM_KEY;
		}
	}
}
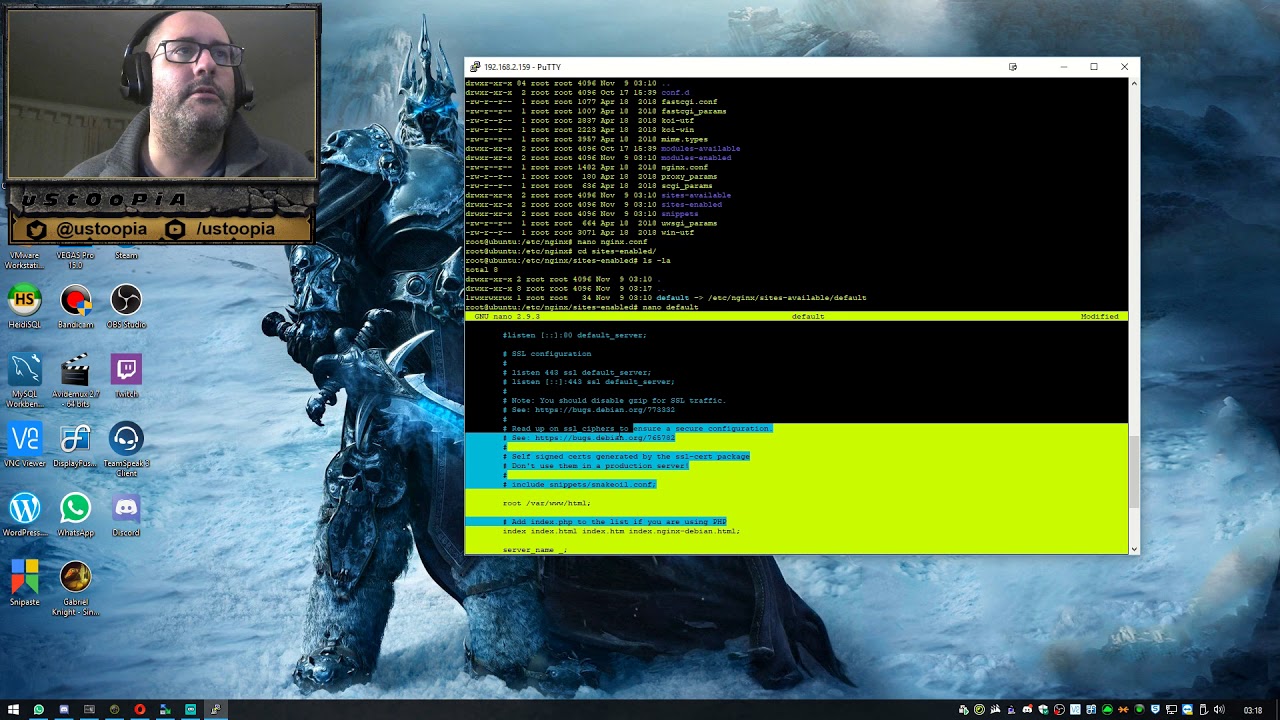
EDIT THE DEFAULT SITE CONFIG
nano /etc/nginx/sites-enabled/default
SEARCH FOR THE FOLLOWING LINES:
#location ~ /.ht {
# deny all;
AND DIRECTLY UNDER IT PASTE THE FOLLOWING
location /stat {
rtmp_stat all;
rtmp_stat_stylesheet stat.xsl;
}
location /stat.xsl {
root /var/www/html/;
}
#location /control {
# you'll need a htpasswd auth file, that's outside the scope of this doc but any apache one will work
# auth_basic "stream";
# rtmp_control all;
#}
SO THAT IT WILL LOOK SOMETHING LIKE THIS AFTER PASTING:
# deny access to .htaccess files, if Apache's document root
# concurs with nginx's one
#
#location ~ /.ht {
# deny all;
#}

location /stat {
rtmp_stat all;
rtmp_stat_stylesheet stat.xsl;
}
location /stat.xsl {
root /var/www/html/;
}
#location /control {
# you'll need a htpasswd auth file, that's outside the scope of this doc but any apache one will work
# auth_basic "stream";
# rtmp_control all;
#}
}

# Virtual Host configuration for example.com
YOU ARE DONE SETTING UP THE SERVER. HAVE A LOOK AT THE WIKI OF THE RTMP MODULE WEBPAGE TO LEARN HOW TO USE DIFFERENT VARIABLES TO FURTHER SET UP YOUR SERVER. https://github.com/arut/nginx-rtmp-module


How to Live Stream to Multiple Services with a RTMP Server ?
Ex: 1. 192.168.2.23/live as key: stream
2. 192.168.2.23/live1 as key: stream2
Hey Dre,
I just went through your setup instructions. Good work! Everything worked right away. As always, I had tried a lot before. Super structured and good job. A big thank you.
Thank you for your kind words. That really means a lot! Glad I could help.
thx bro! awsome!
Hi,
I love your videos, i have built a streaming server thanks to you!! It is set up at the moment to record the stream... how do i record it as an mp4 , which i would then be able to play vod? maybe do a video on this??
thanks again
Andrew
It is in the making! 🙂 I've had more questions on this subject. Subscribe to my youtube and keep an eye out for new video's.
Untill then... to get you going. It is easier to record the livestreams in the default flv format and use ffmpeg to convert the flv to an mp4 at the moment you stop streaming/recording.
Under your application name in the nginx.conf file you need to add the recording variables, but I'm assuming you already have those. If not, it should look something like this:
application live {record all;
record_suffix all-%d-%b-%y-%T.flv;
record_path /var/livestream/recordings/flv; # choose where to save the recordings
record_max_size 4096M;
exec_record_done /usr/bin/ffmpeg -i $path -f mp4 /var/livestream/recordings/mp4/$basename.mp4;
}
Especially the last line is important to have the mp4 files created.
Thank you sooooo much !! it works!! final question... for now 🙂 my saved file name is this......
stream-1604109650-31-Oct-20-02:00:50.mp4
what the heck is the "stream-1604109650" part??
cheers
Andrew
This is the secret code that you will need to open the hatch on the deserted island that you haven’t yet ended up on. So you might wanna keep it some place safe!
All kidding aside. I have no idea how you got that filename. Perhaps have another look at the part that defines the filename in your config. Under record_suffix
Most probably your stream name is “stream” and record unique file name is set to true, so “-unix timestamp”…