
6-8-2023 UPDATE: I wrote a new tutorial, suited for Ubuntu 22.04. Go to the new tutorial.
24-07-2023 UPDATE: Before you read/follow this tutorial, I want to inform you of something important. In case you follow this tutorial, there’s a big chance you won’t be able to get the adaptive streams to work correctly. I don’t know exactly why or what has changed, but I believe the audio codec is no longer used by FFmpeg. This issue can easily be resolved by using AAC codec instead.
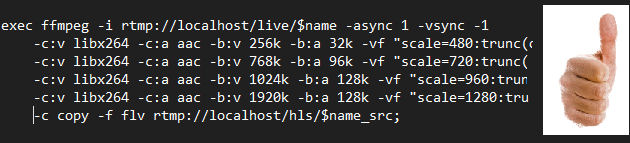
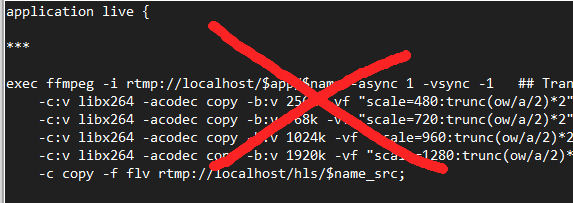
Editing some lines in the nginx.conf file will accomplish this. They are located roughly around line number 84, if you used the example from this tutorial. Somewhere under the /live application search for the lines that look like the image.
Replace the lines starting at “exec ffmpeg” and ending with $name_src with the lines below:
exec ffmpeg -i rtmp://localhost/live/$name -async 1 -vsync -1
    -c:v libx264 -c:a aac -b:v 256k -b:a 32k -vf "scale=480:trunc(ow/a/2)*2" -tune zerolatency -preset veryfast -crf 23 -f flv rtmp://localhost/hls/$name_low
    -c:v libx264 -c:a aac -b:v 768k -b:a 96k -vf "scale=720:trunc(ow/a/2)*2" -tune zerolatency -preset veryfast -crf 23 -f flv rtmp://localhost/hls/$name_mid
    -c:v libx264 -c:a aac -b:v 1024k -b:a 128k -vf "scale=960:trunc(ow/a/2)*2" -tune zerolatency -preset veryfast -crf 23 -f flv rtmp://localhost/hls/$name_high
    -c:v libx264 -c:a aac -b:v 1920k -b:a 128k -vf "scale=1280:trunc(ow/a/2)*2" -tune zerolatency -preset veryfast -crf 23 -f flv rtmp://localhost/hls/$name_higher
    -c copy -f flv rtmp://localhost/hls/$name_src;
Don’t forget to test your config by entering: nginx -t, and to restart it with: sudo systemctl restart nginx. I am currently putting together a new, improved and updated tutorial for Ubuntu 22.04, so keep an eye out for this during the next couple of weeks.
I wrote a new guide on setting up your own live-stream server. Mostly due to your requests. I took the opportunity to simplify the guide a bit. If you follow this guide step by step, and use your brain at times that it’s required, you’ll be fine. This guide has been tested on three occasions, and it works 100%.

Before we begin I want to make something clear. Creating your own live-stream server like this can not be compared by using a streaming platform like Youtube or Twitch. They use a worldwide network to deliver their content, and we’re just using 1 server. That means that it matters where the server is located. If you host a server in Japan, it may not be as fast as you hoped in Ireland. Also keep in mind that when you decide to host your server from your home, that you bandwidth is limited. This can seriously affect your upload speed, especially when you have more then a handful of viewers. To allow more viewers you should host it in a VPS or dedicated server preferably that is in a datacenter with a >500mbps connection. The downside of that is that it might no be powerful enough to do all the transcoding ánd deliver the content to viewers. In other words, this setup is not suited to host a live-stream server to completely replace Youtube or whatever platform. So what is it good for then? For me personally I just use it to re-stream. So I don’t need the transcoding of my stream since I can just forward the RTMP stream to Youtube & Twitch. Also this setup will be fine when you’re using it below 100 viewers, and if the hardware is not from the year 0. And, it can also be used as a primary hub that you stream to and from there it gets distributed to several other servers located at different parts of the world. This can be VPS servers that you rent, or an already existing CDN. That last thing is actually exactly what I’ve been fooling around with, just for fun. Anyways, hopefully all this meets your requirements.
Introduction
In this guide we’ll be setting up a live-stream server on Ubuntu 20.04 powered by Nginx+RTMP mod, and we’ll be using FFmpeg to transcode incoming RTMP streams to several outgoing HLS, adaptive bit-rate streams, or ABS in short, that will allow the most optimal, smooth playback on any type device/screen, even on slow, low-bandwidth internet connections.
Requirements
I’ll assume that you have already done a clean basic install of a server running at least Ubuntu 20.04. You can choose to run the server on an older, spare PC, or a Virtual Machine, or a rented VPS, or a dedicated server perhaps even, or… and I personally did this often times, use a laptop that you don’t really use anymore, one that has a h264 Nvenc capable Nvidia GPU chip in it gives you the option the do all the encoding on your server with the GPU, freeing up a lot of CPU power for other tasks. More on that in a future article. At least a Core i5 is advised, with either 4GB of RAM, but preferably 8GB, or more. More is always better! (One can never have too much RAM).

It is essential that you open or forward ports 80 and 443 in your firewall/router and point it to your server. If you want to allow others to stream to your server from the internet port 1935/udp for RTMP must also be pointing to your server. This is the very first thing you must do before you do anything else. Instructions on how to do this are beyond the scope of this guide. On this site you can test if you have successfully opened the specified ports: www.canyouseeme.org
0. Preparing the server
We’re going to set a proper host name for the server first, ideally a FQDN, as this will be a requirement to successfully set up certificates for HTTPS later on. You can get a dynamic DNS domain name for free at no-ip.org to name just one. In this how-to guide I’ll be using a dummy example addresses like: “yourdomain” or “example.com”. Now please make sure that from this point on you will replace every line that contains this address with the actual address of your server. I’m not going to repeat this so please keep this in mind and pay attention to it.
We’re gonna start by installing Nginx and the RTMP module for Nginx, and Certbot. We ‘re also installing a whole bunch of things that we will be needing or using later on. Let’s first get the server up to date.
sudo apt update && sudo apt upgrade -y
1. Installing Nginx + RTMP module and a bunch other stuff
sudo apt-get install wget unzip software-properties-common dpkg-dev git make gcc automake build-essential zlib1g-dev libpcre3 libpcre3-dev libssl-dev libxslt1-dev libxml2-dev libgd-dev libgeoip-dev libgoogle-perftools-dev libperl-dev pkg-config autotools-dev gpac ffmpeg mediainfo mencoder lame libvorbisenc2 libvorbisfile3 libx264-dev libvo-aacenc-dev libmp3lame-dev libopus-dev -y
Time to install Nginx and the RTMP module and Certbot. Be sure you don’t have anything else like Apache running on port 80 as it will conflict resulting in that Nginx will not start.
sudo apt install nginx -y
sudo apt install libnginx-mod-rtmp python3-certbot-nginx -y
2. Manually create these folders and files
We now have the libnginx-mod-rtmp module installed, but it doesn’t include a specific file that is needed to show a statistics web-page for you live-streams. Cause stats are cool of course, but more importantly, it is an essential tool to see if your streams are working. In case you ever need to troubleshoot an issue with a stream this is a handy tool. We’re going to obtain it from the official libnginx-mod-rtmp github repository. But first, we need to create the folder that we are going to copy this file to. This happens to be the same folder as we’ll be using as root folder for our video web-player files. And perhaps also a WordPress site later on. Oh yeah, you’re going to need a domain name that is pointing to the IP address of your server in DNS. Create these folders but be sure to replace “yourdomain” with whatever domain name you’ll be using.
sudo mkdir -p /var/www/yourdomain/web/js/videojs

sudo mkdir -p /var/livestream/hls /var/livestream/dash /var/livestream/recordings /var/livestream/keys

sudo ln -s /var/livestream/hls /var/www/yourdomain/web/hls
sudo ln -s /var/livestream/dash /var/www/yourdomain/web/dash

sudo chown -R www-data:www-data /var/livestream /var/www/yourdomain
cd /usr/src
sudo git clone https://github.com/arut/nginx-rtmp-module
Now let’s copy the stat.xsl file to your website’s root folder, and also to the default web folder .
sudo cp /usr/src/nginx-rtmp-module/stat.xsl /var/www/html/stat.xsl
sudo cp /usr/src/nginx-rtmp-module/stat.xsl /var/www/yourdomain/web/stat.xsl
Now we’re going to create a new file in he same folder and paste the lines below and save the file.
sudo nano /var/www/html/crossdomain.xml
<?xml version="1.0"?>
<!DOCTYPE cross-domain-policy SYSTEM "http://www.adobe.com/xml/dtds/cross-domain-policy.dtd">
<cross-domain-policy>
<allow-access-from domain="*"/>
</cross-domain-policy>
sudo cp /var/www/html/crossdomain.xml /var/www/yourdomain/web/crossdomain.xml
The following will create a temporary index.html file in your root web folder that is needed for setting up certificates later on.
sudo cp /var/www/html/index.nginx-debian.html /var/www/yourdomain/web/index.html
We need to tell Nginx that it has to use a different config file for handling all the requests that it will receive when using your domain name in a browser. For this we’re going to create a separate, new virtual host config file. Continue with the next step to do so.
3. Set a basic Nginx setup for certificate requests
In order to get valid certificates we need to use a hostname and run a website on it so that Letsencrypt can validate it. An IP address won’t do, so make sure you actually use a hostname in the next config file.
sudo nano /etc/nginx/sites-available/yourdomain.conf
Copy and paste the following in this new file, and pay attention to the code because you will need to replace a couple of lines so it shows your own domain name in stead of “yourdomain”.
server {
	listen 80;
	listen [::]:80;

	server_name YOUDOMAIN;				# << EDIT THIS! (Example: hostname.example.com)
	root /var/www/YOURDOMAIN/web;			# << EDIT THIS! (Example: /var/www/example.com/web)

	index index.html index-nginx.html index.htm index.php;
	client_max_body_size 8192M;
	add_header Strict-Transport-Security "max-age=63072000;";
	add_header X-Frame-Options "DENY";

	location / {
		add_header Cache-Control no-cache;
		add_header Access-Control-Allow-Origin *;
		try_files $uri $uri/ =404;
		}
    location /crossdomain.xml {
		root /var/www/html;
		default_type text/xml;
		expires 24h;
		}
	location /control {
		rtmp_control all;
		add_header Access-Control-Allow-Origin * always;
		}
    location /stat {
		rtmp_stat all;
		rtmp_stat_stylesheet stat.xsl;
		#auth_basic Restricted Content;		# Create a valid .htpasswd before uncommenting this.
		#auth_basic_user_file .htpasswd;	# Create a valid .htpasswd before uncommenting this.
		}
    location /stat.xsl {
		root /var/www/YOURDOMAIN/web;		# << EDIT THIS! (Example: /var/www/example.com/web)
	}
	location ~ /.ht {
		deny all;
		}
    location /hls {
		types {
		application/vnd.apple.mpegurl m3u8;
		video/mp2t ts;
		}
		autoindex on;
		alias /var/livestream/hls;			# << Take note of this line. Change it when required.

		expires -1;
		add_header Strict-Transport-Security "max-age=63072000";
		add_header Cache-Control no-cache;
		add_header 'Access-Control-Allow-Origin' '*' always;
		add_header 'Access-Control-Expose-Headers' 'Content-Length';
		if ($request_method = 'OPTIONS') {
		add_header 'Access-Control-Allow-Origin' '*';
		add_header 'Access-Control-Max-Age' 1728000;
		add_header 'Content-Type' 'text/plain charset=UTF-8';
		add_header 'Content-Length' 0;
		return 204;
		}
	}
        location /dash {
		types{
		application/dash+xml mpd;
		video/mp4 mp4;
		}
		autoindex on;
		alias /var/livestream/dash;			# << Take note of this line. Change it when required.

		expires -1;
		add_header Strict-Transport-Security "max-age=63072000";
		add_header Cache-Control no-cache;
		add_header 'Access-Control-Allow-Origin' '*' always;
		add_header 'Access-Control-Expose-Headers' 'Content-Length';
		if ($request_method = 'OPTIONS') {
		add_header 'Access-Control-Allow-Origin' '*';
		add_header 'Access-Control-Max-Age' 1728000;
		add_header 'Content-Type' 'text/plain charset=UTF-8';
		add_header 'Content-Length' 0;
		return 204;
		}
	}
}
To enable your new site you must create a virtual link from the sites-enabled folder to your config file like this:
sudo ln -s /etc/nginx/sites-available/YOURDOMAIN.conf /etc/nginx/sites-enabled/YOURDOMAIN.conf
You should always use the next command after making this many changes to Nginx’ configuration. It will check if your config is good, and if it contains errors it will show you what the error is.
sudo nginx -t

sudo systemctl restart nginx
4. Use Certbot to request valid certificate for your domain.
You should now be able to see a default Nginx web page when you enter the IP address of your server in your web browser if you’re on the same network. If you connect through the internet to a remote server keep in mind that you may need to open or forward port 80 in your firewall / router. Doing that is beyond the scope of this article. If you are behind a modem/router and you want your server to be accessible from the internet, you must also make sure you setup up port forwarding. Don’t continue this guide until you’ve done so because you will not be able to successfully create certificates if your server is not reachable from the internet on pot 80 (and later on also port 443). Once you’ve confirmed that your server is reachable from the internet and is showing the default Nginx page, it is now possible to create our certificates that allow us to secure the server by employing Https. We can do this with Cerbot very easily. You can enter multiple domains in one line if you need to. See example below.
sudo certbot --nginx -d YOURDOMAIN
Example: sudo certbot –nginx -d example.com -d www.example.com -d subdomain.example.com
A new request will be queued while it asks you some questions like your email address and if you agree to something. Entering email is required by the way. If all went well, you should see a message at the end asking you if you want to have Certbot automatically change some lines in your virtual host config file and whether or not to forward all Http traffic to Https from now on. Choose yes unless you have a good reason not to do so. When you open /etc/nginx/sites-enabled/youdomain.conf you will notice that several lines have been added to the bottom of the config file. It will look something similar to this:
listen [::]:443 ssl ipv6only=on; # managed by Certbot
listen 443 ssl; # managed by Certbot
ssl_certificate /etc/letsencrypt/live/yourdomain/fullchain.pem; # managed by Certbot
ssl_certificate_key /etc/letsencrypt/live/yourdomain/privkey.pem; # managed by Certbot
include /etc/letsencrypt/options-ssl-nginx.conf; # managed by Certbot
ssl_dhparam /etc/letsencrypt/ssl-dhparams.pem; # managed by Certbot

}server {
	if ($host = yourdomain) {
		return 301 https://$host$request_uri;
	} # managed by Certbot

	listen 80;
	listen [::]:80;

	server_name yourdomain;
	return 404; # managed by Certbot
}
This means that you can now open your domain in your browser using a valid certificate. You may want to check if this is actually the case simply by opening your domain name in a web browser. You should not see a warning about certificates and when you investigate the certificate you will see it’s valid.
5. Edit the Nginx.conf to enable RTMP and set related variables like ABS.
Now is a good time to edit the main Nginx config file to add our config for the RTMP server and Ffmpeg encoding. It is safe to replace the current config file with the one below. Making a backups of it never hurts.
sudo mv /etc/nginx/nginx.conf /etc/nginx/nginx-original.conf
Either create a new file and paste what is shown in the oversized codeblock below, and save it after having added all the required lines. Or simply place it where it belong by pulling it directly from my github page, like so:
sudo wget -O /etc/nginx/nginx.conf https://raw.githubusercontent.com/ustoopia/Nginx-config-for-livestreams-ABS-HLS-ffmpeg-transc-/main/etc/nginx/nginx.conf
I strongly suggest to open this config file in a text editor and maximizing the window so the layout is not messed up due to line-breaks or wrapped long lines as it is on this page. It will look neat, like the screenshot, and that makes it easier to read the descriptive and informative comments behind the variables that we put together.
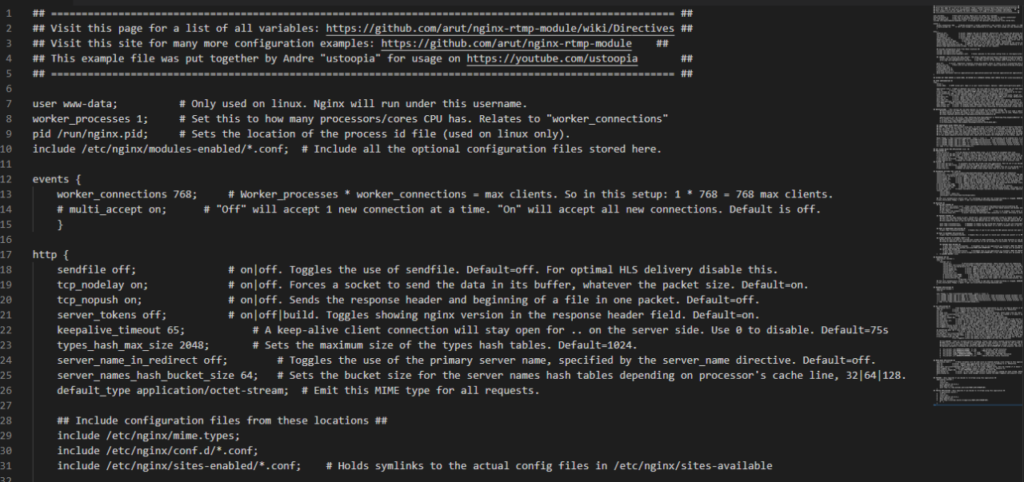
After creating the new nginx.conf file, open it in your favorite text editor or directly from the command line editor Nano / Joe, and go through it carefully. Almost all the variables have a description that says what the variable exactly does, and what the other options for it are. So make any adjustments if you feel you need to. It will work as-is, without making any changes, so if you made changes that don’t work or that you don’t like, just replace it again with this one.
sudo nano /etc/nginx/nginx.conf
Use the small icon in the top right of the lines below to copy the whole content so you can paste it in a decent text editor so it becomes more easy to go through it.
## ====================================================================================================== ##
## Visit this page for a list of all variables: https://github.com/arut/nginx-rtmp-module/wiki/Directives ##
## Visit this site for many more configuration examples: https://github.com/arut/nginx-rtmp-module	  ##
## This example file was put together by Andre "ustoopia" for usage on https://youtube.com/ustoopia       ##
## ====================================================================================================== ##

user www-data;			# Only used on linux. Nginx will run under this username.
worker_processes 1;		# Set this to how many processors/cores CPU has. Relates to "worker_connections"
pid /run/nginx.pid;		# Sets the location of the process id file (used on linux only).
include /etc/nginx/modules-enabled/*.conf;	# Include all the optional configuration files stored here.

events {
	worker_connections 768;		# Worker_processes * worker_connections = max clients. So in this setup: 1 * 768 = 768 max clients.
	# multi_accept on;		# "Off" will accept 1 new connection at a time. "On" will accept all new connections. Default is off.
	}

http {
	sendfile off;				# on|off. Toggles the use of sendfile. Default=off. For optimal HLS delivery disable this.
	tcp_nodelay on;				# on|off. Forces a socket to send the data in its buffer, whatever the packet size. Default=on.
	tcp_nopush on;				# on|off. Sends the response header and beginning of a file in one packet. Default=off.
	server_tokens off;			# on|off|build. Toggles showing nginx version in the response header field. Default=on.
	keepalive_timeout 65;			# A keep-alive client connection will stay open for .. on the server side. Use 0 to disable. Default=75s
	types_hash_max_size 2048;		# Sets the maximum size of the types hash tables. Default=1024.
	server_name_in_redirect off;		# Toggles the use of the primary server name, specified by the server_name directive. Default=off.
	server_names_hash_bucket_size 64;	# Sets the bucket size for the server names hash tables depending on processor's cache line, 32|64|128.
	default_type application/octet-stream;	# Emit this MIME type for all requests.

	## Include configuration files from these locations ##
	include /etc/nginx/mime.types;
	include /etc/nginx/conf.d/*.conf;
	include /etc/nginx/sites-enabled/*.conf;	# Holds symlinks to the actual config files in /etc/nginx/sites-available

	## LOGGING - This section has many options.	See https://github.com/arut/nginx-rtmp-module/wiki/Directives#access-log ##
		access_log /var/log/nginx/access.log;		# off|path [format_name]. Default logging is done to same file as HTTP logger.
		error_log /var/log/nginx/error.log warn;	# Set this here or in the virtual hosts config file in sites-available folder.

	gzip off;		# on|off. Compresses responses using gzip method. Helps to reduce size of transmitted data by half or more. Default=off
	# gzip_vary on;		# More info on zip variables is found here: https://nginx.org/en/docs/http/ngx_http_gzip_module.html
	gzip_proxied any;
	# gzip_comp_level 6;
	# gzip_buffers 16 8k;
	gzip_http_version 1.1;
	gzip_types text/plain text/css application/json application/javascript text/xml application/xml application/xml+rss text/javascript;
}

## EITHER SET YOUR SERVER {} BLOCK HERE, OR RATHER IN A SEPERATE VIRTUAL HOST CONFIG FILE IN /sites-available/yourdomain.conf ##

## RTMP CONFIGURATION ##
rtmp {
	server {
	listen 1935;	# RTMP listen port. Open it in your router/firewall. Options: (addr[:port]|port|unix:path) [bind] [ipv6only=on|off] [so_keepalive=on|off|keepidle:keepintvl:keepcnt|proxy_protocol]

	application live {	# Name it whatever you prefer. You will need at least one application, you can have many more.
	live on;		# on|off. Enables this application and allowing live streaming to it. Default=on.
	# max_streams 32;	# Sets maximum number of RTMP streams. Default value is 32 which is usually ok for most cases. Default=32.
	# max_connections 100;	# Sets maximum number of connections for rtmp engine. Default=off.
	meta on;		# on|copy|off. Receive metadata packets containing predefined fields like width, height etc. Default=on.
	interleave off;		# on|off. Audio and video data is transmitted on the same RTMP chunk stream. Default=off.
	wait_key on;		# on|off. Makes video stream start with a key frame. Default=off.
	wait_video off;		# on|off. Disable audio until first video frame is sent (can cause delay). Default=off.
	drop_idle_publisher 10s;# Drop publisher that has been idle for this time. Only works when connection is in publish mode. Default=off
	sync 300ms;		# When timestamp difference exceeds the value specifiedan absolute frame is sent fixing that. Default=300ms.
	play_restart off;	# on|off. If enabled sends "NetStream.Play.Start" and "NetStream.Play.Stop" every time publishing starts or stops. Default=off.
	idle_streams on;	# on|off. If disabled prevents viewers from connecting to idle/nonexistent streams and disconnects all. Default=on.

## NOTIFICATIONS  - This section has too many options to include in this example config. ##
		## Notifications use HTTP callback to inform subscribers that stream has started. You will need a website that can handle these. ##
		## These option go beyond the scope of this configuration file as it contains lots of info. Please visit this url for more info: ##
		## https://github.com/arut/nginx-rtmp-module/wiki/Directives#notify ##

		publish_notify off;	## on|off. Send "NetStream.Play.PublishNotify" & "NetStream.Play.UnpublishNotify" to subscribers. Default=off
		# on_publish http://www.example.com/plugin/Live/on_publish.php;
		# on_play http://www.example.com/plugin/Live/on_play.php;
		# on_record_done http://www.example.com/plugin/Live/on_record_done.php';

	## TRANSCODING USING FFMPEG EXEC ##
	## EXEC - Many things are possible using exec. To learn more visit https://github.com/arut/nginx-rtmp-module/wiki/Directives#exec   ##
	## You can either set this here, so all the incoming streams to /live/* get transcoded, or you can push to a seperate recorder app. ##
	## The following lines will take our incoming RTMP stream and transcode it to several different HLS streams with variable bitrates  ##
	## This ffmpeg command takes the input and transforms the source into 4 or 5 different streams with different bitrate and quality.  ##
	## 4 or 5 different streams with different bitrate and quality. P.S. The scaling done here respects the aspect ratio of the input.  ##
	## If you enable adaptive bitrate streams here, make sure to disable the stream-push to /hls below, under # STREAM RELAYING LOCAL # ##

# exec ffmpeg -i rtmp://localhost/live/$name -async 1 -vsync -1		## Transcoding can be enabled here, or by using the hls application below.
    #-c:v libx264 -c:a aac -b:v 256k -b:a 32k -vf "scale=480:trunc(ow/a/2)*2" -tune zerolatency -preset veryfast -crf 23 -f flv rtmp://localhost/hls/$name_low
    #-c:v libx264 -c:a aac -b:v 768k -b:a 96k -vf "scale=720:trunc(ow/a/2)*2" -tune zerolatency -preset veryfast -crf 23 -f flv rtmp://localhost/hls/$name_mid
    #-c:v libx264 -c:a aac -b:v 1024k -b:a 128k -vf "scale=960:trunc(ow/a/2)*2" -tune zerolatency -preset veryfast -crf 23 -f flv rtmp://localhost/hls/$name_high
    #-c:v libx264 -c:a aac -b:v 1920k -b:a 128k -vf "scale=1280:trunc(ow/a/2)*2" -tune zerolatency -preset veryfast -crf 23 -f flv rtmp://localhost/hls/$name_higher
    #-c copy -f flv rtmp://localhost/hls/$name_src;


## SET ACCESS RULES FOR APPLICATION /live  ##
## PUBLISHING ##
	allow 127.0.0.1;		# If you decice to harden these rules, it is adviced to uncomment this line.
	# allow publish 192.168.2.0/24;	# Anybody from this local IP address range can stream to this application.
	# allow publish 192.168.2.50;	# Allow a single IP address to stream to this application (multiple lines with different ip's are possible)
	allow publish all;		# Anybody from any location can stream to this application. Comment this out if you want to use deny publish.
	# deny publish 10.0.0.50;	# Deny this specific IP address from streaming to this application. Can also be an IP address range.
	# deny publish all;		# Nobody can stream to the server except those that you've set in previous lines.
## PLAYING  ##
	allow play 127.0.0.1;		# Localhost can play the stream from this application. Must be set if you decide to use push later on!
	allow play 192.168.2.0/24;	# Anybody in this IP range can play the RTMP directly.
	allow play all;			# Anybody can play the RTMP livestream directly. Comment this out if you decide to use the next option.
	# deny play all;		# Nobody can play the RTMP stream except those that we've set in lines above it.

## RECORDING SETTINGS FOR /LIVE ##
	record off;			# off|all|audio|video|keyframes|manual. These options sorta speak for themselves.
	record_path /var/livestream/recordings;	# Folder location that will be used to store the recordings. YOU SHOULD CHANGE THIS TO YOUR PREFERENCE!
	record_suffix -%d-%b-%y-%T.flv;	# Added to recorded filenames. Example uses 'strftime' format results: -24-Apr-13-18:23:38.flv. Default=.flv
	record_unique on;		# on|off. Appends timestamp to recorded files. Otherwise the same file is re-written each time. Default=-off
	record_append off;		# on|off. When turned on recorder appends new data to the old file with no gap. Default=off
	record_lock off;		# on|off. When turned on recorded file gets locked with 'fcntl' call. Default=off.
	record_notify off;		# on|off. Toggles sending "NetStream.Record.Start" and "NetStream.Record.Stop" status messages. Default=off.
	# record_max_size 128K;		# Set maximum file size of the recorded files. No default.
	# record_max_frames 200;	# Sets maximum number of video frames per recorded file. No default.
	# record_interval 15m;		# Restart recording after this number of (milli)seconds/minutes. Zero means no delay. Default=off.
	# recorder name	{}		# Create recorder{} block. Multiple recorders can be created withing single application. Example:
	recorder audio {
		record audio;
		record_suffix .audio.flv;
		record_path /var/livestream/recordings/audio;
		}
	## This will automatically convert your .flv recordings to mp4 when the stream/recording is stopped. WARNING! This will cause high CPU usage!! ##
	# exec_record_done ffmpeg -i $path -f mp4 /var/livestream/recordings/$basename.mp4;

## RELAYING ##
	## PULLING STREAMS ##
		## For more info please visit:	https://github.com/arut/nginx-rtmp-module/wiki/Directives#relay ##
		## pull url [key=value]*	# Creates pull relay. A stream is pulled from remote machine and becomes available locally. ##
		## URL Syntax:			[rtmp://]host[:port][/app[/playpath]] ##
		# pull rtmp://cdn.example.com/live/ch?id=1234 name=channel_a;		# This is an example. Visit above url for more info.
		# session_relay off;		# on|off. On=relay is destroyed when connection is closed. Off=relay is destroyed when stream is closed. Default=off.

	## PUSHING STREAMS ##
		## Push has the same syntax as pull. Unlike pull, push directive publishes stream to remote server. ##
		## This will push the stream from incoming /live application to these below to create HLS and/or Dash streams, or to record or transcode automatically. ##
		## Only enable HLS push if you are not using ABS options earlier or by using the encoder application ##

		push rtmp://localhost/hls;		# Remember to enable an app called HLS! Disable it if you use transcoding using variable bitrates.
		push rtmp://localhost/dash;		# Remember to create the app dash! It is safe to disable this if you're not interested in using Dash.

	## PUSH TO TRANSCODER APPLICATION ##
		# push rtmp://localhost/encoder;	# Enable this if you're not using the ABS options earlier but want to use a different application for it.

	## PUSH TO RECORDER APPLICATION ##
		# push rtmp://localhost/recorder;	# Enable this if you want to record your stream and convert it to MP4 automatically when you stop the stream.

	## STREAM RELAYING TO EXTERNAL PARTY'S ##
		## Push can also be used to re-stream your stream to other platforms. You can do this directly or use an additional application for this. ##
		## Using an additional local application allows you to set up variables if you prefer. Or you can choose to push to 3rd party directly. ##

		## YOUTUBE PUSH OPTIONS ##
			# push rmtp://localhost/youtube;	# Uncomment this to use application on localhost (MUST BE SPECIFIED). OR simply use the following line:
			# push rtmp://a.rtmp.youtube.com/live2 /YOUR-LIVE-STREAM-KEY;	# Your RTMP stream will be pushed as it is to Youtube as an RTMP stream.
		## TWITCH PUSH OPTIONS ##
			# push rmtp://localhost/twitch;		# Uncomment this to use application on localhost (MUST BE SPECIFIED). OR simply use the following line:
			# push rtmp://live-ams.twitch.tv/app /live_YOUR-LIVE-STREAM-KEY;	# Your RTMP stream will be pushed as it is to Twitch as an RTMP stream.
	}	# CLOSING BRACKET /live

## RECORDING APP ##
	application recorder {
	live on;
		recorder all {
			record all;				# off|all|audio|video|keyframes|manual. These options speak for themselves.
			record_path /var/livestream/recordings;	# Folder location that will be used to store the recordings.
			record_suffix all-%d-%b-%y-%T.flv;	# Added to recorded filenames. Example uses 'strftime' format results: -24-Apr-13-18:23:38.flv. Default=.flv
			record_unique on;			# on|off. Appends timestamp to recorded files. Otherwise the same file is re-written each time. Default=-off
			record_append off;			# on|off. When turned on recorder appends new data to the old file with no gap. Default=off
			record_lock on;				# on|off. When turned on recorded file gets locked with 'fcntl' call. Default=off.
			record_notify off;			# on|off. Toggles sending "NetStream.Record.Start" and "NetStream.Record.Stop" status messages. Default=off.
			# record_max_size 4096M;		# Set maximum file size of the recorded files. No default.
			# record_max_frames 200;		# Sets maximum number of video frames per recorded file. No default.
			# record_interval 15m;			# Restart recording after this number of (milli)seconds/minutes. Zero means no delay. Default=off.
			}					# Recorder closing bracket
	## This will automatically convert your .flv recordings to mp4 when the stream/recording is stopped. WARNING! This will cause high CPU useage!! ##
	# exec_record_done ffmpeg -i $path -f mp4 /var/livestream/recordings/$basename.mp4;
	}

## ENCODER APPLICATION ##
	application encoder {
# REMOVED DUE TO OUTDATED COMMANDS FOR FFMPEG
}

## HLS APPLICATION ##
	application hls {		# We enabled pushing stream from 'live' application to 'hls' we need to define it of course.
	live on;			# on|off. Enables this application and allowing live streaming to it. Default=on.
	hls on;				# on|off. Toggles HLS on or off for this application.
	hls_type live;			# live|event. Live plays from the current live position. Event plays from the start of the playlist. Default=live.
	hls_path /var/livestream/hls; # Location to store the video fragment files. Will be created if it doesn't exist.
	hls_fragment 5s;		# Sets HLS fragment length in seconds or minutes. Default=5s.
	hls_playlist_length 30s;	# Sets HLS playlist length in seconds or minutes. Default=30s.
	hls_sync 2ms;			# Timestamp sync threshold. Prevents crackling noise after conversion from low-res (1KHz) to high-res(90KHz). Default=2ms.
	hls_continuous off;		# on|off. In this mode HLS sequence number is started from where it stopped last time. Old fragments are kept. Default=off.
	hls_nested on;			# on|off. In this mode a subdirectory of hls_path is created for each stream. Default=off.
	hls_cleanup on;			# on|off. Nginx cache manager process removes old HLS fragments and playlist files from hls_path. Default=on.
	hls_fragment_naming system;	# system = use system time. sequential = use increasing integers. timestamp = use stream timestamp. Default=sequential.
	hls_fragment_slicing plain;	# plain|aligned. Plain: switch fragment when target duration is reached. Aligned: switch fragment when incoming timestamp is a
					# multiple of fragment duration. Makes it possible to generate identical fragments on different nginx instances. Default=plain.
	## ENCRYPTION KEYS	## !! Only works if you have certificates defined in your HTTP server block (Usually a seperate file in /sites-available/yourfile.conf)
	# hls_keys on;				# on|off. Enables HLS encryption. AES-128 method is used to encrypt the HLS fragments. Requires ssl module. Default=off.
	hls_key_path /var/livestream/keys;	# Sets the directory where auto-generated HLS keys are saved. Default= hls_path.
	# hls_key_url https://foo.bar/keys;	# Sets url for HLS key file entries. When empty it assumes hls_path. Default= empty.
	# hls_fragments_per_key 100;		# Sets the number of HLS fragments encrypted with the same key. 0 means only one key is created at the publish start and
						# all fragments within the session are encrypted with this key. Default=0.

		## HLS_VARIANT - Used for variable bitrate streaming. Please read: https://github.com/arut/nginx-rtmp-module/wiki/Directives#hls_variant ##
		## When hls_variant suffix is matched on stream name then variant playlist is created for the current stream with all entries specified by hls_variant
		## directives in current application. Stripped name without suffix is used as variant stream name. The original stream is processed as usual.
		## Optional parameters following the suffix are appended to EXT-X-STREAM-INF in m3u8 playlist. See HLS spec 3.3.10. EXT-X-STREAM-INF for full list.

		#	hls_variant _low BANDWIDTH=288000;	# _low		- Low bitrate, sub-SD resolution
		#	hls_variant _mid BANDWIDTH=448000;	# _mid		- Medium bitrate, SD resolution
		#	hls_variant _high BANDWIDTH=1152000;	# _high		- Higher-than-SD resolution
		#	hls_variant _higher BANDWIDTH=2048000;	# _higher	- High bitrate, HD 720p resolution
		#	hls_variant _src BANDWIDTH=4096000;	# _src		- Source bitrate, source resolution
		}

## MPEG-DASH APPLICATION ##
	application dash {		# These variables will be used since we enabled pushing /live stream to this application.
	live on;			# on|off. Enables this application and allowing live streaming to it. Default=on.
	dash on;			# on|off. Toggles MPEG-DASH on the current application.
	dash_path /var/livestream/dash;	# Location to store the video fragment files. Will be created if it doesn't exist.
	dash_fragment 5s;		# Sets DASH fragment length in seconds or minutes. Default= 5s.
	dash_playlist_length 30s;	# Sets MPEG-DASH playlist length. Defaults= 30s.
	dash_nested on;			# on|off. In this mode a subdirectory of dash_path is created for each stream. Default=off.
	dash_cleanup on;		# on|off. Nginx cache manager process removes old DASH fragments and playlist files from dash_path. Default=on.
	}

## YOUTUBE - Only required if you decide to re-stream using this application ##
	#application youtube {
	#	live on;
	#	record off;
	#	allow publish 127.0.0.1;
	#	deny publish all;
	#	push rtmp://a.rtmp.youtube.com/live2 /YOUR-LIVE-STREAM-KEY;
	#}
## TWITCH APPLICATION - Only required if you decide to re-stream using this application ##
        # application twitch {
	#	live on;
	#	record off;
	#	allow publish 127.0.0.1;
	#	deny publish all;
	#	push rtmp://live-ams.twitch.tv/app /live_YOUR-LIVE-STREAM-KEY;
        #	}
	}
}
IMPORTANT! Notice that the variables to enable the use of encryption keys for the stream are not enabled in this config. Also the part that handles the adaptive bit-rate streaming has been commented out as well (lines 84/89). You have to remove these comments if you want to enable ABS here. Before you touch the encryption keys variables make sure that you have created decent certificates before. To enable ABS just remove the # in front of the lines, and place a # at the beginning of the line that says: “push rtmp://localhost/hls;” (on line 138) and then restart Nginx. As an alternative you can leave them disabled, and use push to forward the stream to application /encoder. Everything that comes in at /encoder will automatically be encoded to the stream for ABS. The reason I decided to disable these options is so you can first test the server without it doing any encoding. Then, if that works, you can enable ABS by either using the push option I just mentioned, or by removing the comments I also just mentioned.
See if the config is good (sudo nginx -t) and then do a restart (sudo systemctl restart nginx) and now you’re done with the hardest part. Let’s see if the server accepts your stream. Use your favorite app (Like OBS or Wirecast) and in settings choose to use a custom server under server tab, and enter your server address here manually. Example: RTMP://yourIP/live or RTMP://youdomain/live. Under livestream-key field set: stream
Now start streaming! The fastest way to check if your stream works is to use the stat page at: https://yourdomain/stat or http://serverIP/stat
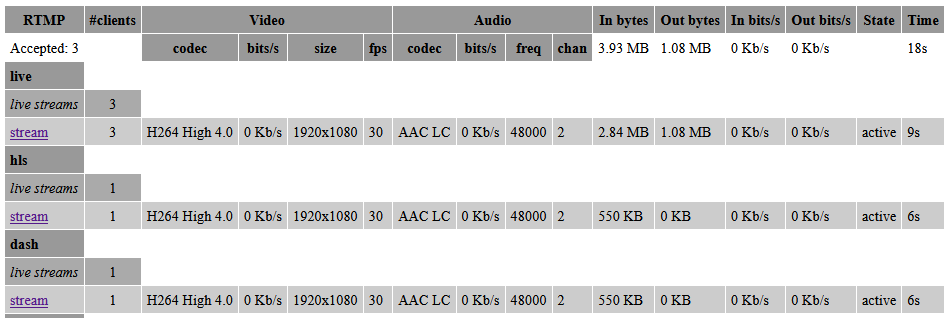
One way to check if everything is working as it should at this moment is by using VLC or PotPlayer to open the RTMP stream directly. The address will be the same as you’ve set in OBS/Wirecast with the streamkey added at the end. Like: rtmp://youdomain/live/stream. But you might as well skip this step because we should also have one HLS and one DASH stream that we may as well use to see if all is working. You’ll figure out how to do this yourself. Or not.. in that case just continue with the guide first and get it all over with.
6. Install and configure Video.JS web player
Video.JS is a web-video player that supports adaptive stream playback. It can do a lot more by utilizing plugins. Have a look at their website to get a glimpse of what the possibilities are. You can choose to follow these next few steps and download Video.JS and host the files from our own server, or you can choose to do it the smarter way, by not downloading anything but just pointing to a CDN hosted in your <script> . The smarter way is also faster, so do that. You can find out the exact URL’s of the most recent version of VideoJS on their github. Also the instructions on what to do. https://github.com/videojs/video.js
Here’s the old-fashioned way , that I for some reason prefer..
sudo wget -O /var/www/YOURDOMAIN/web/js/videojs/latest.zip https://github.com/videojs/video.js/releases/download/v7.11.4/video-js-7.11.4.zip
cd /var/www/YOURDOMAIN/web/js/videojs
sudo unzip latest.zip
Create a new file in your website root folder called videoplayer.html and paste & edit the lines you see a bit below here. Or simply download it directly from my github and edit it. Whatever you choose, in both cases you will have to carefully inspect the code and replace all the things that are marked to to be replaced.
sudo wget -O /var/www/YOURDOMAIN/web/videoplayer.html https://raw.githubusercontent.com/ustoopia/Nginx-config-for-livestreams-ABS-HLS-ffmpeg-transc-/main/var/www/yourdomain/videoplayer.html
nano /var/www/yourdomain/web/videoplayer.html
<!DOCTYPE html>
<html>
<head>
<meta charset=utf-8 />
<title>LiveStream</title>
<link href="https://YOURDOMAIN/js/videojs/video-js.css" rel="stylesheet">
</head>
<body>
<center>
  <video-js id="live_stream" class="vjs-default-skin" controls preload="auto" width="1280" height="auto">
    <source src="https://YOURDOMAIN/hls/stream/index.m3u8" type="application/x-mpegURL">
  </video-js>

  <script src='https://YOURDOMAIN/js/videojs/video.js'></script>
  <script src="https://YOURDOMAIN/js/videojs/videojs-http-streaming.js"></script>

  <script>
    var player = videojs('live_stream');
  </script>
 </center>
</body>
</html>
You have to edit 4 lines in there. Make sure Nginx can access all the files.
sudo chown -R www-data:www-data /var/www/yourdomain/web /var/www/html
You are done!! You have successfully setup a live-stream server. Congratulations. You should now be able to see your own live-stream when you open the video player page in your browser. But only if you have of course started streaming.
Now you can have a closer look at your nginx.conf to see what all the variables can do, and edit them if you have specific wishes or needs. When you are streaming with ABS enabled, you should at first try to monitor your server to see how much CPU it will be using and how far you can go with adding other streams. I’ve said it before, encoding will be hard work for your CPU, no matter what generation, so always keep an eye out on what your setup does to your CPU when you are live-streaming, and adjust your config where necessary.
7. Adaptive Bit rate Streaming
When you’re ready to enable Adaptive Bitrate Streaming, you should open the /etc/nginx/nginx.conf file and make a few changes.
sudo nano /etc/nginx/nginx.conf
Remove the hashtags (#) from the lines that enable adaptive bitrate streaming, as shown in the video. Place a new hashtag in front of the default HLS push that I also show in the video. Continue to remove the hashtags from the lines that specify the variant streams. Again, like I show in the video, and in the three images below.


Save the file and test your configuration by using nginx -t. When the results come back successful go ahead and restart nginx like this:
sudo systemctl restart nginx
You are now able to use the adaptive bitrate stream functionality! If you want to show this stream in a locally hosted html file, you can copy the file videoplayer.html that we created earlier, to a new file, like abs.html. Edit this new file and replace the URL that points to the .m3u8 playlist file in it. Change /hls/stream.m3u8 to /hls/stream/stream.m3u8 and save the file.

Now open it in your web browser by going to https://YOURDOMAIN/abs.html. It should show your HLS stream. You could also use the following command to copy it from Github, but you will also need to edit it first to add your domain name.
wget -O /var/www/YOURDOMAIN/web/abs.html https://raw.githubusercontent.com/ustoopia/Nginx-config-for-livestreams-ABS-HLS-ffmpeg-transc-/main/var/www/yourdomain/abs.html
nano /var/www/YOURDOMAIN/web/abs.html
<!DOCTYPE html>
<html>
<head>
<meta charset=utf-8 />
<title>LiveStream</title>
<link href="https://YOURDOMAIN/js/videojs/video-js.css" rel="stylesheet">
</head>
<body>
<center>
  <video-js id="live_stream" class="vjs-default-skin" controls preload="auto" width="1280" height="auto" poster="https://YOURDOMAIN/poster.jpg">
    <source src="https://YOURDOMAIN/hls/stream.m3u8" type="application/x-mpegURL">
  </video-js>

  <script src='https://YOURDOMAIN/js/videojs/video.js'></script>
  <script src="https://YOURDOMAIN/js/videojs/videojs-http-streaming.js"></script>

  <script>
    var player = videojs('live_stream');
  </script>
 </center>
</body>
</html>
Using Bradmax Player that we’ll be installing later in this guide, it will be possible to manually switch between the different adaptive streams. I believe VideoJS also supports this but I’m not certain it will do so by default. You may also want to have a look at the browse-able folder that contains the video fragment files by entering in your browser: https://YOURDOMAIN/hls. This is where the m3u8 files should be pointing to.

You can stop following this how-to guide here if you like. You did a great job if you completed all the steps up to this point. Your server should now be running. The next steps are totally optional. Continue reading if you’re curious what else we’re gonna do!!
Additional, optional extra steps
8. Installing PHP (7.4 or 8.0)
Stick around if you want to host a (WordPress) website on your server that shows the live-streams. We’ll install PHP, MariaDB, WordPress and of course a nice video player plugin for WP that supports adaptive bitrate streaming playback.Let’s start with installing PHP 7.4.
sudo apt install php7.4 php7.4-common php7.4-fpm php7.4-gd php7.4-mysql php7.4-imap php7.4-cli php7.4-cgi php7.4-curl php7.4-intl php7.4-pspell php7.4-sqlite3 php7.4-tidy php7.4-xmlrpc php7.4-xsl php-memcache php-imagick php7.4-zip php7.4-mbstring php-pear mcrypt imagemagick libruby memcached
It’s also an option to install PHP 8 instead. It’s really easy we only have to add the Ondrej repository. Like this:
sudo apt install software-properties-common
sudo add-apt-repository ppa:ondrej/php
sudo apt update
sudo apt install php8.0-fpm -y
It might be a good idea to install some common modules for PHP. I’ve put together a collection that is widely used. But feel free to skip this or choose only the ones you need.
sudo apt install -y php8.0 php8.0-common php8.0-gd php8.0-mysql php8.0-imap php8.0-cli php8.0-cgi php8.0-curl php8.0-intl php8.0-pspell php8.0-sqlite3 php8.0-tidy php8.0-xmlrpc php8.0-xsl php8.0-zip php8.0-mbstring php8.0-soap php8.0-opcache php-pear php-imagick php-apcu
Now we need to tell Nginx to use the PHP8.0-fpm sock. Place these lines in a virtual hosts file, or in the nginx.conf.
server {
    # . . . your other code

    location ~ .php$ {
        include snippets/fastcgi-php.conf;
        fastcgi_pass unix:/run/php/php7.4-fpm.sock;
		# fastcgi_pass unix:/run/php/php8.0-fpm.sock;
    }
}
For Nginx we must edit a specific line in /etc/php7.4/fpm/php.ini. Search the file for “;cgi.fix_pathinfo=1” and replace it with “cgi.fix_pathinfo=0” and save the file. A more easy way to do this is by entering this command. The first one is if you use the default PHP 7.4 version. The second one is if you use PHP8.
sudo sed -i 's/;cgi.fix_pathinfo=1/cgi.fix_pathinfo=0/g' /etc/php/7.4/fpm/php.ini
sudo sed -i 's/;cgi.fix_pathinfo=1/cgi.fix_pathinfo=0/g' /etc/php/8.0/fpm/php.ini
That was the only thing we are required to change. But there are some other things that is advisable to change as well. Be sure to enter your timezone in the last sed option. The first ones below here are for PHP 7.4. Use your brain and just replace 7.4 in them with 8.0 if you want to make these changes and you’re using 8.0.
sudo sed -i 's/upload_max_filesize = 2M/upload_max_filesize = 1024M/g' /etc/php/7.4/fpm/php.ini

sudo sed -i 's/max_input_time = 60/max_input_time = 300/g' /etc/php/7.4/fpm/php.ini

sudo sed -i 's/max_execution_time = 30/max_execution_time = 60/g' /etc/php/7.4/fpm/php.ini

sudo sed -i 's/;date.timezone =/date.timezone = "Europe/Amsterdam"/g' /etc/php/7.4/fpm/php.ini
sudo systemctl restart php7.4-fpm nginx
sudo systemctl restart php8.0-fpm nginx
9. Installing MariaDB and PHPMyAdmin
Next up we’ll install MariaDB and PhpMyAdmin simply by using:
sudo apt install mariadb-server mariadb-client phpmyadmin -y
Create a symlink to PhpMyAdmin in your web root folder so you can use it
sudo ln -s /usr/share/phpmyadmin /var/www/yourhostname/web/phpmyadmin
Follow the Mysql secure installation steps
mysql_secure_installation
Choose whatever suits your needs. Restart mysql once it is done. (sudo systemctl restart mysql) and login to Mysql like this:
mysql -u root -p
Use the following commands to set up a database and database user for WordPress.
CREATE DATABASE wordpress;
grant all privileges on wordpress.* TO 'wordpress'@'localhost' identified by 'YourPassword';
FLUSH PRIVILEGES;
Since we’re at the mysql cli anyways, we might as well do this as well:
use mysql;
update user set plugin='' where User='root';
FLUSH PRIVILEGES;
quit;
sudo systemctl restart mysql
There are other guides out there that can show you what you can change in your Nginx configuration to optimize it specifically for WordPress. You should definitely look in to that because many of these options make your server more secure. It is beyond the scope of this guide to go in to that right now. The plan is to write a new guide on this subject in the future some time but until then, google it. 😛
10. Download and install WordPress
wget -O /var/www/YOURHOSTNAME/web/latest.zip https://wordpress.org/latest.zip

cd /var/www/YOURHOSTNAME/web

sudo unzip latest.zip

sudo mv /var/www/YOURHOSTNAME/web/wordpress/* /var/www/YOURHOSTNAME/web/
The files will be unpacked in a folder so you may want to move al these files to the folder that is below it. In other words, the files should be placed in the root folder for your website.
sudo chown -R www-data: /var/www/yourhostname/web
Now open your browser and enter your site’s domain name. You should see a language list. This is the first step of the WordPress installer. The rest is pretty explanatory. Remember to use the username and password we set a couple of steps ago during the database setup.
Create a new user for yourself and login to your brand new WordPress.
11. All right Sparky! Let’s add a video player
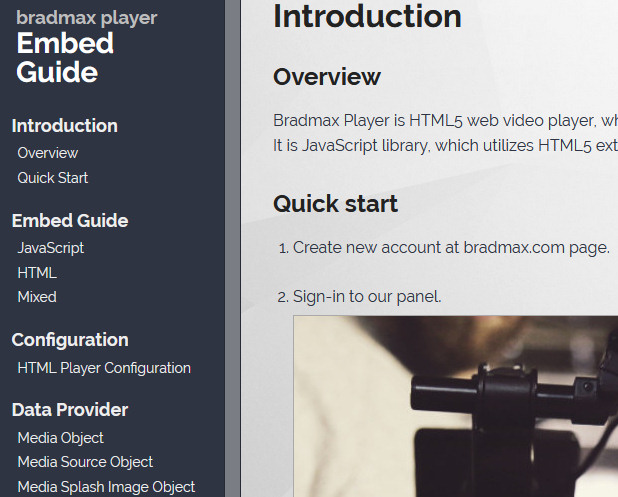
Once the setup is complete, you can log in to your new WordPress website. To add your stream to the site first install a plugin for this purpose. Now there’s plenty of video player plugins out there, but I strongly advice to use Bradmax Player.
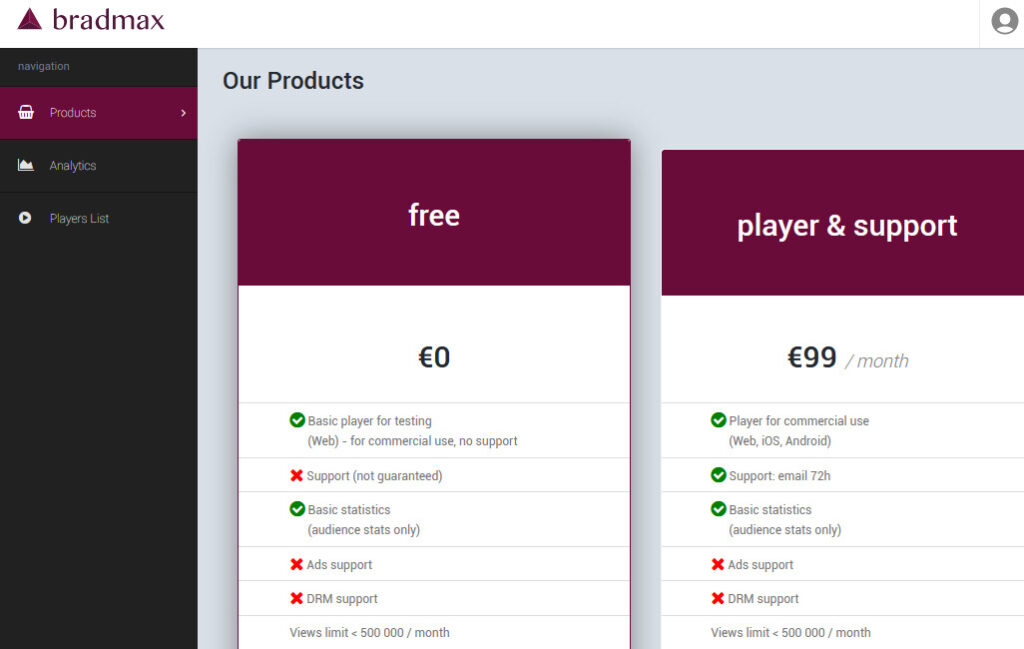
You’ll be able to customize your player if you create an account at their website and from there you can create your customized player.
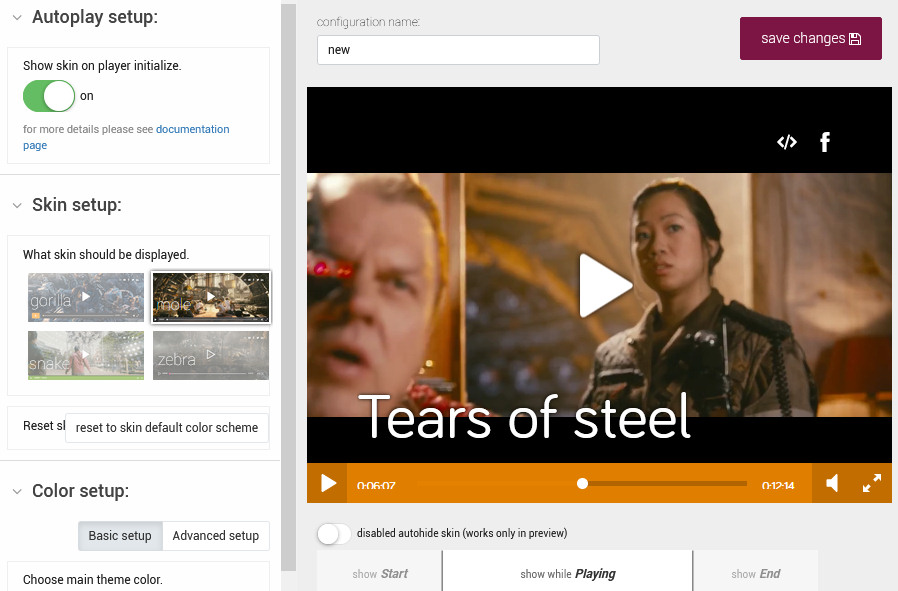
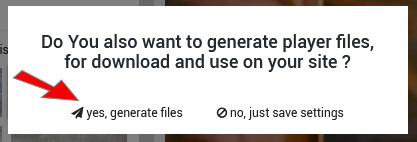
Once you did that you are asked if you want to generate the files for your player. Choose yes and download the zip. Open the zip and extract the bradmax.json file.
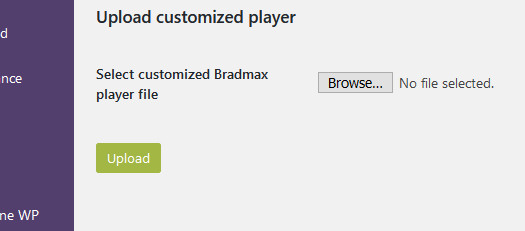
Now go to the settings page of Bradmax plugin in WordPress and upload the .json.This way the player on your site will look like what you’ve set up on the Bradmax site.
Now we need to add the shortcode for our player to a page or post. You have several variables you can use for this. Most importantly is the address of the .m3u8 playlist file. See the examples below to see what your options are.
bradmax_video url="url to your file or playlist"
poster="url to your poster file"
autoplay="true or false"
duration="length of video file in seconds"
style="width:1280px;height:720px"
style="border:solid 1px gray"
Let’s put together a proper shortcode that we can actually use. It can look like any of the examples below.
[bradmax_video url="https://yourdomain/hls/stream.m3u8" poster="https://yourdomain/wp-content/uploads/poster.jpg" style="border:solid 1px gray" autoplay="false"]The example above points to the playlist of your HLS stream and it also adds a poster image for when there is no stream active when a person opens the player. Also it will add a border and will not automatically start playing.
[bradmax_video url="http://example.com/hls/hls_stream.m3u8" style="width:1280px;height:720px;border:solid 1px gray"]This example sets the player’s resolution in pixels. In this case 1280×720 with a gray border of 1 pixel.
[bradmax_video url="https://yourdomain/static/video/index.mpd" url_2="https://yourdomain/static/video/index.m3u8"]This example plays a Dash stream and as a fallback it will play a HLS stream. For more info on the shortcode variables that are available, check out the help pages on the Bradmax website.
In case you have any question about this guide, leave a comment below and I’ll respond as soon as I can.