
This tutorial is an updated and improved version of a previous tutorial that I wrote. This new tutorial will work 100% on a (fresh) Ubuntu 22.04 system. The tutorial was put together in August 2023.
UPDATE: I've put together a script that does everything automatically. Check it out here!
All throughout this tutorial, I will be using the non-existing domain name: your.hostname.com as an example. You will need to replace every instance in the tutorial that contains your.hostname.com with your own domain name / host-name.
This tutorial will require you to have a domain name that you can use to host the live stream. You'll need a properly resolving domain name to obtain valid certificates from Letsencrypt halfway down this tutorial. So in order to prepare for this tutorial, make sure to point the DNS of your domain to the IP address of the server. In case you're doing this at home, the domain should point to the external IP address of your router. (Visit https://www.whatismyip.net to see your external IP address). In case you don't have a domain name, simply register one for free right now! A free domain will be perfectly fine to achieve our goals. Get a free domain at https://www.noip.com or https://www.duckdns.org.
This tutorial will assume that you're on a fresh installed Ubuntu 22.04 server. Our newly installed server will most likely have some updates waiting that should be installed. Let's perform these updates before we continue.
sudo apt update && sudo apt upgrade -yThe primary goal at this moment, is to make sure we can log in remotely to the server, from our Windows desktop for example, through SSH/SFTP, using WinSCP in combination with Putty. These two go hand in hand, and together they provide the ultimate tool for administrating our server. It will make our lives a bit easier, and it also helps to finish this tutorial a lot faster. To reach our goal, we're going to begin installing these couple of packages:
sudo apt install nano ufw openssh-server -yNano is probably already installed, but I included it just in case. Ufw is a firewall app for iptables, that I included in our first step for those of you who are using a fresh installed VPS. In case you are, you should enable your firewall sooner rather than later when your VPS is directly connected to the internet. Openssh-server is the software that runs SSH that we will be connecting to from our desktop workstation.
In case you are setting up a server in your home, or any place where the server will be behind a router or firewall, you'll probably want to set a static IP address. Setting a static IP address is advised for when you are going to forward or open up several ports on your router/firewall. First we need to find out what address range the local network is in, and also we want to find out the exact name of our network adapter. The command "ip addr" will tell us all of these things.
ip addr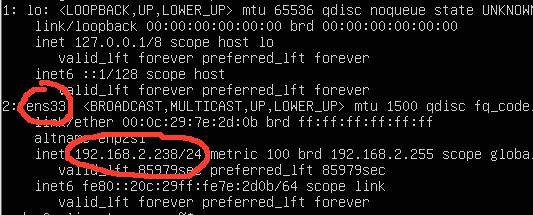
Now that we know the IP address, we can connect to the server from a remote device like your desktop PC for example.
In this example, our network adapter is named ens33, and the server is in local network IP range 192.168.2.0/24 starting with 192.168.2.1 and ending at 192.168.2.254. Choose any address you prefer in your range, but ideally an address that is excluded from the DHCP range. I want to use 192.68.2.83, so I'm, going to edit the Netplan config file. There is probably just one file located in /etc/netplan, so you can't miss it. To see what the filename is, we can use the command below.
ls -la /etc/netplanNow that we know the name of the file, we are going to edit it. This file may or may not have a different name on your server. Let's create a backup first by copying it.
sudo cp /etc/netplan/01-netcfg.yaml /etc/netplan/01-netcfg.yaml.bakNow let's edit the config file.
sudo nano /etc/netplan/01-netcfg.yamlThis config file is very sensitive when it comes to using the correct formatting of the file. All tabs, spaces and enters matter! And improper use will render the file unusable. So keep that in mind when you are editing the IP addresses, so they will fit your needs. The next bit is formatted the correct way, so you shouldn't run in to any problems when you copy/paste it. Don't forget to edit the name of the network adapter to how yours is called. Obviously, you also need to make sure the IP addresses are in line with your environment. You can also find a copy of it on this Pastebin.
network:
  renderer: networkd
  ethernets:
    ens33:
      addresses:
        - 192.168.2.83/24
      nameservers:
        addresses: [192.168.2.14, 1.1.1.1]
      routes:
        - to: default
          via: 192.168.2.1
  version: 2
Use the next command to fully apply the changes. Once you pressed enter, the IP address will change instantly.
sudo netplan applyThis is potentially the moment where you will need to reconnect to your server on the new IP address.
To finish off the networking part of this tutorial, we're going to enable the firewall we installed earlier. But before we do, we'll need to add some rules to it, cause if we don't, we would lock ourselves out. To ensure that we can continue to use SSH/SFTP, the first rule we are going to add is to allow traffic to port 22. Enabling the firewall at this point may not so much be required if your server is behind a router. But it would be good to enable the firewall as soon as possible if you are using a VPS server.
sudo ufw allow 22We want to open up these other ports as well, since we'll be using them later on. Port 80, 443 and 1935.
sudo ufw allow 80/tcp &&
sudo ufw allow 443/tcp &&
sudo ufw allow 1935Now we can safely enable the firewall.
sudo ufw enablesudo apt install -y nginx libnginx-mod-rtmp wget unzip software-properties-common dpkg-dev git make gcc automake build-essential python3 pip zlib1g-dev libpcre3 libpcre3-dev libssl-dev libxslt1-dev libxml2-dev libgd-dev libgeoip-dev libgoogle-perftools-dev libperl-dev pkg-config autotools-dev gpac ffmpeg mediainfo mencoder lame libvorbisenc2 libvorbisfile3 libx264-dev libvo-aacenc-dev libmp3lame-dev libopus-dev unzip git php-common php-fpm php-gd php-mysql php-imap php-cli php-cgi php-curl php-intl php-pspell php-sqlite3 php-tidy php-xmlrpc php8.1-xml php-memcache php-imagick php-zip php-mbstring php-pear mcrypt imagemagick memcachedYou may notice that we're also installing PHP here. While PHP is not actually required to get our live-stream server up and running, I believe it will come in handy. In order to have PHP work nicely with Nginx, a specific string in the php.ini file needs to be changed. We can make this change by entering this command:
sudo sed -i 's/;cgi.fix_pathinfo=1/cgi.fix_pathinfo=0/g' /etc/php/8.1/fpm/php.iniNow let's restart the PHP-FPM process.
sudo systemctl restart php8.1-fpmWe installed Nginx from the default Ubuntu repositories, and this will result in version 1.18.0. This version is a bit outdated in my opinion, and I prefer to install a more recent version like 1.25.1. Luckily, this can be accomplished really easy, by adding the ppa:ondrej repository. Once it's added, you can simply use an "apt upgrade" to have it upgrade Nginx from 1.18.0 to 1.25.1.
sudo add-apt-repository ppa:ondrej/nginx-mainline sudo apt updatesudo apt upgrade -ysudo add-apt-repository ppa:ondrej/nginx-mainline To see if the upgrade was successful, enter "nginx -v"
I've chosen to create the folders below in /mnt, because it would in fact be a very good idea for you to use a mounted USB drive or even SD drive to use for /mnt/livestream. The reasoning behind this is that when we start live streaming, a lot of files will be written to & read from these folders, and deleted again once we stop streaming. This high I/O is not ideal for our hard drive. It causes wear and tear. This will decrease the lifetime of your internal hard drive due to this heavy usage. For this reason, it's a good idea to use a separate drive for this. A USB pen drive with 2 or 4 GB capacity would already be sufficient, unless you want to record your live-streams in the same location. If you plan to record your live-streams, simply change the folder where you want to store the recordings in the next step, or use a USB drive that has enough capacity. If you have more than one hard drives, you could mount a different drive, other than the one that contains the operating system, to /mnt/livestream. This way, the drive containing the operating system will be granted a longer life.
I won't go into how to mount an external USB drive. But if you decide to use a mounted drive, and I strongly advise you to do so, if the option exists for you, make sure to mount it to /mnt/livestream. Also add a line similar to the one below, but with the UUID of your USB drive obviously, to your /etc/fstab, so it will automatically mount the drive during startup. To find the UUID of your USB drive, use this command: lsblk -o size,fstype,model,name,uuid
UUID=9db4ccfe-8de7-4efb-88fa-83ea32397118 /mnt/livestream ext4 defaults 0 0Create the following folders:
sudo mkdir -p /mnt/livestream/hls
sudo mkdir -p /mnt/livestream/keys
sudo mkdir -p /mnt/livestream/dash
sudo mkdir -p /mnt/livestream/recNow we'll create the folder that will be the root folder for our website. This can be any name you want. In this tutorial, I use a folder named web.
sudo mkdir -p /var/www/webThis is where it starts to get interesting. We're going to configure Nginx in such a manner that we will be able to use it as our live-stream server. All the properties of our live-stream server we'll define in the /etc/nginx/nginx.conf file. Afterward, we will create the configuration for our virtual host separately. Let's first create a backup of the original nginx.conf by renaming the file, in case you ever want to revert to it.
sudo mv /etc/nginx/nginx.conf /etc/nginx/nginx.conf.backupNow we're going to create our own new nginx.conf file.
sudo nano /etc/nginx/nginx.confCopy all the lines below and paste them in to your nginx.conf file. Or copy the lines from this pastebin.
#### ======================================================================================================== ####
####						NGINX.CONF						      ####
####  Go to this page for a list of all variables: https://github.com/arut/nginx-rtmp-module/wiki/Directives  ####
####  Go to this site for many more configuration examples: https://github.com/arut/nginx-rtmp-module	      ####
####  This Nginx config file was put together by "ustoopia" for a setup tutorial at https://www.ustoopia.nl/   ####
#### ======================================================================================================== ####

user www-data; # The server will run as this user & group.
worker_processes 1; # Using 1 will results in a reliable /stat page. Set to auto or a specific number.
pid /run/nginx.pid;
include /etc/nginx/modules-enabled/*.conf; # Include all the .conf files located in this folder.

events {
	worker_connections 768; #
	# multi_accept on;
}
http {
	sendfile off;		# Default=on. Toggles the use of sendfile. For optimal HLS delivery disable this.
	tcp_nopush on;		# Default=off. Sends the response header and beginning of a file in one packet.
	tcp_nodelay on;		# Default=on. Forces a socket to send data in its buffer, whatever packet size.
	server_tokens off;      # Default=on. Enables/disables the server signature.
	keepalive_timeout 65;
	types_hash_max_size 2048;
	server_name_in_redirect off;
	server_names_hash_bucket_size 64;
	default_type application/octet-stream;

	ssl_protocols TLSv1.2 TLSv1.3;
	ssl_prefer_server_ciphers on;

	#### This logging format is optimal for Amplify monitoring (https://amplify.nginx.com) ####
	log_format main	'$remote_addr - $remote_user [$time_local] "$request" '
			'$status $body_bytes_sent "$http_referer" '
			'"$http_user_agent" "$http_x_forwarded_for" $request_time';

	access_log /var/log/nginx/access.log main;
	error_log /var/log/nginx/error.log warn;

	gzip off;	# Compresses responses using gzip method. Helps to reduce size of transmitted data by half or more.
	# gzip_vary on;
	# gzip_proxied any;
	# gzip_comp_level 6;
	# gzip_buffers 16 8k;
	# gzip_http_version 1.1;
	# gzip_types text/plain text/css application/json application/javascript text/xml application/xml application/xml+rss text/javascript;

	include /etc/nginx/mime.types;		# This will include the mime.types. Do not remove this.
	include /etc/nginx/conf.d/*.conf;	# This line will include all the config files in this folder to our configuration.
	include /etc/nginx/sites-enabled/*;	# This line will include all the virtual hosts file to our configuration.

} # HTTP closing tag

#### RTMP SERVER ####
rtmp {
	server {
	listen 1935;			# The port where RTMP will listen on. Default = 1935.
	chunk_size 4096;
	timeout 30s;
	buflen 1s;

#### THE /LIVE APPLICATION WILL BE USED TO SEND OUR LIVESTREAM TO, INCLUDING A STREAMKEY. ####
application live {			# The /live application will receive the incoming live-stream.
	live on;			# Enable/disable the live application.
	interleave off;			# Audio and video data is transmitted on the same RTMP chunk stream. Default=off.
	wait_key off;			# Makes video stream start with a key frame. Default=off.
	wait_video off;			# Disable audio until first video frame is sent (can cause delay). Default=off.
	idle_streams off;		# If disabled prevents viewers from connecting to idle/nonexistent streams and disconnects all.
	drop_idle_publisher off;	# Drop publisher that has been idle for this time.
	allow publish all;		# Default=all. Anybody can stream to our server. Change this to restrict this behaviour.
	# deny publish all;		# Enable this in case you set an IP address for previous option allow publish.
	# deny publish 10.0.0.9         # Example of how to deny access from a specific IP. Uncomment to use.
	allow play 127.0.0.1;		# Diables direct playback and restricts it to localhost. To allow all playback change to: all
	# deny playback all;            # Uncomment to truly allow only playback on localhost (this includes ffmpeg)

	#### We aren't using these next few lines here. Serves as an example of how to implement potential authentification ####
	# on_publish http://127.0.0.1/streamauth/auth.php;		# Event is triggered when livestreaming starts.
	# on_publish_done http://127.0.0.1/streamauth/deauth.php;	# Event is triggered when livestreaming stops
	# on_play http://127.0.0.1/streamauth/play.php;			# Event is triggered when a vierwer starts watching

	#### OPTIONS TO PUSH OR FORWARD THE INCOMING VIDEO STREAM TO ####
	# push rtmp://localhost/hls;	# Push the source stream as-is to /hls to create a single HLS stream. Low CPU usage.
	# push rtmp://localhost/dash;	# Push the source stream to the /dash app to create a DASH outgoing stream. Low CPU usage.
	# push rtmp://localhost/rec;	# Enable this to record the source streams. Also see /rec application below!
	# exec_push /etc/nginx/ffmpeg/transcode.sh; # Alternative to the lines below, placing ffmpeg command in a seperate file.

	#### FFMPEG WILL GRAB THE SOURCE STREAM AT /live, CREATE THE VARIANTS, AND SENDS THEM TO /hls | HIGH CPU! ####
	#### IF YOU DON'T NEED THIS MANY ADAPTIVE STREAMS, OR CPU USAGE IS TOO HIGH, DISABLE ONE OR MORE OF THESE LINES. ####

	exec_push ffmpeg -i rtmp://localhost/live/$name -async 1 -vsync -1
	-c:v libx264 -c:a aac -b:v 256k -b:a 32k -vf "scale=480:trunc(ow/a/2)*2" -tune zerolatency -preset veryfast -crf 23 -f flv rtmp://localhost/hls/$name_low
	-c:v libx264 -c:a aac -b:v 768k -b:a 96k -vf "scale=720:trunc(ow/a/2)*2" -tune zerolatency -preset veryfast -crf 23 -f flv rtmp://localhost/hls/$name_mid
	-c:v libx264 -c:a aac -b:v 1024k -b:a 128k -vf "scale=960:trunc(ow/a/2)*2" -tune zerolatency -preset veryfast -crf 23 -f flv rtmp://localhost/hls/$name_high
	-c:v libx264 -c:a aac -b:v 1920k -b:a 128k -vf "scale=1280:trunc(ow/a/2)*2" -tune zerolatency -preset veryfast -crf 23 -f flv rtmp://localhost/hls/$name_higher
	-c copy -f flv rtmp://localhost/hls/$name_src;

	#### AN ALTERNATIVE METHOD TO CREATE THE ADAPTIVE BITRATE STREAMS. DISABLE THE PREVIOUS ONE BEFORE TESTING | HIGH CPU USAGE! ####
	#exec_push ffmpeg -i rtmp://localhost/live/$name -async 1 -vsync -1
	#-c:a aac -strict -2 -b:a 128k -c:v libx264 -vf scale=-2:240 -g 48 -keyint_min 48 -sc_threshold 0 -bf 3 -b_strategy 2 -b:v 400k -maxrate 700k -bufsize 1200k -b:a 96k -r 20 -f flv rtmp://localhost/hls/$name_low
	#-c:a aac -strict -2 -b:a 128k -c:v libx264 -vf scale=-2:480 -g 48 -keyint_min 48 -sc_threshold 0 -bf 3 -b_strategy 2 -b:v 1200k -maxrate 2100k -bufsize 2400k -b:a 128k -f flv rtmp://localhost/hls/$name_med
	#-c:a aac -strict -2 -b:a 128k -c:v libx264 -vf scale=-2:720 -g 48 -keyint_min 48 -sc_threshold 0 -bf 3 -b_strategy 2 -b:v 2400k -maxrate 4200k -bufsize 100000k -b:a 128k -f flv rtmp://localhost/hls/$name_high
	#-c copy -f flv rtmp://localhost/hls/$name_src;
	}

#### THE /HLS APPLICATION AUTOMATICALLY CREATES THE FILES FOR THE OUTGOING HLS STREAM. ####
application hls {			# The /hls app will reads the input and create a useable outgoing HLS stream.
	hls_path /mnt/livestream/hls;	# Location where the temporary video fragment files will be stored.
	hls on;				# This makes sure that a m3u8 index file will be created to play our .ts video files.
	live on;			# This enables or disables this application.
	hls_fragment 10;		# Sets HLS fragment length in seconds or minutes. Default = 5s.
	hls_playlist_length 50;		# Sets HLS playlist length in seconds or minutes. Default = 30s.
	# hls_sync 100ms;		# Timestamp threshold. Prevents crackling noise after conversion from low (1KHz) to highres(90KHz)
	hls_nested on;			# In this mode a subdirectory is created for each stream under hls_path.
	hls_type live;			# Options: live|event. Live plays from the current position. Event plays from start of playlist.
	hls_continuous off;		# HLS sequence number is started from where it stopped last time. Old fragments are kept.
	hls_cleanup on;			# Automatically clean up temp files. When turned on, it automatically negates hls_continues
	allow publish 127.0.0.1;	# Only localhost (this includes /live feed) is allowed to publish to the /hls application
	# deny publish all;             # Uncomment this to truly restrict publish to localhost.
	allow play all;			# Allow everybody to play the HLS streams.

	#### HLS VARIANTS ####
	# When hls_variant suffix is matched on stream-name, a variant playlist is created for current stream with all entries specified
	# Stripped name without suffix is used as variant stream name. The original stream is processed as usual.
	# Make sure you use the same naming convention as used in the output names of the ffmpeg commands above.

	hls_variant	_low	BANDWIDTH=288000;	# Low bitrate, sub-SD resolution
	hls_variant	_mid	BANDWIDTH=448000;	# Medium bitrate, SD resolution
	hls_variant	_high	BANDWIDTH=1152000;	# Higher-than-SD resolution
	hls_variant	_higher	BANDWIDTH=2048000;	# High bitrate, HD 720p resolution
	hls_variant	_src	BANDWIDTH=4096000;	# Copy of source stream. Source bitrate, source resolution.
	}

#### DASH APPLICATION CREATES THE FILES THAT WILL FORM THE OUTGOING DASH STREAM ####
application dash {
	dash on;			# on|off. Toggles MPEG-DASH on the current application.
	live on;			# Enables or disables the application.
	dash_path /mnt/livestream/dash;	# Location to store the video fragment files. Will be created if it doesn't exist.
	dash_fragment 5s;		# Sets DASH fragment length in seconds or minutes. Default= 5s.
	dash_playlist_length 30s;	# Sets MPEG-DASH playlist length. Defaults= 30s.
	dash_nested on;			# In this mode a subdirectory of dash_path is created for each stream. Default=off.
	dash_cleanup on;		# Cache manager process removes old DASH fragments and playlist files from dash_path.
	allow publish  127.0.0.1;	# Allow only localhost to publish to /dash
	allow play all;			# Allow everybody to play these streams.
	}

##### RECORDING /rec  #####
application rec {
	live on;				# on|off. Enables this application and allowing live streaming to it. Default=on.
	record all;				# Records everything sent to /rec. Options are: off|all|audio|video|keyframes|manual
	record_unique on;			# Appends timestamp to files. Otherwise the same file is over-written
	record_path /mnt/livestream/rec;	# Location where the recordings will be stored. Adjust this according to your needs.
	record_suffix -%d-%b-%y-%T.flv;		# Added to filenames. Example uses 'strftime' results in: -24-Apr-13-18:23:38.flv.
	# record_max_size 128K;			# Set maximum file size of the recorded files.
	# record_max_frames 200;		# Sets maximum number of video frames per recorded file.

	##### OPTIONAL! WHEN RECORDING FINISHES, CONVERTS .FLV FILES TO .MP4 | HIGH CPU USEAGE WHILE IT RUNS ####
	exec_record_done ffmpeg -i $path -c copy $dirname/$basename.mp4;
	}

} # SERVER closing tag
} # RTMP closing tag
Sidenote: If you went through the nginx.conf file, you might have noticed that I've included two different methods for Ffmpeg creating the adaptive video streams, with the first of them active. I used these two methods because I'm pretty certain that they will work for everybody. These are just two examples, and please be aware that many other methods can be used here. This may be something to fool around with yourself, perhaps doing some testing to find out whatever works best for you, or which ever uses the least CPU power. If you have a decent Nvidia GPU in your server, and you've installed the right drivers and CUDA, then you should definitely change the Ffmpeg commands to use a different codec (like for example: h264_nvenc or hevc_nvenc). This will result in the GPU doing all the hard transcoding work. This will greatly reduce the CPU usage during transcoding. Now let's get back to the tutorial!
Save the file, and do a sudo nginx -t to see if it's all good.
sudo nginx -tNow let's restart Nginx
sudo systemctl restart nginxNow we need to create a new virtual host file for hosting the HLS video fragment files, and a video player, or maybe even a Wordpress website if you choose. Later on we will be editing this file again, after we have obtained a certificate.
sudo nano /etc/nginx/sites-available/your.hostname.com.vhostAnd copy/paste the following in to your vhost file. Make sure to go through it, as you'll need to edit the hostname on line 5. This can also be copied from this pastebin.
server {
	listen 80;
	listen [::]:80;
	root /var/www/web;
	server_name your.hostname.com www.your.hostname.com; # <<== EDIT THIS

	index index.php index.html index.htm index.cgi index.pl index.xhtml standard_index.html;

	location ~ /. {
			deny all;
        }
	location / {
		try_files $uri $uri/ /index.php?$args;
	}
	location ~ .php$ {
                include snippets/fastcgi-php.conf;
		include /etc/nginx/fastcgi_params;
                fastcgi_pass unix:/var/run/php/php8.1-fpm.sock;
		fastcgi_param SCRIPT_FILENAME $document_root$fastcgi_script_name;
            	fastcgi_intercept_errors on;
	}
	location /stat {
        	rtmp_stat all;
        	rtmp_stat_stylesheet stat.xsl;
		add_header Refresh "8; $request_uri";		# Refreshes the stat page every 5 seconds.
		# auth_basic "Members Only";			# Create a valid .htpasswd before uncommenting this.
		# auth_basic_user_file /var/www/web/.htpasswd;	# Create a valid .htpasswd before uncommenting this.
		}
	location /stat.xsl {
        	root /var/www/web;
    		}
	location /control {
		rtmp_control all;
		}
	location /keys {
		root /mnt/livestream;
		autoindex off;
		}
	location /nginx_status {
        	stub_status on;
        	allow 127.0.0.1;
        }
	location /hls {
		alias /mnt/livestream/hls;		# Points to where the video fragment files are located
		autoindex on;				# Optional. Allow browsing of the video fragment files folder
		expires -1;				# Cache related
		add_header Cache-Control no-cache;	# Prevent caching of HLS fragments
		add_header Access-Control-Allow-Origin *; # Allow remote web players to access our playlist
		types {
			application/vnd.apple.mpegurl m3u8;
			text/html html;
			video/mp2t ts;
			}
		if ($request_method = 'OPTIONS') {
                	add_header 'Access-Control-Allow-Origin' '*';
                	add_header 'Content-Length' 0;
                	return 204;
                	}
		}
	location /dash {
		alias /mnt/livestream/dash;
		autoindex on;
		expires -1;
		add_header Cache-Control no-cache;	# Prevent caching of HLS fragments
		add_header Access-Control-Allow-Origin *; # Allow remote web player to access our playlist
		types {
			application/dash+xml mpd;
			text/html html;
			video/mp4 mp4;
			}
		if ($request_method = 'OPTIONS') {
                	add_header 'Access-Control-Allow-Origin' '*';
                	add_header 'Content-Length' 0;
                	return 204;
                }
	}
}To enable this website vhost file, all we have to do is create a link from sites-available to sites-enabled.
sudo ln -s /etc/nginx/sites-available/YOUR.HOSTNAME.COM.vhost /etc/nginx/sites-enabled/You can, if you want, disable the default virtual host file that Nginx loads by default. Simply remove the virtual link to it.
sudo rm /etc/nginx/sites-enabled/defaultNow it's time to bring our virtual host online by restarting Nginx But before we do, we're going to check if our configuration is without errors.
sudo nginx -tIf you see any errors, you did not follow this tutorial to the letter :-P. Please make sure that your configuration is ok before continuing. Once the nginx -t doesn't show any errors, it's safe to restart Nginx.
sudo systemctl restart nginxLet's add some files to our root web folder. You can choose to create the files manually using the content shown below, or you can simply download them from the provided Pastebin links.
Create an index.html file. This will become the page people get to see when they visit the web address. As you may notice in the code for this page, we're going to use Clappr video player to show our livestream on this page. The player is set up to play this playlist: /hls/stream.m3u8. Refer to the Clappr documentation pages for more info.
sudo nano /var/www/web/index.htmlCopy the code from below in the index.html file. Or copy the code from this Pastebin.
<!DOCTYPE html>
<html>
<head>
<title>LiveStream</title>
<meta charset=utf-8 />
<meta http-equiv="Access-Control-Allow-Origin" content="*" />
<script type="text/javascript" src="https://cdn.jsdelivr.net/npm/clappr@latest/dist/clappr.min.js"></script>
<script type="text/javascript" src="https://cdn.jsdelivr.net/clappr.level-selector/latest/level-selector.min.js"></script>
<script type="text/javascript" src="https://cdn.jsdelivr.net/npm/@joaopaulo.vieira/clappr-media-control-plugin@latest/dist/clappr-media-control-plugin.min.js"></script>

</head>
<body>
<center>
<div class="container-fluid">
    <div class="row">
    <div class="col-md-6 col-md-offset-3 col-sm-6 col-sm-offset-3">
        <div class="embed-responsive embed-responsive-16by9">
        <div id="player" class="embed-responsive-item"></div>
        </div>
		<script type="text/javascript">
		var playerElement = document.getElementById("player");
		var player = new Clappr.Player({
		parentId: "#player",
		source: "/hls/stream.m3u8",
		poster: '/poster.jpg',
		width: '1280',
		height: '720',
		exitFullscreenOnEnd: false,
		plugins: [LevelSelector, MediaControl.MainPlugin,
				MediaControl.PlayPauseButtonPlugin,
				MediaControl.VolumePlugin,
				MediaControl.FullscreenButtonPlugin,
				MediaControl.SeekBarPlugin,
				MediaControl.LevelSelectorPlugin,
				],
			mediaControl: {
				disableBeforeVideoStarts: true,
				levelSelectorComponent: {
					layer: 1,
					section: 1,
					position: 2,
					separator: true,
					onlyShowWithClick: true,
					labels: {
						0: 'low',
						1: 'med',
						2: 'high',
						3: 'higher',
						4: 'src',
						},
					onLevelsAvailable: function(levels) { return levels.reverse() },
					}
				},
			levelSelectorConfig: {
				title: 'Quality',
				labels: {
					4: 'src',
					3: 'higher',
					2: 'high',
					1: 'med',
					0: 'low',
					},
				labelCallback: function(playbackLevel, customLabel) {
				return customLabel + playbackLevel.level.height+'p'; // High 720p
				}
			},
		});
		</script>

      </div>
    </div>
  </div>
</center>
</body>
</html>Or you can use this command to download a copy of the file.
sudo wget https://www.ustoopia.nl/wp-content/uploads/clappr.html.txt -O /var/www/web/index.htmlWe're going to need an image that the video player will display when no live-stream is active. You should really design your own poster image for this. But, for the time being, we'll use one that I made.
sudo wget https://www.ustoopia.nl/wp-content/uploads/poster.jpg -O /var/www/web/poster.jpgDownload the crossdomain.xml file as well.
sudo wget https://www.ustoopia.nl/wp-content/uploads/crossdomain.xml.txt -O /var/www/web/crossdomain.xmlOr create the file manually and enter the contents below.
sudo nano /var/www/web/crossdomain.xml<?xml version="1.0"?>
<!DOCTYPE cross-domain-policy SYSTEM "http://www.adobe.com/xml/dtds/cross-domain-policy.dtd">
<cross-domain-policy>
<allow-access-from domain="*"/>
</cross-domain-policy>The last file we need is one that we're going to copy from the official Github page for the RTMP module. I'm going to clone the repository in the /opt folder, and copy it to our web folder.
sudo git clone https://github.com/arut/nginx-rtmp-module /usr/src/nginx-rtmp-modulesudo cp /usr/src/nginx-rtmp-module/stat.xsl /var/www/web/stat.xslAll the files in your web folder should be owned by the www-data user and www-data group. Nginx runs on this user, so this allows Nginx to read/write files in this folder. This command changes the ownership of the mentioned folder to www-data:
sudo chown -R www-data:www-data /mnt/livestream /var/www/webNow open up your web browser, and open the address you are using for your server. There, you should see a page showing a video player. I should add, that for this step to work on your end, is depending on a bunch of factors, and I won't be going into this very much.
It is practically impossible to write a good tutorial that works for everybody on the subject of opening ports and other network related topics, since there are too many variables to cover. The most common reason that can cause your website not to open, is that you are behind a router or firewall, at home for example, and have not yet opened/forwarded the ports that are required for this to work. This would be ports 80/tcp, 443/tcp and 1935/tcp+udp. I know that I'm repeating myself again here, but you need to make sure you opened up these ports and forwarded them to the local static IP address of your server. The domain you want to use should point to your server using the outside IP address of your router. If you don't own a domain, you can get one for free at the websites I mentioned earlier on. You won't be able to follow the next step in this tutorial if your server is not reachable from outside your network, or in other words, the internet. Here's a screenshot of the configuration that I've used with my router.
Certbot recommends using their snap package for installation. Snap packages work on nearly all Linux distributions, but they require that you’ve installed snapd first in order to manage snap packages. Ubuntu 22.04 comes with support for snaps out of the box, so you can start by making sure your snapd core is up to date:
sudo snap install core; sudo snap refresh core
After that, you can install the certbot package:
sudo snap install --classic certbot
Finally, you can link the certbot command from the snap install directory to your path, so you’ll be able to run it by just typing certbot. This isn’t necessary with all packages, but snaps tend to be less intrusive by default, so they don’t conflict with any other system packages by accident:
sudo ln -s /snap/bin/certbot /usr/bin/certbotNow that we have Certbot installed, let’s run it to get our certificate. The next command will request a certificate from Letsencrypt. If their server can verify that your site is reachable on the submitted domain, you'll receive valid certificates. Add any additional domains if you want by adding for example: -d www.yourhostname.com
sudo certbot --nginx -d YOUR.HOSTNAME.COMThis will edit your vhost configuration file automatically. So let's take a look at how the configuration file for the virtual host for your website has been edited by Certbot.
sudo nano /etc/nginx/sites-available/YOUR.HOSTNAME.COM.vhostThe vhost file should show several lines that have been added by certbot that will look something like this:
listen [::]:443 ssl; # managed by Certbot
listen 443 ssl ipv6only=on;  # managed by Certbot
ssl_certificate /etc/letsencrypt/live/your.hostname.com/fullchain.pem; # managed by Certbot
ssl_certificate_key /etc/letsencrypt/live/your.hostname.com/privkey.pem; # managed by Certbot
include /etc/letsencrypt/options-ssl-nginx.conf; # managed by Certbot
ssl_dhparam /etc/letsencrypt/ssl-dhparams.pem; # managed by Certbot
Next, at the bottom of the vhost file I commented out the line "return 404; # managed by Certbot" in order to disable it, and above this line I added "return 301 https://$host$request_uri;". This will forward visitors from HTTP to HTTPS automatically. It would look like this:
return 301 https://$host$request_uri;
# return 404; # managed by Certbot
After making any changes to the vhost file, it's always required to restart Nginx to apply the changes.
sudo nginx -t
sudo systemctl restart nginxWe can use the following command to send a test video feed to the server:
ffmpeg -f lavfi -i testsrc -vf scale=1920:1080 -vcodec libx264 -profile:v baseline -pix_fmt yuv420p -f flv rtmp://localhost/live/streamNow visit https://your.hostname.com/stat to take a look at the statistics page, it should show the incoming stream and the adaptive bit rate streams that are being generated by Ffmpeg. This means the video should also play when you open the page with the video player at https://your.hostname.com/. Now that we confirmed that it works, you can set up whatever app you are using for the source live stream.
Whenever the source device that you'll be using (a PC with OBS, or a mobile device connected to the Wi-Fi), is on the same local network as your server, you should use the local IP address to stream the source stream to. For example: rtmp://192.168.2.83/live/stream. This will prevent a lot of unnecessary traffic stressing out, or even crashing your router. When you are not on the same network, and streaming over the internet to a VPS for example, then simply use the domain name like this: rtmp://your.hostname.com/live/stream.
Once you got the source stream running, you can go ahead and test the properties of your HLS stream on the websites listed below. The URL that you will enter should look like this: https://your.hostname.com/hls/stream.m3u8. Enter your address to the m3u8 file, and watch these sites come up with some interesting information and statistics on your HLS live stream.
https://hlsjs.video-dev.org/demo/
Congratulations, you have successfully set up a live stream server!! That pretty much concludes this tutorial!!
There are many ways to expand upon your live-stream server or to build additional things on top of it. One example that pops to mind is AVideo, and in particular the live-stream plugin that it comes packaged with it. Or maybe you want to start by restricting usage of your server by implementing an authentication method that requires streamers to use a username & password, or a specific stream-key. If you are interested in this, take a look at nginx-rtmp-module-authserver, or rtmpauthbot, or any other of the many Githubs on this subject. If you are familiar with Django, then you may want to check out this page that shows how to implement authentication through using stream keys.
Please leave any of your questions, remarks, or comments that you may have in the comment section below, and I will answer all of them. I wouldn't mind a simple thank-you note, either, in case you found this tutorial useful.


Update - HLS is fine, but Dash is not working. Dash folder is there, but dash streams are not active
Just remove # at the beginning of "push rtmp://localhost/dash" in /etc/nginx/nginx.conf. Remember to put a semicolon at the end of it cause there was a typo from the author. Cheers.
Thank you for pointing it out. I have edited the post and it does now contain the semicolon in the post as wel as the pastebin.
Thank you for your great wiki. Everything is fine.
Love your tutorial again and again. Thank you so much for this tutorial.
Thank you 🙂 Glad to hear it.
cheers for the update, very smooth instructions, I skipped the letsencrypt as I am using my own blockchain tls1.3 🙂 I ran the index.html for hls and it comes up with an error code:hls:networkError_manifestLoadError
I checked the stat.xsl and my obs is streaming the video fine, just cant seem to get the hls player to playback, I must be missing something stupid in the nginx.xconf file, possibl;e not alowed to stream from a lan client to the server on hls. I am broadcasting on a local lan for now.
I tested in vlc my rtmp and it works fine.
Any idea what it could be
UPDATE: alias paths in my local sites-available conf was wrong
On your own blockchain tls1.3 you say? I'm not sure what that would look like. Care to elaborate more on that subject? You've triggered my interest 🙂
So you got it all up and running after you found the error in the alias config?
Yeah all running fine was just a paths issue. I am having buffering issues locally on mytest stream and cant figure out why its buffering and stalling, I might have to recompile ffmpeg. disks are fine as they run 8GBs 128 gig ram stream and nginx on same machine for local testing. Once I solve the local buffering, happy to collaborate on a blockchain build.
These two variables can be of great influence for buffering issues:
hls_fragment 3; # Sets HLS fragment length in seconds or minutes. Default=5s.
hls_playlist_length 60; # Sets HLS playlist length in seconds or minutes. Default=30s.
Fooling around with these two variables, always a case of tweaking and through trial and error, till you find the sweet spot.
I'm not sure if the following will have a positive impact on the buffering, but you could perhaps try it yourself. I'm talking about setting up a ramdisk. Somebody gave me this tip recently, and I plan to do this for my livestream server soon. Instead of explaining, I'll just copy/paste his message here.
I was looking at the adaptive bit rate again and it seems creating ramdisk (no more than 512k each for hls and dash) on the linux server will use a little less cpu usage and of course reduce wear and tear of the disk.
I have a newer 14gb VDS (vertual dedicated server) with 4 cores and is absolutely great. Without adaptive bit rate I can run pre-recorded video 24 hours a day with cpu usage only 4 to 5 percent all day as long as the video is encoded h264 and audio at acc 128k. So, this will make the server company happy as well.
I thought I would share my findings with you.
Thaks that a good area to explore, I will look into that. With rtmp copying the fragments for HLS it make sense on the moving of fast data.
Ok I created the ram disk for hls and dash, all good data is writing good, I tested with dd and I get 930MB/s write and 1GB/s read no issues there. I monitored directory of the files being created from rtmp to hls and I cant see any delays creating and refreshing. When I run the screen test with a low bandwidth locally the player stalls and jumps, I am thinking its the player not handling the playback somehow. when playing around with the fragments it somehow made rtmp more stable. Continuing to test
Ok some hours later and all day testing, I noticed the stats page was delaying the updateof the dat being written and that coincides with the delay on the player, so somehow I have a bottleneck with nginx and rtmp writes
ok I got this fixed I reset the nginx.config to default you posted and set my codec to apple VT this reduced my dropped frames I went for software as that is more tweakable. so I can confirm that my apple M1 MAx is running your nginx over starlink encrypted to to uk nginx server and then re-encoded out to block chain via cloudflare which puts out the letsencrypt cert against the crypto checksum.
I'm glad that you've been able to fix it. I was thinking to myself, what could be causing this on your end. Honestly, I haven't been able to come up with any thoughts on that.
What did you mean where you said: I went for software as that is more tweakable. What exactly do you use what software for?
That all sounds like a pretty cool implementation of a nginx live-stream server. Good job on that! I'm glad my tutorial was of some help in putting it all together.
On Mac M1 you can run software or hardware for encoding and I chose software as its more controllable.
Also, make sure that when you watch the stream locally, that you are in fact connecting only locally. In other words, make sure that the traffic doesn't get to you through a route that goes over the outside of your router. Avoid using the domain name to watch the stream locally since it will then request the stream over the internet. Hope I'm making any sense.
Hi A,
Yes I tested from a local ip, no routes, I will check the ramdisk, the previous version worked flawlessly, I noticed the rtmp plays more fluently even from a remote end, its does skip a bit but not much, so maybe the ram disk will be the additional step. I also ran the test screen and it was skipping.
Hello guys,
I have server up and running with HLS adaptive bit rates fine, DASH is working .... except there is no master manifest in the dash folder. The various bit rate folders all have an index.mpd file, but just no master.
Any ideas?
"Obtaining certificates from Letsencrypt with Certbot" always error for me Bro. Either Ubuntu20.04 or Ubuntu22.04.
hi guys how can i let link work only on some specific domains?
@ustoopia:disqus Hi André, thank you so much for your great series of tutorials! I'm glad that i found them and i was able to setup an nginx to livestream rtmp to hls with adaptive bitrates. Since one of my cameras is a thermal infrared with only 640x512 output i also created a second set of applications for low resolution live_lowres and hls_lowres. Almost everything works very well if there wasn't one small thing that i can't figure out yet.
The rec application isn't working. I push live rtmp to rec and in stats i can see my stream arrives at rec application, recording is enabled, postprecessing to mp4 is currently disabled but i do never see a single flv file in the recordings path. Do you have an idea? It's not a permission issue, the process user running nginx and ffmpeg has write permission to my livstreams and recordings folders.
Hmm. Good one! Is the camera directly connected with a cable, or does it use the network? If it's a network cam, what protocol does the camera use to send out the stream to your server? rtsp or rtmp or something else? Is 'record' set to video, audio or all? Make sure you didn't set 'record_interval'.
My first guess is that it has something to do with the resolution, or the aspect ratio of this resolution. Some codecs don't appreciate it when your video feed uses a more 'exotic' resolution or aspect ratio.
If it was me, I would start fiddling around with ffmpeg from the command line manually to try to record the camera feed. Ffmpeg will then show feedback, depending on what codec you use, with some details in case things went wrong. This feedback can be very helpful or insightful. The errors you encounter, if any, may also be responsible for the recording done by nginx. A solution may be to utilize Ffmpeg from Nginx, to transmute it, or to record with an alternative, more versatile codec.
At the bottom of the following page, a person explains a bit, and talks about SAR and DAR, perhaps you find it useful. https://superuser.com/questions/1734633/extracting-video-frames-with-correct-resolution-aspect-ratio
Another thing I just thought of is the following: Does the stream coming from the camera contain audio? Or does it only send a video feed? A camera with the audio output muted, may decide to leave out the entire audio feed. Having no audio feed may cause it not to record. Make sure it has an audio feed in the stream, even if it is muted.
My cams are connected to a Jetson Nano and are handled by video4linux on the input side, then encoded to h264 using the Nanos GPU and finally sent as FLV via rtmp to the nginx application live/. So the server side input is rtmp. All sender side handling happens in GStreamer.
In the live application of nginx i have enabled the push rtmp://localhost/rec; as well as the ABR encoding with exec_push ffmpeg -i...
Both push and push_exec seem to work because i can see incoming streams in hls and in rec on the stat page. Also i can watch all adaptive bitrate streams and the src stream using hls
Thanks for the hint about what should be recorded. I tried to record "all" and also "video". I had also tried to stream a mp4 clip with OBS to the nginx rtmp application. HLS playyback on website does have audio then but i get the same result, no records.
Yet I have to dive into the superuser discussion. Thanks for the link.